Garmin Venture HC
How to Transfer Maps to Garmin Etrex Venture HC (Linux)
I have a Garmin Etrex Venture HC. It has 24MB internal memory. Garmin charges a lot of money for it's mapsource software. Here is my method to copy OSM maps to the Venture HC.
Operating System
I tested Macintosh, Windows XP and Linux (Ubuntu Jaunty). The first two steps can be done on all three OS. The final step (uploading the img file to the gps device) I could only do on Ubuntu. This example will use Ubuntu linux.
Export the Desired Map from OSM
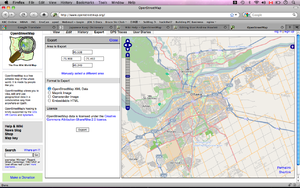
Aim your browser at the openstreetmap.org and find the region you want. Click the Export tab at the top of the viewport. Select the OpenStreetMap XML Data format. If you cannot select the XML data format, then zoom in until you can.
Click the Export button. Save the file as map.osm
Convert from OSM to img format
Download Mkgmap. It is a java program: if you don't have a java run-time environment installed already then install it now.
$sudo apt-get install sun-java6-jre
Copy mkgmap.jar to the same directory as map.osm. Use this command:
$java -jar mkgmap.jar --mapname=12345678 --description="My Map" --country-name="Canada" map.osm
You can adjust this command slightly. For instance, the mapname can be any eight digit number. You can change the country name to something appropriate to your map selection. The map.osm filename must be the same as the filename you used for your openstreetmaps export.
Upload the img file to the gps device
I was only able to successfully complete this step on Ubuntu linux. I installed the garmin gps driver, then used the free version of the sendmap20 command to transfer the file:
$ sudo modprobe garmin_gps
$ sudo ./sendmap20 -t/dev/ttyUSB0 12345678.img
How to Transfer Maps to Garmin Etrex Venture HC (Windows)
Getting, converting and transferring maps to a Garmin can be cumbersome and tricky on Windows if you don't get your hands on the right tools. Follow the steps and you should be able to get maps on your Garmin in about an hour!
Step 1 : Download Maps
Before you start, make sure you have installed Java 1.6 or later and have added the java path to PATH environment variable in Windows. I tried with the 32-bit version.
Maps can be downloaded in a number of ways. You can download .osm or .pbf offline maps from : http://download.geofabrik.de/ Save the maps on c:\ or somewhere where there will be no permission issues on Windows.
Let's say: C:\MyMaps
Step 2: Download and install tools
Now there are a couple of separately available tools that you'll need to play around with raw .osm or .pbf files to convert them to .img files that your Garmin can understand.
1. splitter and mkgmap:
Splitter is used to fragment the big map to smaller bits which can be handled by other tools gracefully.
Download from : http://www.mkgmap.org.uk/download/splitter.html
Unzip it under: C:\splitter
mkgmap converts the OpenStreetMaps to Garmin map format .img.
Download from : http://www.mkgmap.org.uk/download/mkgmap.html
Unzip it under: C:\mkgmap
2. osmfilter and osmconvert:
Download from: http://m.m.i24.cc/osmfilter.exe and http://m.m.i24.cc/osmconvert.exe
These are used to generate detailed bounds and supplementary information like city names, ZIP codes etc.
Save these to C:\mkgmap
3. MapSetToolKit and cGPSmapper:
This is needed to install the maps (.img) you'll generate on Windows so that the Garmin tool BaseCamp picks it up.
MapSetToolKit: http://cypherman1.googlepages.com/
cGPSmapper: (free version) : http://www.cgpsmapper.com/download2/FreeSetup.exe
Extract these to : C:\MyMaps
4. Garmin BaseCamp:
Download and install from : http://www8.garmin.com/support/download_details.jsp?id=4435
Cool! Now you're all set.
Step 3: Split the big OSM Map
Open Command prompt and switch to c:\splitter
run:
java -Xmx1024m -ea -jar splitter.jar --max-nodes=600000 --overlap=4000 --max-areas=255 --description="MyCountry" --mapid="90000001" --max-nodes="600000" --no-trim --overlap="4000" C:\MyMaps\xxxx.osm > splitter.log
with xxxx.osm being your .osm map you've downloaded. Adjust the memory the first param (set to 1Gb RAM) if you're low on memory. Note that the bigger your map is, more memory you'll need on Java heap to convert it. So...
Now you'll get a number of .osm.pbf files in this directory after finish. Copy all these to C:\mkgmap.
Step 4: Create bounds info (Optional)
Switch to c:\mkgmap
This can be pretty crappy. osmfilter and osmconvert can handle only one file at a time.
run:
osmconvert 90000001.osm.pbf -o=mybounds.o5m

osmfilter mybounds.o5m --keep-nodes= --keep-ways-relations="boundary=administrative =postal_code postal_code=" -o=boundaries00001.o5m

java -cp mkgmap.jar uk.me.parabola.mkgmap.reader.osm.boundary.BoundaryPreprocessor boundaries00001.o5m bounds
The last command will create the bounds file in c:\mkgmap\bounds directory.
You can probably add the below commands in a script to run for all .osm.pbf files. Note that you have to run these commands at least once. (Or omit the bounds option in the next step)
Step 5: Convert maps to Garmin .img format
Run the command:
java -jar mkgmap.jar --route --add-pois-to-areas --bounds=bounds --index --gmapsupp 9000*.osm.pbf
If you skipped Step 4 then run:
java -jar mkgmap.jar --route --add-pois-to-areas --index --gmapsupp 9000*.osm.pbf
This will generate .img files in the same folder.
Step 6: Install the maps using MapSetToolKit
Follow the instructions: https://sites.google.com/site/scdiscdi/mstk/mapsetv1a.swf?attredirects=0
Use c:\mkgmap as the .img input folder.
Step 7: Send maps to device using BaseCamp
Open BaseCamp and under Maps tab you should be able to see the maps you've installed. Select it. Now connect your device and it should should show up on BaseCamp provided all the drivers are installed.
Now right click on the device and click Install Maps.
Now you can select the maps you want to install and then install them !!
Voila! You're done! Reboot your device and the maps should show up.
