JA:Key:tunnel
 |
| 説明 |
|---|
| トンネルは、地下を通る道路などの通り道です。 |
| グループ: 配置 |
| 適用できる要素 |
| 含まれる意味 |
| よく併用されるタグ |
|
| 状態:事実上の標準 |
| ツール |
tunnel=* はトンネル内を通る道路、鉄道、運河などに使用します。
立体交差の形状によっては、下のウェイがトンネルのなのか、上のウェイが bridge=* なのか議論の余地があるかもしれません。一般的には、下のウェイが長くて土に覆われていればほぼトンネルであると言え、下のウェイが短くて上のウェイがコンクリートやレンガや金属で作られた支柱や梁で支えられていれば、ほぼ橋であると言えます。個人的な判断が求められる場面もありますが、下のウェイをトンネルとするか、上のウェイを橋とするかのどちらか一方にしてください。
建物の下を通過する道路によく見られる、左右の一方が開いている覆われた通路は、 tunnel=* の代わりに covered=* を使用してください。山道にあるがけ崩れやなだれからの保護設備は tunnel=avalanche_protector でタグ付けするので例外です。
小さい小川や溝、それに家畜が道路や建物の下を横切る場合、 tunnel=yes の代わりに tunnel=culvert を使用してください。
waterway=*が地下をある程度長い距離通る場合、それが運用中に人間が安全に利用できるように設計されていないものはtunnel=floodedを、管で構成されている場合にはman_made=pipelineを使うことができます。
地中に埋められた電力線(power=cable)やパイプライン(man_made=pipeline)は、トンネルとしてタグ付けするべきではありません。ケーブルが埋められている場所は、任意で location=underground または location=underwater としてタグ付けすることもできます。
しかし、ケーブルやパイプラインが自立型のトンネルの中に敷設されていた場合は、 tunnel=yes とタグ付けすることもできます。大きな都市の中では、そのようなライフライン専用トンネル(共同溝)もときどき見られます。
マッピング方法

- トンネルの起点と終点で該当するウェイを分割してから tunnel タグを追加してください。トンネルを交差点に接続するのではなく、交差点の前でトンネルに入る前の部分を分割しておくことが最良の方法です。
- 多くのトンネルは layer=-1 またはふさわしい値でタグ付けするべきです(tunnel=building_passage は例外)。地下鉄や非常に長いウェイは layer=-2 を設定しておくと、トンネルと地面の間に地下歩道を入れることができるので便利です。
- トンネルへのアプローチが切通しになっている場所は、 cutting=yes で識別できます。なお、レベルの違いを区別する必要がない限り、 layer=* タグを切通しや盛土に設定する必要はありません。
tunnel=building_passage には通常、建物との明確な上下関係がない限り、 layer を設定するべきではありませんが、建物内の通路が複数の階層である場合には、必要になる場合もあります。
もし通行制限が明示されていれば、 maxheight=* や maxwidth=* を追加すると便利ですし、車両の種類や利用者による利用制限がある場合は、 access=* を使用してください。
もしトンネルに名前が付いているのであれば、 tunnel:name=* で指定することができますが、(14,060 uses by 1197 editors at 2021-02-28) although it should be clear that this is still an indirect way of mapping "a tunnel" (it is a property of the feature which is in the tunnel and refers to a tunnel which may be mapped as a distinct object as well). トンネルの名前や、トンネルそのものを独立したオブジェクトとしてマッピングする最良の方法については、いまだに議論があります。
lit=* でトンネル内に照明があるかどうかの情報を含めることができます。
値
OpenStreetMapでは以下の値があると考えられています。
さらに以下の値が水路について使われています。
レンダリング
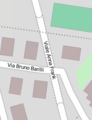
tunnel=yes と tunnel=building_passage と covered=yes は OpenStreetMap の既定スタイルでレンダリングされます。
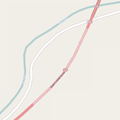
OSM Carto は道路上のトンネルを、点線の輪郭とより明るい色の塗りつぶしで、トンネルの入口は弧で表現します。


関連項目
- covered=*
- highway=corridor
- Proposed features/building passage - 承認済みの提案
- Relations/Proposed/Bridges and Tunnels - リレーションによる複数のトンネルのグループ化
- Proposed features/man made=tunnel - トンネルの輪郭を示す単純なウェイで、そのトンネルに関するすべての地物をグループ化