Osmarender/Rules
Developing Osma Styles
If you plan to create a new style for rendering, have a look at Osmarender Styleguide where we try to collect some guidelines.
Rule file grammar
The rule file is an xml file that specifies the drawing rules. So it needs to have an standard XML format at least. The following is the minimum format.
<?xml version="1.0" encoding="UTF-8"?>
<?xml-stylesheet type="text/xsl" href="osmarender.xsl"?>
<rules>
</rules>
- The first line is the XML header required for all XML format files.
- The second line is an optional line to specify a location of osmarender.xsl. If you are going to use a XSLT processor which doesn't have any other options to specify it (for example, Firefox) , you must to write the right path to the osmrender.xsl.
- The third line <rules> is the root element tag for the rule XML file. All the rules (which are scripted by <rule> element tags explained on the next section) and additional SVG information (which are by <defs> explained as later) must be scripted between <rules> and </rules>. The <rules> element has many optional attributes. See Options for the detail.
<rule>
The basic structure is a list of selection rules containing rendering instructions that are processed sequentially. Items drawn later will be on top of items drawn earlier. For example:
<rules>
<rule e="way" k="highway" v="primary">
   ...
</rule>
<rule e="way" k="highway" v="motorway">
   ...
</rule>
 ...
</rules>
Each rule specifies what elements to select based on a matching key/value pair (for example, e="way" k="highway" v="motorway" will select all ways that have a highway tag with a value of motorway). It then specifies what to do with these nodes or segments or ways. The current instruction set allows lines, circles, symbols and text to be drawn.
Rules may be nested. This enables a rendering instruction to be based on a combination of key values. For example the following rule will select only anglican places of worship:
<rule e="node" k="amenity" v="place_of_worship">
  <rule e="node" k="denomination" v="anglican">
    ...
  </rule>
</rule>
 <rule e="elementList" k="keyList" v="valueList"
   [s="selector"]
   [closed="yes|no"]
   [horizontalProximity="degrees" verticalProximity="degrees"]
   [notConnectedSameTag="key"]
   [minSize="number"]>
    ...
 </rule>
- Requirements
- e: elementList. It is a | separated list of one or more of the following elements that will be matched by this rule:
- node
- way
- k: keyList. It is a | separated list of keys that will be matched by this rule. A value of "~" will match any element that does not have any keys. A value of "*" will match any value.
- v: valueList. It is a | separated list of values that will be matched for the keys selected by this rule. A value of "~" will match any element that does not have the specified key. A value of "*" will match any value.
- Options
- s: selector is an optional attribute that specifies which element to use for selection. For example, all nodes can be selected that are on ways that have a highway tag, by using
e="node" s="way" k="highway" v="*". - closed: yes filters so only closed ways (ways that look like areas) are selected, while no filters for only linear ways.
- horizontalProximity and verticalProximity provide a crude method of preventing collisions between place names by specifying the minimum distance between nodes that match the current rule. See example of collision detection for more details.
- notConnectedSameTag is meant to inhibit the rendering of text on features that should only be labeled when some key has a different value on the feature than it has on at least one connected element. For example it is used to only display names for highway areas and roundabouts when they have a name that's different from all the connected ways.
- minSize makes it possible to filter on the approximate size of an object. See #716 for details.
<else>
<rules>
 ...
<rule e="node" k="denomination" v="anglican">
 ...
</rule>
<else>
   ...
</else>
</rules>
The <else> rule selects all elements that were not selected by the preceding <rule>.
Due to a limitation in the implementation horizontalProximity/verticalProximity, notConnectedSameTag and minSize (which are implemented as filters) don't work in the expected way with <else>, they get applied in the same way to both <rule> and <else>.
Rendering Instructions
Between the <rule> and </rule>, you should add at least one rendering instruction.
Each rendering instruction can contain SVG styling attributes or it can reference a class that is defined in an embedded CSS stylesheet so the full power of SVG and CSS can be used to control the look and feel of the output.
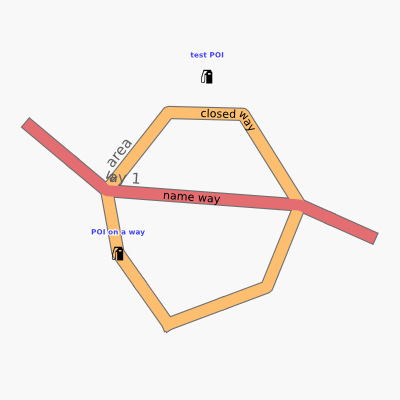
When <symbol> or <caption> is used on an area the position of the icon is calculated using the algorithm described on [1].
The current <pathText> used to be called text, and it worked on ways and nodes. For areas there was an <areaText> instruction. <symbol> used to only work for nodes, and one needed to use <areaSymbol>. The old instructions are still present for backwards compatibility, but may be removed at some future date.
The following instructions tell Osmarender what to do with the OSM elements selected by a rule:
<line>
<line> draws a line. It applies to way elements.
<rule e="way" k="keyList" v="valueList">
  <line
   [smart-linecap="yes|no"]
   [honor-width="yes|no"
    width-scale-factor="factor"
    minimum-width="px"
    maximum-width="px"]
   [style="SVG style"]
   [class="class name list"]
  />
</rule>
- Options
- smart-linecap: If it is yes, the line will be divided and drawn as 3 lines. This function make the end-caps smooth, however, the line doesn't look continuous at high zoom level. The default value is yes.
- honor-width: If it is yes, the line will be drawn with the width reflecting the width=* value, if the way has the width tag. width-scale-factor is scale factor from width tag value (meter) to pixel width of the SVG. minimum-width and maximum-width specify the minimum and the maximum width. If the way doesn't have the width tag, the line is drawn with the width specified by CSS.
- class: list of class names separated by the space character if you want to script the line styles on CSS part.
- style: script the line styles here. Well used parameters for <line> are follows.
- stroke: The colour of the line.
- stroke-width: The width of the line.
- stroke-dasharray: Specifing the line style.
- stroke-linecap: How to draw the terminal. Choice one from round, butt or square.
- stroke-opacity: The opacity of the line. The value takes from 0.0 (completely invisible) to 1.0 (completely overdrawing). The default is 1.0 .
- fill: Unless you want to fill the area enclosed by the line you should provide fill: none;
<area>
- <area> draws an area. It applies to way element even if it is not closed way.
<rule e="way" k="keyList" v="valueList">
  <area
   [style="SVG style"]
   [class="class name list"]
  />
</rule>
- Options
- class: list of class names separated by the space character if you want to script the styles on CSS part.
- style: script the line styles here. Well used parameters for <area> are follows.
- fill: The colour of the filling.
- fill-opacity: The opacity of the filling. The value takes from 0.0 (completely transparent) to 1.0 (completely overdrawing). The default is 1.0 .
- stroke: The colour of the outline. If you don't want to draw the outline, set it as none.
- stroke-width: The width of the outline.
- stroke-opacity: The opacity of the line.
<wayMarker>
- <wayMarker> draws a marker on a node perpendicular to any way that passes through the node. Applies to node elements.
<rule e="node" k="keyList" v="valueList">
  <wayMaker
    k="key for the way"
   [style="SVG style"]
   [class="class name list"]
  />
</rule>
- Requirements
- k: it specified the key of the way that passes through the node. (eg
k="highway").
- Options
- class: list of class names separated by the space character if you want to script the styles on CSS part.
- style: script the line styles here. Well used parameters for <wayMarker> are follows.
- stroke: The colour of the line.
- stroke-width: The width of the line.
- stroke-linecap: How to draw the terminal. Choice one from round, butt or square.
- stroke-opacity: The opacity of the line. The value takes from 0.0 (completely invisible) to 1.0 (completely overdrawing). The default is 1.0 .
<circle>
<circle> draws a circle. It applies to node and closed way elements.
<rule e="node|way" k="keyList" v="valueList">
  <circle
   r="radius"
   [style="SVG style"]
   [class="class name list"]
  />
</rule>
- Requirements
- r: The radius of a circle.
- Options
- class: list of class names separated by the space character if you want to script the styles on CSS part.
- style: script the line styles here. Well used parameters for <circle> are follows.
- fill: The colour of the filling.
- fill-opacity: The opacity of the filling. The value takes from 0.0 (completely transparent) to 1.0 (completely overdrawing). The default is 1.0 .
- stroke: The colour of the outline. If you don't want to draw the outline, set it as none.
- stroke-width: The width of the outline.
- stroke-opacity: The opacity of the line.
<symbol>
- <symbol> draws a symbol or image. It applies to node or closed way elements.
<rule e="node|way" k="keyList" v="valueList">
  <symbol
    ref="file name"
   [position="where"]
  />
</rule>
- Requirements
- ref: it specified the file name of the symbol. The symbol file must be in the directory specified at the <rules symbolsDir="" > option. (eg
ref="traffic_signal").
- Options
- position: Relative position to put the symbol for an area. Now it has only a choice center. Of cause the default value is center.
<caption>
- <caption> draws text at a node, or in the middle of a closed way that describes an area. See the <pathText> description for deciding the text to be drawn.
<rule e="node|way" k="keyList" v="valueList">
  <caption
    k="key for the text instruction"
   [dx="dx"]
   [dy="dy"]
   [text-anchor="start|middle|end"]
   [style="SVG style"]
   [class="class name list"]
  />
</rule>
- Requirements
- k: it specified the key of the text instruction (eg
k="name").
- Options
- dx: Translational length on x axis from the center point.
- dy: Translational length on y axis from the center point.
- text-anchor: It specify the anchor point on the text. You can choice form start,middle or end. The default value is start. It is the same meaning with svg:text-anchor property.
- class: list of class names separated by the space character if you want to script the styles on CSS part.
- style: script the line styles here. Well used parameters for <caption> are follows.
- font-family: The font family of the text. (ex. serif, "DejaVu Sans")
- font-size: The size of the font.
- fill: The colour of the text.
- fill-opacity: The opacity of the text. The value takes from 0.0 (completely transparent) to 1.0 (completely overdrawing). The default is 1.0 .
- stroke: The colour of the font outline. Usually it should be none.
<pathText>
- <pathText> draws text along the path of a way. It applies to way elements.
<rule e="way" k="keyList" v="valueList">
  <pathText
    k="key for the text instruction"
   [dy="translational length"]
   [text-anchor="start|middle|end"]
   [startOffset="caption"]
   [avoid-duplicate="true|false"]
   [style="SVG style"]
   [class="class name list"]
  />
</rule>
- Requirements
- k: it specified the key of the text instruction (eg
k="name").
- Options
- dy: Translational length on y axis from the center line of the way. Usually this is used for drawing ref=*.
- text-anchor: It specify the anchor point on the text. You can choice form start,middle or end. The default value is start. It is the same meaning with svg:text-anchor property.
- startOffset: It specify the anchor point on the path. The value is given by %. The range is form 0% (start of the path) to 100% (end of the path). The default value is 0%. It is the same meaning with <svg:textPath StartOffset="">
- avoid-duplicate: This works only on or/p now.
- class: list of class names separated by the space character if you want to script the styles on CSS part.
- style: script the line styles here. Well used parameters for <pathText> are follows.
- font-family: The font family of the text. (ex. serif, "DejaVu Sans")
- font-size: The size of the font.
- fill: The colour of the text.
- fill-opacity: The opacity of the text. The value takes from 0.0 (completely transparent) to 1.0 (completely overdrawing). The default is 1.0 .
- stroke: The colour of the font outline. Usually it should be none.
z-index
It is possible to set instruction's stack order. That is whether instruction will be drawn below or above other instructions.
The order depends on three attributes (in order of importance): z-mode, layer and z-index. Z-mode is either bottom, normal or top. Bottom means instruction is drawn below other instructions, layer is ignored. Normal means instruction is drawn as usual, layer is respected. Top draws instruction above other instructions, layer is ignored.
Z-index sets position within the group of elements with the same z-mode (and layer in case of z-mode=normal).
Instructions can have layer attribute which overrides any layer tag that there may be on the actual element itself. This is supported only for backwards compatibility.
<defs>
<defs> is a child element of <rules>. You can script additional information for SVG file generated by osmarender here. The scripted text between <defs> and </defs> is directory copy to the output SVG file as a <defs> tag.
<style>
The most important information to be added is cascade style sheets (CSS). CSS is script between <style> and </style>:
<rules>
  <rule ...>
   ...
  </rule>
  <defs>
    <style xmlns="http://www.w3.org/2000/svg" type="text/css">
      .map-background {
	fill: #f8f8f8;
	stroke: none;
      }
     ...
    </style>
  </defs>
</rules>
Note that I strongly recommended to script this <style> tag even if you don't use any class attributes in your rules, because the map background use some CSS classes and they don't have the default values. It means that some renders show black or transparent background when you didn't specify it. What classes are used are written on the page Options.
Examples
Simple Example
This is a simple example of a rule file that selects primary roads (all ways with a key of highway and a value of primary) and draws them first in black with a 4px wide line and then in green with a 2px line (this results in a green road with a black border or casing).
<?xml version='1.0' encoding='UTF-8'?>
<?xml-stylesheet type="text/xsl" href="osmarender.xsl"?>

<rules
  data="data.xml"
  scale="1"
  minimumMapWidth="4"
  minimumMapHeight="3"
  showScale="yes"
  showGrid="yes"
  showBorder="yes"
  showAttribution="yes"
  showLicense="yes"
  showZoomControls="yes"
  javaScript="yes">

  <rule e="way" k="highway" v="primary">
      <line style="stroke-width: 4px; stroke-linecap: round; stroke: #000000;"/>
  </rule>

  <rule e="way" k="highway" v="primary">
      <line style="stroke-width: 2px; stroke-linecap: round; stroke: #7FC97F;"/>
  </rule>

</rules>
Example of drawing nodes
Nodes can be drawn either as circles or as captions or both. This example draws towns as captions, churches as black circles with the name of the church as a caption, and hotels as uncaptioned green circles.
When a circle and a caption are both drawn for a node the caption can be offset from the circle by using the SVG attributes dx and dy.
<?xml version='1.0' encoding='UTF-8'?>
<?xml-stylesheet type="text/xsl" href="osmarender.xsl"?>

<rules
  data="data.xml"
  scale="1"
  minimumMapWidth="4"
  minimumMapHeight="3"
  showScale="yes"
  showGrid="yes"
  showBorder="yes"
  showAttribution="yes"
  showLicense="yes"
  showZoomControls="yes"
  javaScript="yes">

  <rule e="node" k="class" v="town">
    <caption k="name" font-family='Verdana' font-size='14px' font-style='bold' fill='black'/>
  </rule>

  <rule e="node" k="class" v="church">
    <circle r='3px' fill='black' stroke='black' stroke-width='1px'/>
    <caption k="name" font-family='Verdana' font-size='10px' fill='black' dx='4px' dy='4px'/>
  </rule>

  <rule e="node" k="class" v="hotel">
    <circle r='3px' fill='green' stroke='black' stroke-width='1px'/>
  </rule>

</rules>
Example of using embedded CSS styles
CSS styles can be used to define the appearance of drawing elements using a style element embedded in the rules file. This is done by referencing the style using the class attribute. The following example shows minor and unclassified roads drawn using the same style.
<?xml version='1.0' encoding='UTF-8'?>
<?xml-stylesheet type="text/xsl" href="osmarender.xsl"?>

<rules
  data="data.xml"
  scale="1"
  minimumMapWidth="4"
  minimumMapHeight="3"
  showScale="yes"
  showGrid="yes"
  showBorder="yes"
  showAttribution="yes"
  showLicense="yes"
  showZoomControls="yes"
  javaScript="yes">

  <rule e="way" k="highway" v="unclassified">
      <line class='unclassified-casing'/>
  </rule>

  <rule e="way" k="highway" v="minor">
      <line class='unclassified-casing'/>
  </rule>

  <rule e="way" k="highway" v="unclassified">
      <line class='unclassified-core'/>
  </rule>

  <rule e="way" k="highway" v="minor">
      <line class='unclassified-core'/>
  </rule>

  <defs>
    <style type="text/css" xmlns="http://www.w3.org/2000/svg">
      .unclassified-casing {
        stroke-width: 3px;
        stroke-linecap: round;
        stroke: #000000;
        }

      .unclassified-core {
        stroke-width: 2px;
        stroke-linecap: round;
        stroke: #E6E6E6;
        }
    </style>
  </defs>

</rules>
Example of route number captions
This example shows how to display route captions near a road. The text follows the path of the road but is offset to one side.
<?xml version='1.0' encoding='UTF-8'?>
<?xml-stylesheet type="text/xsl" href="osmarender.xsl"?>

<rules
  data="data.xml"
  scale="1"
  minimumMapWidth="4"
  minimumMapHeight="3"
  showScale="yes"
  showGrid="yes"
  showBorder="yes"
  showAttribution="yes"
  showLicense="yes"
  showZoomControls="yes"
  javaScript="yes">

  <rule e="way" k="highway" v="primary">
      <line style="stroke-width: 4px; stroke-linecap: round; stroke: #000000;"/>
  </rule>

  <rule e="way" k="highway" v="primary">
      <line style="stroke-width: 2px; stroke-linecap: round; stroke: #7FC97F;"/>
      <pathText k="ref" font-family='Verdana' font-size='10px' fill='black' dx='2.5px' dy='-2.5px'/>
  </rule>

</rules>
Example of text on ways
This example shows how to render text along the the path of a way using the <pathText> instruction. The k="name" attribute specifies that the value of the name key should be used as the text value. The startOffset='50%' and text-anchor='middle' attributes specify that the text should centered halfway along the line of the path. The baseline-shift attribute offsets the baseline of the text from the center-line of the way.
Caveats:
- Text that extends beyond the end of the way will get truncated.
- Not all SVG viewers are able to display textPaths. Adobe ASV3 and Inkscape can, Firefox 1.5 and GIMP cannot. Inkscape does not interpret the baseline-shift attribute.
<?xml version='1.0' encoding='UTF-8'?>
<?xml-stylesheet type="text/xsl" href="osmarender.xsl"?>

<rules
  data="data.osm"
  scale="1"
  minimumMapWidth="4"
  minimumMapHeight="3"
  showScale="yes"
  showGrid="yes"
  showBorder="yes"
  showAttribution="yes"
  showLicense="yes"
  showZoomControls="yes"
  javaScript="yes">

  <rule e="way" k="highway" v="primary">
      <line style="stroke-width: 4px; stroke-linecap: round; stroke: #000000;"/>
  </rule>

  <rule e="way" k="highway" v="primary">
      <line style="stroke-width: 2px; stroke-linecap: round; stroke: #7FC97F;"/>
      <pathText k="name" baseline-shift='-35%' text-anchor='middle' startOffset='50%' font-family='Verdana' font-size='4px' fill='black'/>
  </rule>

</rules>
Example of collision detection
This example shows how to filter nodes to reduce the chance of collisions when captions are rendered. Normally, if two items, such as place names, are very close together then when they are rendered one will overlap the other.
A <rule> can filter nodes based on the distance to the next similar node by using the horizontalProximity and verticalProximity attributes. The two attributes describe a rectangle around a node. If there is another node of the same kind within this rectangle then the first node will be filtered out.
For example:
<rule e="node" k="place" v="town" horizontalProximity="0.8" verticalProximity="0.2">
  <rule e="node" k="place" v="town">
  	<caption k="name" class='caption-casing town-caption-casing'/>
  	<caption k="name" class='caption-core town-caption' />
  </rule>
</rule>
This rule will select all nodes tagged with place=town, but will filter out any nodes that are close to another node within 0.8 degrees horizontally or 0.2 degrees vertically.
Links
- ColorBrewer is an online tool designed to help people select good colour schemes for maps and other graphics. It is free to use, although we'd appreciate it if you could cite us if you decide to use one of our colour schemes.
- Vischeck shows you how your image looks to the colour-blind.
- OpenGIS® Styled Layer Descriptor (SLD) Implementation Specification
