Zh-hant:Mapping techniques
製作地圖的手續大致上可以區分為兩種動作:第一,你必須蒐集物件「在哪裡」(例如街道),第二,你必須知道這裡「有什麼」,所謂的POIs(Point of interest),街道的名稱和性質。你可以分階段或一次完成這兩種動作,但很難在得知位置之前就描述POIs的性質。
蒐集街道的走向
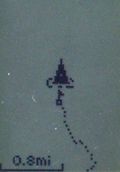
GPS軌跡記錄
這是繪製道路、步道、交通船航線、滑雪路徑等,的基本技術,只要把GPS開啟,讓它去記錄你所移動的航跡。這些航跡是以WGS84的大地坐標基準為預設值,可直接顯示在 OpenStreetmap以及其編輯環境。
使用GPS記錄時,最好把記錄的點設定的愈密集愈好。在Garmin的系統中,你可以在 "Tracks", "Setup", "Resolution: Highest" 頁面中編輯。
JOSM 本身可以使用來記錄航跡: surveyor plugin (需要livegps plugin) 允許加入資訊於你所在的點位置。
一些應用程式 用GPS接收器提供位置資訊,讓你可以用筆電,PDA或行動電話來記錄GPS航跡。
衛星和航空像片(Satellite/Aerial Imagery)
許多城市有高解析度且幾何糾正過的航空像片,這些可用來繪製OSM圖的資料,但因為資料著作權(資料權限)關係,只有共享(公有領域)或創用授權(Creative Comon, CC)的資料可使用。當然在許多的地圖編輯的應用程中,所用YHAOO的衛星影像是可被允許的 Yahoo!'s aerial imagery,事實上,這可幫助後續的製圖工作如果你使用的是線上的 potlatch 編輯。
在你製圖前,請選擇一個區域來畫,請上 Yahoo! maps選定,確認有衛星影像的籤標頁(satellite tab),這樣你就不會使用到有著作權的地圖資料,且列印出衛星影像(不是印街圖),當你繪圖時,你可以使用這印出的衛星影像和筆(注意: 這筆最好是中性筆或墨水筆,不要是鋼珠筆除非你用寫字板夾,而且也不要用鉛筆因為在圖上那不會那清楚),而且可以標記上街道/路徑的名字和重要的地方的位置在衛星影像。你或許也可以用這印出來的衛星影像來看看有那些地方是否被遺漏了,如被掩藏的街道或庭院。
當你回家了,打開編輯的程式和繪製你記下的所有東西,因為你帶著衛星影像到現場,你已經知道所有東西的位置和就不會對於一些地物特徵感到困惑,如綠色斑塊相鄰黑色斑塊間是一條路徑或只是一個銅製屋頂。
另一個替代方案是使用GPSbabel來轉換你的航跡為Google Earth的kmz檔,這可以載入航跡到Google Earth且套疊到衛星影像上,每一個GPS都固定的給予一個'點'時間/日期的戳記(stamp),被寫入註記的這些戳記可以在不同座標參照(reference)中輕易地轉換,任何有有GPS航跡問題的區域立即地被顯示出來,你可以記下所遺失的路徑/道路或錯誤。
為了避免著作權問題,使用Google Earth是用來找出問題資料或需要再進一步調查的區域,不要將Google Earth的資料直接拿來用,如道路或地名。
取得細節的方法 (Getting the details)
記錄細節更為理論的方法在地理標記資料的註釋資料.
GPS航點(Waypoints)

GPS接收器使得標記航點變得容易,例如,在Goko,按"Mark", "OK" 即可插入一個數值的航點,在這個案例中,製圖者停在酒吧的停車場中且標記了一個為名為206的航點,有些GPS的型號可讓你取得一個'平均'的點,也就是說,從許多點中理論上更準確的取得一個航點,這通常是被使用在高度精準優先的資料收集,且時間不是一個主要考量的因素,但通常可以很快的完成。
使用記事本或錄音機來記錄航點所對應的事物,雖然通常是可以將資訊輸入GPS,但會很繁瑣。
GPS補償方法(GPS Offset Method)
(中級程度的技術)
當有一構違物或地物你想去定位但無法接近,如基地台被包圍在大型的圍籬中,此時你可以用GPS補償方法來取得它的坐標。此法需要GPS、指北針、測距儀(可選的)和記錄資料的方法,如記事本或錄音機。(取代使用測距儀,你可以推估距離但通常準確度較低)。
1) 開始收集航點和給予這些航點可辨認的ID,如基地台1,這是一個好機會使用平均航點的功能(已有許多廠牌的GPS都有這個功能)。
2) 用指北針來定位該構造物且記下你所在位置和構造物的方位於記事本中。
3) 如果有測距儀的話,瞄準構造物且記下距離在你的記事本中。如果沒有測距儀,就自行推估距離。
4) 結束GPS資料收集且儲存你的航點。
下列是一個範例如同在你記事本中所記錄:
基地台1 = 90公尺 在航點1的 340°
基地台2 = 60公尺 在航點2的 176°
...等等
5) 當你回到你的電腦前,你可以下載你的航點且輸入補償筆記於試算表中,對於這構造物的較低精度座標,你可以用量測工具,包含許多的製圖軟體,來量距離和方位,參考你的筆記,定下這個點,大致上這就是航點補償方法。對於高精度的座標,你可使用商業GIS軟體,如ESRI Arcmap + COGO Extension or Softree Roadeng(Survey).
(NOTE: Looking for a free alternative to accomplish this and will post here if I find one...)
數位相片(Digital photography)
- 主條目:Photo mapping
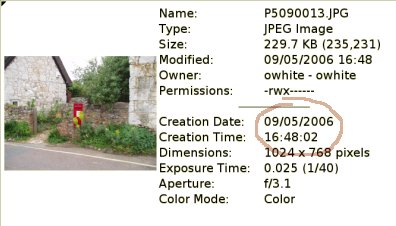
數位相機是記錄街名、村庄名、和其它圖徵很有用的工具,因為數位相片有時間戳記(timestamps),我們可以找到照相者在某一時間的位置(使用他們的GPS的航跡),且用這個位置為相片的位置。
在這裡的範例中,我們或許可以定郵筒在地圖上,在GPS時間4:48 pm的地方。
或者,你可以用專業的軟體來相互關連你的GPS航跡和相片,GPS資料將植入相片的詮釋資料中(最常見的是JEPG的EXIF)。如此,你可以列出你所拍照的地方,OSM軟體如 JOSM支援地理標記的"這些相片"。
當植入座標於相片,必需確認相機的時間和GPS的時間是一致的(開始照相的行程時先檢查時間);否則相互關連不會正確也必須移除。
城市街道手繪圖 (Hand-drawn maps of city streets)
- 主條目:City mapping
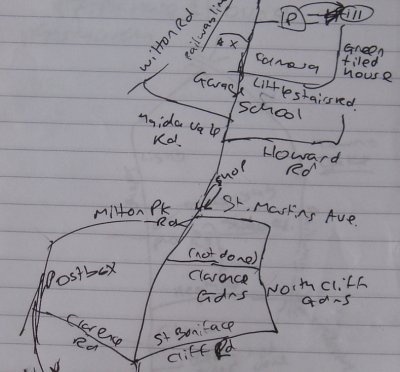
在高密度的城市中,單行道系統和網格式道路,是很難記錄成千上百的街道名。
一方法是速記街道的如何交叉,之後再相互關連到已產生航跡中。
另一方法是二次訪問(two-pass),先記錄航跡,再帶著從OSM中印出的街道輪廓圖回到現場去,找到路牌填入街道名。
二次訪問的一次變形是使用航空相片(取代航跡)去產生街道的輪廓,印出未標記的路段(如一個JOSM截圖(screenshot)),再寫下路名。
如果你的記錄紙沒有太多空間,可考慮以數字註記在印出的圖上,之後再相互關連這些數字到路名或地標在另一張紙。
Walking Papers Printed Map
- 主條目:Walking Papers
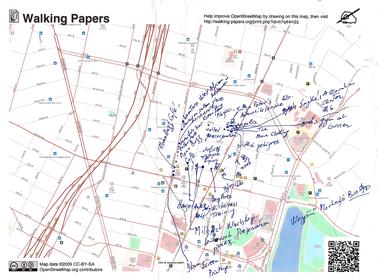
This technique is similar to a hand-drawn map, but it gives you a head start with what we already know and you have the option of letting another volunteer edit the map from your notes.
Visit the web site walking-papers.org and choose the area where you will be going, print out the OpenStreetMap for that area, then take it with you and make notes on what needs to be changed.
After you are finished making notes for an area, you can choose what to do with them. You can just look at your notes while editing the map normally or you can scan in your notes. After scanning, you, or any other map editor, can edit the map while using your notes on the screen as a backdrop.
Voice recording / Audio mapping
- 主條目:Audio mapping
I have found voice recording to be the medium of choice mapping by bike. I started using paper as above, but found the continuous stopping and starting was time consuming and a killer on the knees.
There is a great number of different audio mapping styles, with different accuracy, level of detail, using different hardware and software. There are easy techniques for the beginner and difficult, but extremely powerful techniques for the advanced mapper. Check out the completely restructured main article.
Video
- 主條目:Video mapping
For those driving alone who can't stop to take notes: mount a video camera (or digital camera in "movie" mode) somewhere that it can see roadsigns, and leave it recording for the duration of your journey.
Afterwards, note the timestamp of anything interesting in the video (e.g. "Shops on the left between 1:32 and 1:37") and correlate that with the GPS tracklog.
Photogrammetry
- 主條目:Photogrammetry
Photogrammetry is a technique used by many mapping agencies and companies gather data. When you have two photos of a scene from different positions it's possible to extract the geometry of the scene. This can be done manually or by software and by using this features such as buildings, road shape and amenities can be added to the map with a high relational accuracy.
Colorizing the map
Once all the tracks have been added and updated, you are ready to begin colorizing the map. Some areas can be added from memory, but not all areas have clearly defined boundaries. It is important to make sure the streets (the GPS tracks and TIGER data) are properly updated first because often times they form boundaries for other areas.
You can use Yahoo images to fill in such things as parks, shopping centers, hospitals, golf courses, lakes and airports. Some things that aren't marked on the map include cemeteries, campsites, churches, schools, buildings and city zones. These areas can't be filled in with a GPS.
One way to start off is by referencing a directory for a certain category (i.e. churches, schools) with their addresses and then cross referencing them on a map. Once you know where they are, you can begin adding nodes and land use into OSM.
Most times cities and counties will have color-coded municipal zoning maps that can be used to fill in the land use for residential, agricultural, retail, commercial and industrial. These maps are often dividing into specific categories (ie light industrial, heavy industrial). The zoning maps can be loaded into an image editor such as Photoshop and then the zone colors can be combined. It doesn't matter what colors you pick just so you know what colors are what.
You can use a program like Map Rectifier to warp an image so it can be used in OSM. Once it has been warped, it can be loaded into JOSM in a WMS layer. From there, you can trace the zones and add the appropriate land use tag.
You may be able to find a GIS map from a city or county that has park info on it. You can view that shapefile data in a program like ArcGIS. Once the info is on the screen correctly, you can do a screen shot and then use that as your layer to warp in May Rectify. Shouldn't be a problem with copywrites but you'll want to check and make sure.
Adding buildings
Buildings can be added from Yahoo images by drawing a shape around the building and then tagging it building=*. Since each town and city could have thousands of buildings, you'll need to decide where you want to start. Maybe doing all the buildings for organizations such as churches, schools, community buildings. Maybe you start with the downtown or a major shopping center. If you want to tackle a whole town, try to focus on the larger buildings and work one a specific area at a time. Yahoo images are mostly from 2006 but in some areas even from 2001, so they may not be up to date. You may have to rely on your own notes or memory to image some of the newer buildings.
General issues
Transportation
Depending on the type of tracks which you intend to create, some transportation means are more suited than others. Obviously, for tracking rails and motorways, you have to use an allowed vehicle. Generally, a car is good to track all the length of a motorway, where little special features appear. A bike is good for medium distance tracks, where you might want to stop frequently to mark points of interests or intersections. For tracking residential areas with dense features, inline skates or a skateboard/longboard are the way to go.
Long Journeys
- 主條目:Long journeys
In some cases, you may be away from a computer for an extended period, and the number of trackpoints your GPS holds can become a severely limiting factor. You may need to increase the interval between trackpoints, consider using a different model of GPS, and plan ahead for extra battery capacity.
Privacy
In general you should keep your traveling to public rights of way, although there can be some exceptions (such as an access road into a camp site for example). Use your common sense, if a driveway is labelled 'No Trespassing' then respect the sign and do not enter.
When taking photographs which will later be made public, treat the property as you'd expect yours to be treated. Intrusive photographs are not needed in order to map the streets, you might question whether street number signs are 'fair game' - in rural areas these can be useful as they may be the only way to confirm the name of the public road leading to the property/address.
There's also a page for more detailed analysis of restrictions on photography and national differences.
Physically Securing Your Device
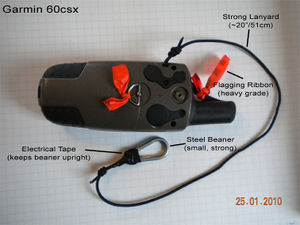
If traveling with a lot of gear and/or when there's a risk of dropping/loosing your gps unit, it's good to rig up your gps so it attaches to you. Here's an example photo. Just attach beaner to a secure d-ring or loop on your belt/vest/pack etc. Attaching bright color flagging ribbon is very helpful to find the device if you do drop it in a place where it blends into the terrain like in forested regions. (This setup also works great for other types of gear as well ie. field book, compass, range finder etc.)
See also
- Tricks and tips
- Recording GPS tracks
- Using GPS in vehicles
- Editing
- How others do mapping - cars with multiple cameras and a professional GPS, basically
