User:Tallguy/Thoughts & ideas/Beginners guide
Mapping your first square for HOT
This section is intended as a guide for someone new to mapping, who wants to map for HOT. Many of the points mentioned are only suggestions, but they are intended to help you progress quickly. Getting everything set up for mapping your first square may take you some time, but it quickly becomes habit and takes no time at all.
If you are an experienced HOT mapper you will have already developed your own routine's and methods. Your tips and ideas would be appreciated - either edit this wiki directly, add something to the Talk section, or send a message to someone who can add it.
If there is something 'wrong' in this guide, get it put right!
Before you start
- This will only make sense if you have some experience of mapping, or you have read at least some of LearnOSM.
- For an additional guide to mapping, including video tutorials, see MapGive - mainly uses the iD editor
- You will need an OSM login - see LearnOSM if you need to know how.
- Accept the fact that there is a learning curve, and you will make a mistake (or two!). Learn & keep trying - there are many people who want you to succeed. If it was too easy we wouldn't need guides telling us how to do it, BUT It's not that difficult once you develop a systematic approach. With the amount of mapping that many do, you have to expect the occasional problem - just keep doing your best & correct your own errors when you find them.
Web Browser
Have each of the following as a loaded tab on your browser so that you can quickly refer to them (right mouse click on the link & select 'Open Link in New Tab');
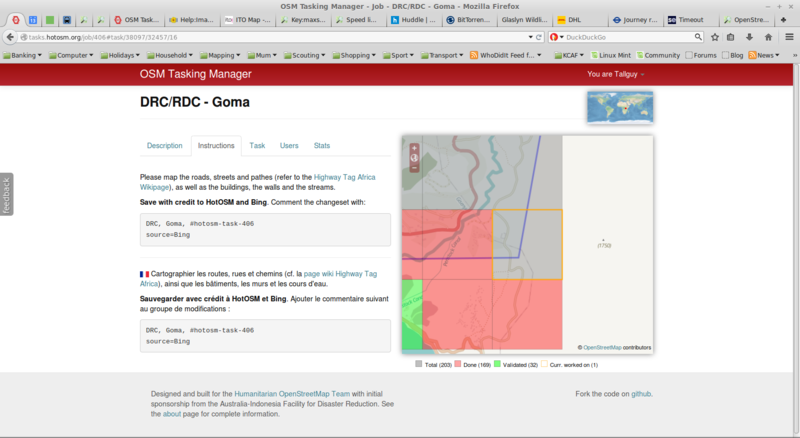
- The HOT Tasking manager Login using your OSM login - you can use the same one as you use for your other mapping.
- LearnOSM
- OSM_Tasking_Manager This guide
- Highway_Tag_Africa The vast majority of the mapping done by HOT requires the tags to comply with this page. The tags are no different to those used in the rest of OSM, but the explanations make the requirements clearer.
- Map_Features Useful for more general tags. How to tag a radio mast, river ford, wadi, etc., etc..
- If using JOSM you will probably also want JOSM/Guide
You may have other tabs, so consider 'pinning' them - see image above.
Setup your editor
- See OSM_Tasking_Manager#Setting_up_your_editor elsewhere in this wiki.
- For iD or Potlatch this may be another tab on your web browser, or you may wish to set this within a separate window so you can quickly 'Alt+Tab' between the windows.
Using JOSM - but principles the same for all editing programmes
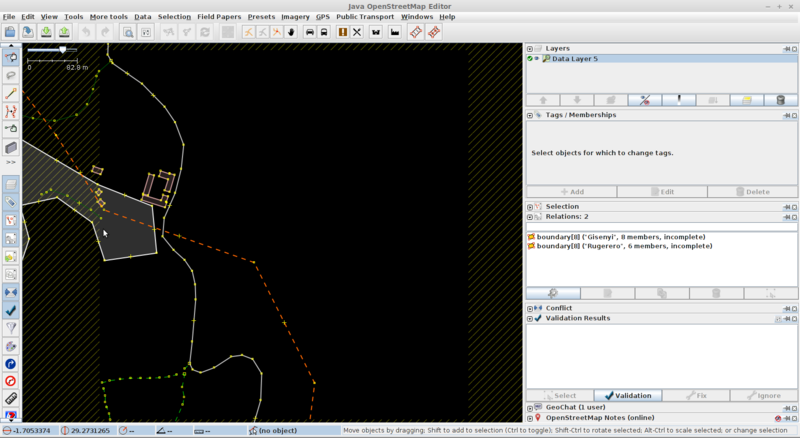
Your JOSM screen should now look something like this screenshot. Don't do anything yet - read the next section!
Points to note from first screen
- You are only working on the central square which does not have any diagonal lines across it (if you don't have any diagonal lines outlining your square, you may have Download OSM data continuously installed & ticked under the file menu in JOSM - you need to delete the data layer, untick Download OSM data continuously & then reload your square).
- The particular square in the screenshot has been partially mapped by other mappers - to see their comments look at your web browser, Tasking Manager, Task tab & you will be able to scroll down & see any comments left by the mappers who have already worked on it.
- If something happens & you have to release a square before you have completed it, it is good practice to add a comment explaining what you have done, and what is to be completed still.
- Many features in this square extend outside your square - another mapper could be editing them at the same time as you - remember to upload & refresh at regular intervals.
Scale
Top left on the screen is a scale indicator. In this case it is reading 82.8 m (metres). You can alter the scale by;
- rolling the mouse button, or
- grabbing the scale marker with your mouse pointer & sliding it left or right, or
- using the + or - keys on your keyboard.
The whole square in this screenshot is a square several hundred metres along each side - you do not edit anything at this scale, but you can learn a lot by just taking a moment and looking. When you start editing the scale reading will probably be about 20 m (depends on features and your screen size, but 20m will give you a good starting figure until you have more experience).
As you are mapping you may find features that you are not sure of the size of - compare their size on the screen with the scale markers to establish their approximate size. There is also a measurement tool available for JOSM which can be useful on occasions.
Squares can cover different areas in different tasks and it is not unusual to find you have a square several kilometres on each side.
Splitting a square
Some squares take a long time to map & sometimes it is possible to split a square so you have four smaller squares (this has happened in this case - this is not always possible as it is limited to avoid too many extremely small squares being created).
Add the imagery layer
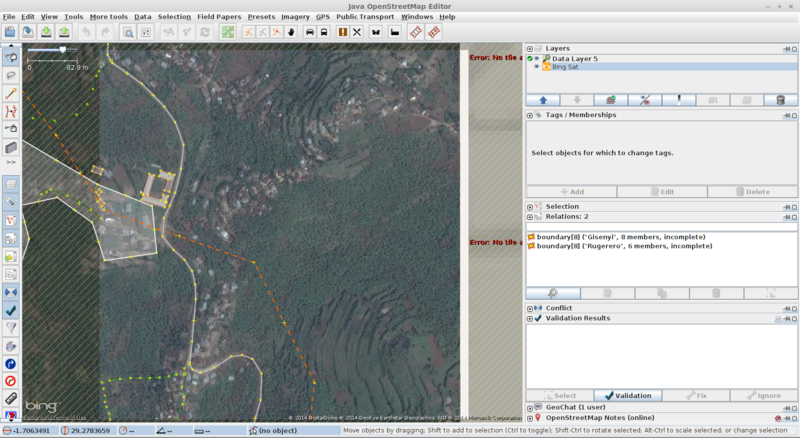
Bing in this case, by clicking on Imagery/Bing in JOSM. Other imagery is often used, and you will need to read the instructions on TM to make sure you are using the correct imagery - you may be able to load this using remote control - explained earlier. Also note that some imagery is coloured to enhance features that need tracing.
Overlap at the edges of the square
To the left side of the square you can see where more features have been mapped than elsewhere - this is where the square has bordered with a square that has been mapped already. This overlap is very slight, but it allows you to see what has been mapped by the adjoining mapper. When you are adding to the map, and the feature you are tracing goes out of your square, extend it to the border of your square (you can go very slightly over the border) and end it there - immediately do an upload so that a person selecting the square the feature will appear in their mapping data - further explained later.
Viewing different layers
Move your mouse over to the top right of JOSM & click on the picture of an eye to the left of the words Data Layer. You can now see the imagery layer, but not the map data that has already been completed.
Points to note
- The majority of the square is green, and the other colours are mainly as the result of man.
- Many buildings are visible - have been built with materials brought into the area by probably quite large vehicles.
- The road is very definite and appears to have a compacted earth surface. This road is the main road of the area - take a look at Highway_Tag_Africa. This is not a highway=track, it is at least;
- highway=unclassified, or
- highway=residential, but may even be tertiary, secondary or primary.
GPS traces
GPS traces are extremely useful for mapping purposes. They generally have an accuracy of well within 20 metres, and are frequently accurate to within a metre or so. Highways, roads and other features are often obscured by trees and other overhead objects, and a gps trace can help you to identify their location, but be aware that the trace may 'wander' when the gps producing it no longer had a clear view of the sky.
To check for gps traces on the square you are mapping, click on the download icon (on my screenshots this is the third icon from left on the top row - green arrow pointing down). Another screen appears and you must remove the tick from the OpenStreetMap Data box, leaving only a tick in Raw GPS data, before you click on the Okay button.
If there were any gps traces for your square they would appear as another layer in the Layers pane - again you can make them visible or invisible by clicking on the eye icon.
There are sometimes variations in alignment between the satellite imagery, the map data, and GPS traces - unless there are specific directions to the contrary the gps data should be considered the most accurate, and the imagery should be aligned to the gps trace before tracing starts.
Checking the existing data
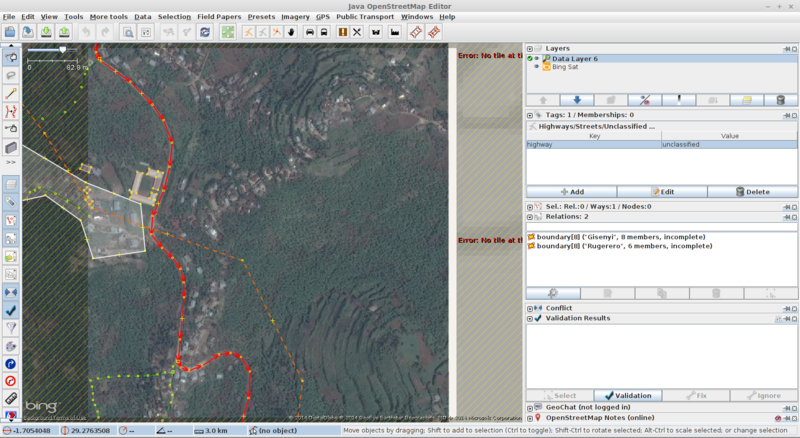
Left mouse click on a highway or other feature and it will turn red on the map window, and details of its tag(s) will appear to the right in the Tags/Memberships pane - in this case the highway has only the tag highway=unclassified.
We've already seen that this highway does not have any asphalt or concrete type surface, and it should have a tag showing this. With the highway selected click on the Add button at the bottom of the Tags/Memberships pane, and in the pop up box that appears start typing surface - it will probably be autocompleted before you finish typing. In the next field, start typing unpaved - again it will probably be autocompleted before you finish typing. Although we have chosen unpaved, it would be equally correct if the highway was tagged surface=dirt, or surface=ground, or any similar variation.
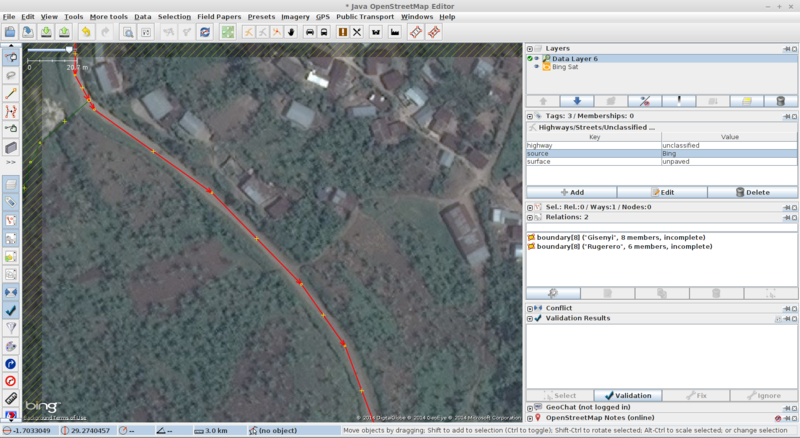
Some mappers also add source codes to objects, and it would be correct to have source=Bing as it has been traced from Bing imagery.
Checking way accuracy - Improve Way Accuracy tool
Zoom in to where the feature meets the edge of your square, and ensure your scale is reading about 20m. I've added the tags for surface & source to my highway & I'm now making sure that it accurately follows the line of the highway. If a previous mapper had attempted to trace it while their scale was at 100m for instance, the route would not follow the road, and would have to be improved using the Improve Way accuracy tool of JOSM (on my screen, left column of icons, 4th icon down - two red lines with dots). If / when you need to use this tool select the way (highway, river, or whatever) and then click on the icon - further instructions available from the JOSM user guide, and LearnOSM).
In this case, the highway has already been accurately traced and no action is required.
Moving around the screen
Either right click with the mouse, hold & drag, or use Ctrl + one of the arrow keys to move around the screen.
Uploading your edits to OSM
Having edited a feature that extends out of the square into another square, there is now a risk that another mapper will attempt to update the same feature, which will result in what JOSM describes as a conflict. The best course of action is to upload the edit as soon as possible, after editing any feature that could cause a conflict (conflict's are fairly easy to sort out, but can take a little time - if you can avoid them it is a lot easier though!)
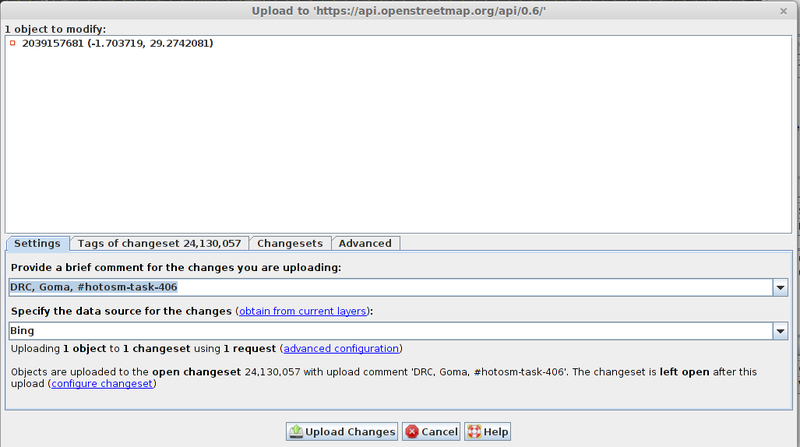
When you select the icon in JOSM to upload (green arrow pointing upwards, 4th from left in top row), you will be presented with another pop up window with fields to be completed. To obtain the information to complete the fields in JOSM, go to Tasking Manager & transfer the information from the Instructions Tab of Tasking Manager by using copy & paste - while you are looking at Tasking Manager, check the count down timer to make sure you are not running out of time.
JOSM contains a feature which carries out a very quick form of validation, and may present you with another pop-up window warning of a problem - take your time & read this to see if there is something you need to correct before continuing with the upload. There is normally an option to continue to upload anyway, and you may consider this is the best option, and you can then sort out the problem after this upload.
In the unlikely event that JOSM detects that there is a conflict, another pop up window will appear - see conflicts elsewhere in this guide.

