Cake diagram
A Cake Diagram is a map image of the area to be mapped, with lines drawn on it to form 'slices'. Each mapper can choose a slice that they will map. The idea is to coordinate mapping effort and avoid two or more people duplicating effort mapping the same area.
This is particularly important during mapping parties where several people are definitely doing surveying at the same time, but a cake diagram can be used to coordinate over a longer timespan. Surveying is labour intensive, and it's clearly wasteful to have two people accidentally walking the same street gathering data, but a cake diagram can also be used to coordinate armchair mapping work, to try to avoid two people simultaneously inputting data on the same spot.
How to make a cake diagram
A lot of mappers have complained that creating a cake diagram is hard. It's really quite simple. Here are the basic steps:
- Find the area that you want, and the map style you want. (choose a styles on the layers picker of the home page, or go looking on other websites e.g. the stamen toner style is designed for printing.
- Take a screenshot of the area.
- Load that image into some image editing software like Photoshop, Gimp, Paint.NET or just Paint.
- If the image editing software supports multiple "layers", create a new layer now. It will be better to do each of the following 2 steps in a separate layer, as it will be easier to correct some of the mistakes if you do it that way.
- Start drawing lines for the boundaries of the cake pieces. The size of the cake pieces vary based on factors like the type of party it is (aiming for POI mapping, or just getting lots of road names), the number of people attending, how fast they are mapping, etc. It is usually best to draw the lines in a colour that isn't used much on the map, and you set it to have about 50% transparency. Also remember that some people will print the map off in black and white.
- Using a text tool, number each of the cake segments
- Export the image as a png, and upload to the wiki for use in the mapping party wiki page
- Add a list of numbers to the wiki page for each person to sign up to the particular segment
Tools
- Main article: :Category:Collaborative software
- Tasking Manager.
- SimpleTaskManager.
- Divide and map. Now.
- MapCraft is a tool for making a cake diagram and tracking mapping progress.
Examples
Don't worry about your cake diagram being perfectly like one you've seen, but here are some examples to show how they look and how they can vary in style.
-
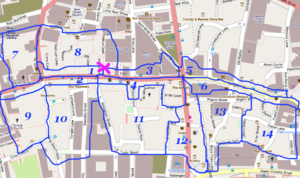 Fleet Street, London. Strange elongated slices are to allow people who are interested in shop mapping to pick these highstreet areas
 -
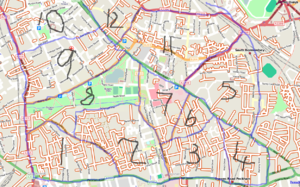 Peckham, London hand sliced cake. This is on an old NoNames map background from back in the old days, when we had lots of street names to gather in London still
 -
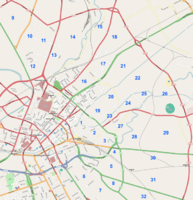 An early mapping party in Manchester with areas numbered but without lines. The main roads mapped so-far provide divisions.


History
The term "Cake" became associated with OSM as a result of the early mapping parties, specifically Mapchester Mapping Party 2006, the first mapping party in Manchester. A "Cake diagram" was produced to help with the mapping effort. As you can see, this first one was actually shaped quite like a circular cake cut into slices:

