User:Jared.Campbell/JOSM.MergeShapefileBoundaries
This method ensures that tags and relations don't have to be recreated onto a new boundary (much cleaner and easier in the long term).
Add the Shapfile Boundary to JOSM
- Download the desired area from OSM servers
- Open the desired shapefile
- This is done through the File --> Open menu (Ctrl + O)
- You must have the OpenData plugin installed to open shapefiles in OSM
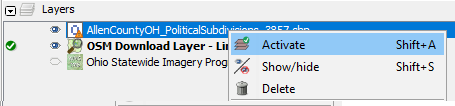
- Activate the shapefile layer
- Right-click the layer and select "Activate" (Shift + A)
- Select the desired shapefile object
- Merge the selection
- Edit --> Merge selection (Ctrl + Shift + M)
- In the drop down menu, select the OSM layer as the target layer
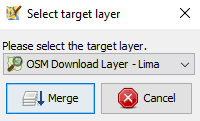
- Click the "Merge" button
- Activate the OSM layer for editing


Merge OSM and Shapefile Boundary Nodes
Now both boundaries are on the OSM layer and the original OSM boundary nodes can be individually merged to the shapefile boundary nodes.

- Select an OSM boundary node
- Ctrl + select a shapefile boundary node
- Merge the two nodes into one
- Tools --> Merge nodes (M)


Note: The first selected node will move to the second selected nodes location. Thus, it is important to select the OSM boundary node first and the shapefile node second.
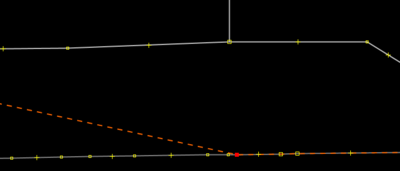
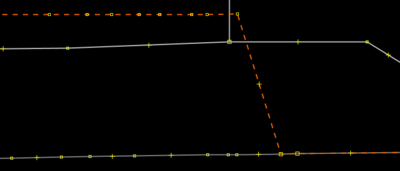
Add Missing Boundary Nodes
As seen in the picture below, the OSM boundary may have fewer nodes than the shapefile boundary. These shapefile nodes should be added to the OSM boundary.
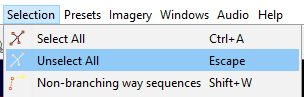
- Click Selection --> Unselect All (Escape)
- This ensures that a way is not accidentally drawn in the next steps
- Click "Draw Nodes (A)"
- Click the OSM boundary to add a node
- The exact location on the OSM boundary is irrelevant as the node will be merged with the shapefile boundary
- Unselect the node to prevent from drawing a new way
- Repeat this for the desired number of nodes
- Seven new nodes were added in this example
- Now merge each OSM boundary node with the shapefile boundary node as described above


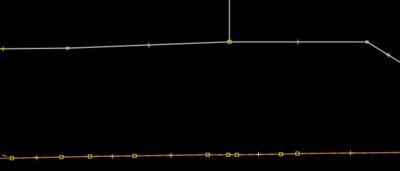
Delete Extra Boundary Nodes
The OSM boundary may have more nodes than the shapefile boundary. These nodes should be deleted.
- Select the extra OSM boundary node
- Click "Select, move, scale and rotate objects (S)"

- Click the extra OSM boundary node

- Delete the extra OSM boundary node
- Edit --> Delete (Delete)


Unglue Merged Ways
The original OSM layer boundary may be merged with other ways (e.g. highways, rivers). The boundary should be "unglued" from other ways, unless it is 100% known that the way defines the boundary. If you are unsure if the way defines the boundary, then the shapefile should be the authority and the boundary should be unglued from the way.
- Select the node
- Unglue the boundary from the way
- Tools --> UnGlue Ways (G)
- Select the boundary
- Select the node
- Do not Ctrl + select, but single select
- Selecting the boundary before the node ensures that the boundary's node is selected and not the way's node
- Delete the boundary's node
- Select the remaining node for the way
- Merge the node back to the original way(s)
- Tools --> Merge nodes (M)
- Note: If the node is an intersecting, then ungluing the ways also unglued the intersection. This is fixed by merging the intersection nodes back together.
- Test: Grab the node and move it to see if the correct ways are attached.
- Undo the test move with Edit --> Undo (Ctrl + Z)
Remove the Shapefile Boundary
Once the OSM boundary mirrors the shapefile boundary, then the shapefile boundary can be deleted.
Note: If this isn't done then the shapefile will be imported into OSM when the changes are uploaded. Do NOT do this.
Clean Up
Warning: Skipping this step could have unintended consequences.
Moving a boundary can have unintended consequences:
- Where roads names change
- Boundaries of other areas (e.g. parks, neighborhoods, landuse)
- Breaks in long highways (e.g. interstates, railroads)
These changes need to be cleaned up after the boundary has been moved.
Double Check Tags and Relations
Ensure that the boundaries tags and relations have not been changed.
Hint: This is a good opportunity to ensure that the boundary's tags and relations are correct.
Upload the Changes
The resulting changes can then be uploaded to the OSM server.
Tips
- Remember to move the OSM boundary to the shapefile boundary (i.e. select the OSM boundary node first)
- Edit --> Undo... (Ctrl + Z) is your best friend
- Zooming in extremely close can help distinguish other ways from the boundary way
- If you unglue nodes where multiple ways intersect, you may need to glue the other ways back together
- You can move a node, select the boundary node, and then use undo to move the node back while retaining the selection of the boundary node
- This is extremely helpful when ungluing nodes and trying to pull the boundary node out from the mess of other nodes