JOSM/Guide
Welcome to the JOSM guide. This guide is split across several tabs (above), starting with an introduction aimed at new users. The text assumes some knowledge of OpenStreetMap concepts, and focuses entirely on using JOSM, not other tools. As such, some users may prefer the general Beginners' Guide or learnosm.org (which also offers JOSM tutorials).
You can also see the official JOSM introduction.
Starting JOSM
Download and run the jar using Java: josm-tested.jar
Don't like jar files? Click this java web-start link instead.
For operating system specific installation steps or troubleshooting tips see JOSM/Installation.
When JOSM starts up, the main editing space displays some text. This can include important announcements, but really we want to see some map data …
Download data
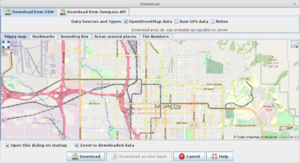
Click the download toolbar button (![]() ) to open the download dialog window.
) to open the download dialog window.

Finally, use the left mouse button to drag a box around the area you want to download.
You should download an area encompassing the editing you will be doing, but avoid downloading too much map data (the OpenStreetMap server will take a long time to respond, and JOSM may slow down or run out of memory) You probably want to zoom right in close to the maximum zoom level. Pick a handful of streets around the area you are interested in. Start small, because you can download more data as you need it.
When you click ![]() Download, the data should appear in the main editing area.
Download, the data should appear in the main editing area.
After downloading some data, it may be a good idea to do a validation run on the downloaded data. It is common that this will trigger many warnings or even errors - and it is good to know which errors are in the data before you start editing it.
Zooming and Panning
Within the main editing area, you can pan around and zoom in and out.
- Zoom using the mouse scrollwheel. Alternatively use the zoom bar at the top-left or press Ctrl+, and Ctrl+..
- To pan around, drag with the right mouse button. Alternatively, you can hold down Ctrl and use the arrow keys.
If you can't see anything you probably need to zoom out (scroll backwards) until things come back into view. While zooming in you need to point the mouse at the data you wish to zoom towards.
Yellow hatching (diagonal lines) indicates areas which are not loaded into JOSM at the moment. You should see a rectangular area with a plain black background. This is area you have downloaded. Within this area (and trailing off the edges of it) you will see the OpenStreetMap data.
Download more data
Now that JOSM knows where it is, it's quite easy to request a little bit more data to extend the downloaded area. Use the zooming and panning features described above to position the visible area. The rectangular area of the screen which is currently in view, will be the default selected area next time you click the download toolbar button (![]() ).
).
Try downloading a little bit more data in a second rectangular patch, of about the same size, alongside the area you already downloaded. To do this you will need to zoom in and out until the width of the first downloaded area is about the same as the visible screen width, and then pan off to one side to position the view on some new territory (a patch with yellow hatching), then click download.
This time you don't need to do anything within the download dialog. Just click OK. Zoom out a little bit to see the result.
Remember, always avoid downloading too much data in one go.
Switch on aerial imagery as background
For example, click the "Imagery" menu and select "Bing". Better imagery might be available for your region. You can find other imagery sources sorted by country under "Imagery", "Image Preferences".
Now you're ready to begin some basic editing.