Proposal:IndoorOSM
IndoorOSM was a proposed tagging schema for Indoor Mapping which however now is defunct and has been replaced by other proposals that do not have the technical problems (tag collisions, massive use of relations and direct use of osm element IDs) it had. Please do not use for any new projects.
See Simple Indoor Tagging for current tagging.
| IndoorOSM | |
|---|---|
| Proposal status: | Obsoleted (inactive) |
| Proposed by: | Gomar1985 |
| Applies to: | |
| Definition: | The main characteristics of the model proposal are:
|
| Draft started: | 2011-11-29 |
Intention of this project
Currently, most maps (not only online maps but also mobile maps on smartphones) focus on outdoor environments, although most of our time, we spent indoors. Additionally, new (high rise) buildings are constructed and their internal structure gets more and more complex, thus it is likely that (especially foreign) people get lost inside such places.
As many others, we (GIScience UniHD) discovered, that there is an increasing interest inside OSM for building mapping activities (currently there are nearly as much buildings as streets). These two facts (the increasing interest in buidlings and the need for indoor maps) have encouraged us to extend OSM to indoors. We have investigated the (hardly) existing indoor ideas in the community and created an extensive model for OSM indoor mapping activities, and also tried to communicate this with mappers and the research community (Cf. Goetz M., Zipf A. (2011): Extending OpenStreetMap to Indoor Environments: Bringing Volunteered Geographic Information to the Next Level , In: Rumor, M., Zlatanova, S., LeDoux, H. (eds.) Urban and Regional Data Management: Udms Annual 2011: Delft, The Netherlands. p. 47-58.) and received a lot of positive feedback. People in that community like the model and think that it is a very important step for the future.
Of course we want to involve you all (the OSM community) in this model development process and are looking forward to your comments and ideas. In addition to improvements and extensions of the model, also editors and visualizations need to be adapted.
Summary
To sum up, these are the main characteristics of the model:
- mapping of indoor spaces including different levels (floors)
- mapping of doors and windows (inside as well as facade)
- 3D properties (e.g. height etc. are also included)
- existing OSM methodologies (nodes, ways, relations and keys) are utilized
Use Cases
Indoor maps or 3D Indoor information can be used for various applications, e.g.
- Indoor Navigation/Routing
- 3D Visualization OSM-3D
- 2D Maps
- Public Participation
- Emergency response
for different venues, e.g.
- Airports
- Hotels
- Universities
- Schools
- Museums
- Train stations
- Shopping Malls
- other public buildings
The Model / Tagging Schema
In the following section, the model is presented and described
A building (main relation)
For first results see Simple 3D Buildings.
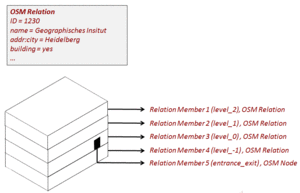
A building is represented as a relation within our model, whereby the type of the relation is set to building. Additional (general) information about the building such as address, name, height etc. is attached as OSM keyvalue pairs to this main‐relation. The relation‐members (i.e. the children) of the main‐relation comprise the different levels and entrances/exits of the building. That is, for each building level (floor) there is one relation member. The role of these members define which level the corresponding level is (i.e. level_0, level_1, level_‐1, etc.). The ground level is always level_0. The entrances/exits are also mapped as relation‐members (Single nodes), but their role is entrance_exit. The main idea of what a building is, is depicted in Figure 1. As one might notice, the whole model follows some kind of relational approach.
An exemplary main-relation of the IndoorOSM model as OSM-XML source code is provided below:
<?xml version="1.0" encoding="UTF-8"?>
<osm version='0.6' generator='JOSM'>
  ...
  <relation id='1370729' timestamp='2011-12-02T12:16:49Z' uid='300276' user='gomar1985' visible='true' version='8' changeset='10016221'>
    <member type='relation' ref='1370727' role='level_-1' />
    <member type='relation' ref='1370728' role='level_0' />
    <member type='relation' ref='1370725' role='level_1' />
    <member type='relation' ref='1370726' role='level_2' />
    <member type='node' ref='1098227410' role='entrance' />
    <tag k='addr:city' v='Heidelberg' />
    <tag k='addr:country' v='DE' />
    <tag k='addr:housenumber' v='48' />
    <tag k='addr:street' v='Berliner Straße' />
    <tag k='amenity' v='university' />
    <tag k='building' v='yes' />
    <tag k='building:architecture' v='modern' />
    <tag k='building:buildyear' v='1980' />
    <tag k='building:cladding' v='concrete' />
    <tag k='building:condition' v='good' />
    <tag k='building:facade:colour' v='grey' />
    <tag k='building:levels' v='4' />
    <tag k='building:max_level' v='2' />
    <tag k='building:min_level' v='-1' />
    <tag k='building:roof:colour' v='black' />
    <tag k='building:roof:material' v='cardboard' />
    <tag k='building:roof:shape' v='flat' />
    <tag k='height' v='14.5' />
    <tag k='name' v='Geographisches Institut' />
    <tag k='type' v='building' />
  </relation>
  ...
</osm>
Generally, due to the open key‐value pair methodology, it is possible to add any kind of information to the main-relation. However, we think that the following attributes are the most relevant ones (many of them are already used in OSM in some context).
Modeling the different levels (floors)
Each level of a building (i.e. each relation-member of the main-relation) is again mapped as an OSM relation. The type of these relations is level. The members of these relations are OSM elements (i.e. nodes, ways or relations) which represent the different level parts (e.g. rooms, corridors etc.). Their individual role is buildingpart. General information about the level (e.g. name, usage etc.) is attached as key-value pair to the corresponding level-relation.
There is also one closed way added to the relation to represent the shell (outline) of the level.
An exemplary level-relation of the IndoorOSM model as OSM-XML source code is given below:
<?xml version="1.0" encoding="UTF-8"?>
<osm version='0.6' generator='JOSM'>
  ...
  <relation id='1370725' timestamp='2011-12-02T12:16:50Z' uid='300276' user='gomar1985' visible='true' version='6' changeset='10016221'>
    <member type='way' ref='94551306' role='buildingpart' />
    <member type='way' ref='94551291' role='buildingpart' />
    <member type='way' ref='94551309' role='buildingpart' />
    <member type='way' ref='94551293' role='buildingpart' />
    <member type='way' ref='94551280' role='buildingpart' />
    <member type='way' ref='94551479' role='buildingpart' />
    <member type='way' ref='94551407' role='buildingpart' />
    <member type='way' ref='94551384' role='buildingpart' />
    <member type='way' ref='94551345' role='buildingpart' />
    <member type='way' ref='94551321' role='buildingpart' />
    <member type='way' ref='94551352' role='buildingpart' />
    <member type='way' ref='94551323' role='buildingpart' />
    <member type='way' ref='94551312' role='buildingpart' />
    <member type='way' ref='94551295' role='shell' />
    <member type='way' ref='94551468' role='buildingpart' />
    <member type='way' ref='94551456' role='buildingpart' />
    <member type='way' ref='94551411' role='buildingpart' />
    <member type='way' ref='94551389' role='buildingpart' />
    <member type='way' ref='94551418' role='buildingpart' />
    <member type='way' ref='94551392' role='buildingpart' />
    <member type='way' ref='94551363' role='buildingpart' />
    <member type='way' ref='94551325' role='buildingpart' />
    <member type='way' ref='94551282' role='buildingpart' />
    <member type='way' ref='94551482' role='buildingpart' />
    <member type='way' ref='94551470' role='buildingpart' />
    <member type='way' ref='94551458' role='buildingpart' />
    <member type='way' ref='94551472' role='buildingpart' />
    <member type='way' ref='94551460' role='buildingpart' />
    <member type='way' ref='94551428' role='buildingpart' />
    <member type='way' ref='94551394' role='buildingpart' />
    <member type='way' ref='94551315' role='buildingpart' />
    <tag k='height' v='4' />
    <tag k='level' v='1' />
    <tag k='level:usage' v='academic' />
    <tag k='name' v='1. Obergeschoss' />
    <tag k='type' v='level' />
  </relation>
  ...
</osm>
Reasonable and senseful keys and values which should be added to such a level-relation are mentioned in the following table:
| Key | Description | Example value(s) |
|---|---|---|
| name=* | the name of the corresponding level | name=Ground Floor |
| level:usage=* | describes the usage of the level | level:usage=academic, level:usage=residential |
| height=* | the height of the level (with default unit meter) | height=4 |
| level=* | describes which level number the current level has (0 is always the ground-level, -1 is the first basement etc.) | level=0, level=-2, level=3 |
Modeling the different building parts
The different building parts of a level (Cf. above) also need to be mapped in OSM. Thereby, those parts with a covered area (i.e. rooms, stairways, corridors) are mapped as closed-ways (areas), whereat in contrast other parts such as doors or windows are mapped as single nodes with additional information about the width, height, accessibility etc. Information about the building parts themselves (e.g. a name or type) are again attached as key-value pairs to the corresponding building part element. An exemplary OSM-XML excerpt for a building part is given below:
<?xml version="1.0" encoding="UTF-8"?>
<osm version='0.6' generator='JOSM'>
  ...
  <way id='94551494' timestamp='2011-12-02T12:16:58Z' uid='300276' user='gomar1985' visible='true' version='3' changeset='10016221'>
    <nd ref='1098227358' />
    <nd ref='1098226969' />
    <nd ref='1098227303' />
    <nd ref='1098226902' />
    <nd ref='1098227358' />
    <tag k='buildingpart' v='room' />
    <tag k='height' v='3m' />
    <tag k='indoor' v='yes' />
    <tag k='name' v='010' />
  </way>
  ...
</osm>
| Key | Description | Example value(s) |
|---|---|---|
| buildingpart=* | what type of buildingpart is it | buildingpart=room, buildingpart=hall, buildingpart=corridor, buildingpart=verticalpassage |
| name=* | the name of the buildingpart (e.g. the room name) | name=Vesalius Aula, name=Audimax |
| ref=* | the ref of the buildingpart (e.g. the room number) | ref=101, ref=01.15 |
| height=* | individual height of an buildingpart (defaul unit is meter) | height=3, height=2.5 |
| window=* | it's a window (attached to a node which is part of the buildingpart way). The node should be placed in the center of the actual window.
The value of this key can either be yes or it can also be used for refining the type of the window (see examples) |
window=yes, window=glass, window=opening, window=lattice window |
| width=* | individual width of a window (default unit is meter) | width=2 |
| height=* | individual height of a window (default unit is meter) | height=1.2 |
| breast=* | the breast of a window (i.e. the space between the ground and the bottom of the window, default unit is meter) | breast=1.3 |
| door=* | it's a door(attached to a node which is part of the buildingpart way). The node should be placed in the center of the actual door.
The value of this key can either be yes or it can also be used for refining the type of the door(see examples) |
door=yes, door=manual, door=automatic |
| width=* | individual width of a door (default unit is meter) | width=1 |
| height=* | individual height of a door (default unit is meter) | height=2 |
Modeling connections between different levels
A crucial issue about indoor mapping (at least in current 2D editors) is the mapping of vertical connections between different levels (vertical connectors). There are already some other ideas within OSM (Cf. Indoor1, Level Map or Indoor2, see also the Discussion page here), but they (especially the latter two ones) are not applicable for vertical connectors which do not have the same coordinates on the different levels (e.g. escalators or stairways).
As mentioned above, the buildingparts which represent a vertical connector (a verticalpassage) should be mapped as buildingpart=verticalpassage. That is, each elevator funnel, each stairway area or each escalator platform will be mapped as a closed way. For providing information about what kind of verticalpassage it is, the tag buildingpart:verticalpassage=* with values stairway, elevator, escalator can be used. The general floorrange of the vertical connector can be provided by using buildingpart:verticalpassage:floorrange=*.
| The following approach is severely broken; one should not under any circumstances use object IDs in tag values because object IDs are not reliably constant. |
The IndoorOSM model proposes the following approach:
Also, all verticalconnectors are accessed via a door (see above), so for each entrance to a vertical connector, a door node should be provided. The information about the vertical connection itself is attached to these door-nodes by using the key connector:ids=*. The value of this key is then the OSM-ID of the OSM element which it is (in reality) connected to. If a verticalpassage is connected to several levels (e.g. an elevator), then several values are provided, e.g. connector:ids=94551469, 94551394. In the case of an one-way vertical connector (e.g. an escalator), only the starting node of the connector will be enriched with this key.
Example 1 (an escalator, A -> B):
OSM node id 12345
connector:ids = 67890
OSM node id 67890
Example 2 (an elevator with two entrances, A <-> B):
OSM node id 12345
connector:ids = 67890
OSM node id 67890
connector:ids = 12345
Example 3 (an elevator with three entrances, A <-> B <-> C):
OSM node id 12345
connector:ids = 67890
OSM node id 67890
connector:ids = 67890
connector:ids = 11111
OSM node id 11111
connector:ids = 67890
By mapping vertical passages in this way, it is possible to create a (semantically described) connection between various levels. For the current OSM editors it might be a bit circuitous to obtain the corresponding OSM ids, but it might be the best method (for any kind of vertical connection) to map vertical connectors.
Mapping data in JOSM
Since the proposed IndoorOSM mapping schema is based on nodes, ways, relations and tags, users can use existing OSM editors for mapping indoor environments.
Below there is a short and brief explanation of how to map IndoorOSM data with JOSM.
Initial Situation
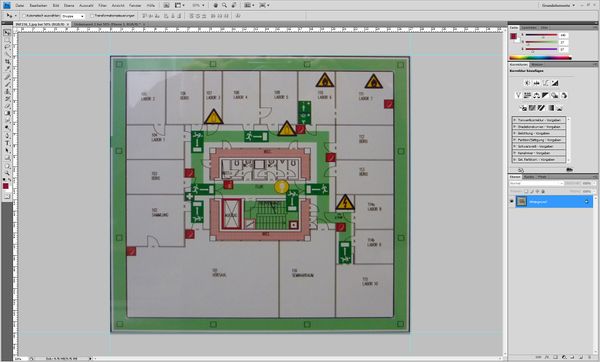
In most public buildings there are publicly accessibly floor plans (evacuation plans) which show the different parts of a distinct floor. Pictures of those plans (taken by yourself, see Fig. 2.) can serve as a basis for indoor mapping. Since self-made pictures are often deformed, it is (often) required to distort them, i.e. to make them rectangular. This can be achieved in any photo editing software, as for example Adobe Photoshop (CTRL + T, see Fig. 3).
Fig. 3: Deformed Picture
PicLayer
For using the image of the floorplan for the mapping, it needs to be opened in JOSM. Therefore, the PicLayer-Plug In must be available in your JOSM application.
This can be done by “Edit -> Preferences (F12) -> Configure available plugins” (see Fig. 4).
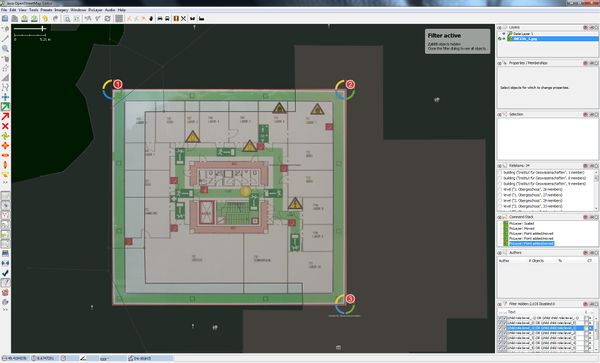
Afterwards, the created picture can be loaded into JOSM by selecting “PicLayer -> New picture layer from file…”. By activating the corresponding PicLayer, it is then possible to adjust the position and scale of the image. If you are mapping indoor data for an existing building in OSM, it is advisable to adjust your image to the existing building footprint. You can do this by tagging the corners of the plan (green arrow-button ![]() ). It is advisable to tag the three most dominant points of the plan (so for example for a rectangular footprint tag three edges, see Fig. 5).
). It is advisable to tag the three most dominant points of the plan (so for example for a rectangular footprint tag three edges, see Fig. 5).
Fig. 5: Set points in PicLayer
Selecting the right (best) points can be tricky for some buildings.
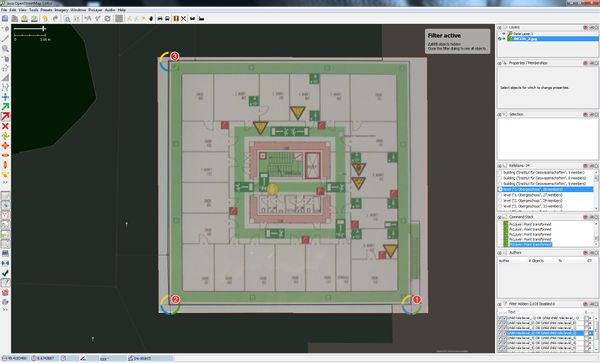
These marked points can then be moved to the corners of the building with the red arrow-button ![]() (see Fig.6).
(see Fig.6).
Fig. 6: Marks on the right position
Modeling
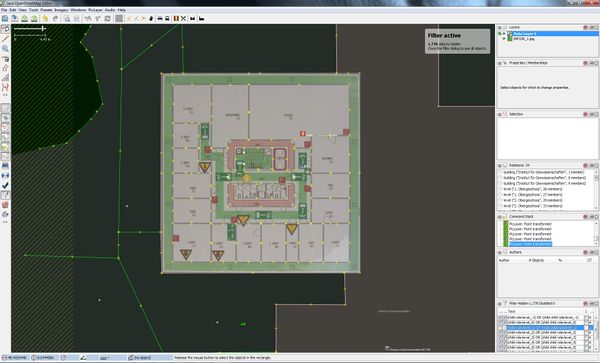
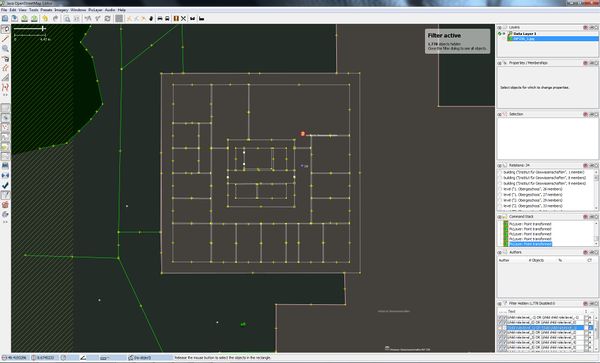
Before the mapping activities can start, the OSM Layer must be activated. Then the rooms can be created (“Draw nodes”) (see Fig.7/8) - this is done in the same way as one would map a normal polygon (such as a building footprint or a lake). Afterwards, different properties (tags) can be added to the different OSM features: doors, stairways, elevator, windows, rooms….
Fig.7: Created building
Fig.8: Created building
Relations
Since all elements of one building floor (level) are combined in one relation, you have to combine all beforehand mapped elements (rooms, corridors, building shells etc.) into one OSM relation. Therefore, select all element and create the new relation (![]() ). If there is no panel for the relations on the right side, it can be activated by “Window -> Relations”. All selected objects can now be added with the
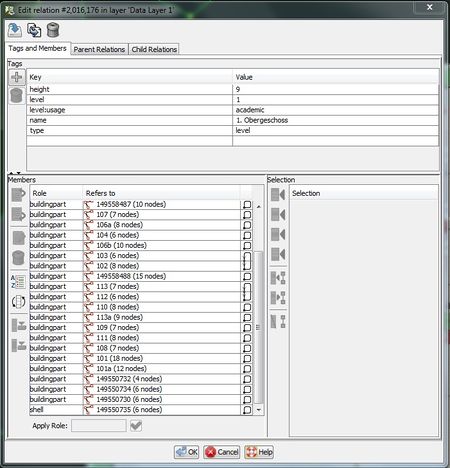
). If there is no panel for the relations on the right side, it can be activated by “Window -> Relations”. All selected objects can now be added with the ![]() -button as members of the relation. Every member needs a “role”. Only the outer object of the building gets the role “shell”, the other ones get the role “buildingpart”. Thereafter, different tags (height, level, type…) can be attached to the whole relation (see Fig. 9).
-button as members of the relation. Every member needs a “role”. Only the outer object of the building gets the role “shell”, the other ones get the role “buildingpart”. Thereafter, different tags (height, level, type…) can be attached to the whole relation (see Fig. 9).
Fig.9: Child-Relation
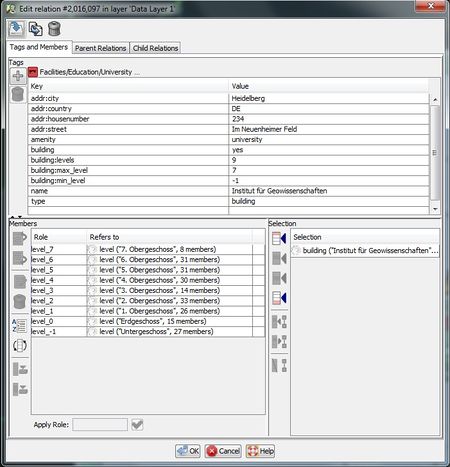
Since the whole building is again a relation (whereas all floor/level-relations are relation-members of this building relation), the beforehand level-relation must be added to the building-relation. Thereby, the role of the level-relation is the corresponding level number, so for example role:level_0 for the ground floor, level_1 for the first floor, level_-1 for the basement etc. Those roles are very important, because they are used for filtering methods (see below). Tags for the complete building can also be added (see Fig.10).
Fig.10: Parent-Relation
Create another level
If you are finished with one level and want to continue with a new one, the existing (finished) level(s) can be hidden. This can be done with filters (see “Creating filter rules”). Relations can also be duplicated (CTRL + D), so stairway, elevator... have the same position and other rooms can be moved easier. In this case the name and the role of the level have to be changed.
Creating filter rules
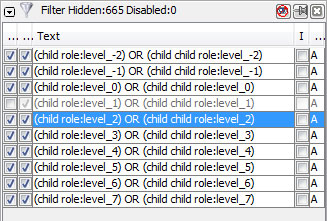
JOSM provides the possibility of filtering data. Since indoor data is mostly multi-level and there are often overlapping elements, it is very convenient to create filters. These allow the selection of a distinct level of the building, thus mapping is very easy and straight-forward. The filter panel in JOSM is located in the bottom right corner of the GUI. If it is not displayed, you can add it via the menu Windows > Filter (see Figure 11). By clicking on Add, a new dialogue box pops up. In this box you have to define the filtering rule. The easiest way for filtering IndoorOSM data according to the desired level can be done via the role of the relations (remember: each level relation has a distinct role in the main-relation, describing the actual level. So for example the ground floor has the role level_0, the first floor below ground has level_-1 and so on).
Since we want to hide a complete level, we have to filter for all childs of the relation with the corresponding role. Additionally, we also want to hide all nodes (e.g. windows or doors), thus we additionally need to filer for all childs of these childs. These two rules can be combined in one filter with the logical operator OR.
Examples for filtering rules are:
- (child role:level_-1) OR (child child role:level_-1)
- (child role:level_0) OR (child child role:level_0)
- (child role:level_1) OR (child child role:level_1)
- (child role:level_2) OR (child child role:level_2)
An alternative possibility for filtering is a filter according to the level number.
Alternative filtering rules:
- (child level=-1) OR (child child level=-1)
- (child level=0) OR (child child level=0)
- (child level=1) OR (child child level=1)
- (child level=2) OR (child child level=2)
In JOSM, you can create an arbitrary amount of filters, thus you can easily add filters for all required levels. If you activate all filtering rules except one, JOSM shows the the desired level map. So for example in Figure 12, JOSM will desiplay the indoor data of level 1 - all other levels are hidden. A filtering rule is activated by using the first (left hand) checkbox. The second (right hand) checkbox can be utilized for either really hiding the elements of the filter (checkbox is checked) or by bluring the data (checkbox is unchecked).
Figure 12: Exemplary filters in JOSM
Other issues
There is not yet a proper name for this indoor project. Do we need one? For example we could think of IndoorOSM or (having the OPEN in mind and one of the most important use cases (see below for activites of other companies) ) e.g. OpenVenueMaps (OVM). These proposals are of course open for discussion - so if you have other ideas, just provide them :)
Places/Examples
A list of all places which are mapped according to this model:
- Institut of Geography in Heidelberg
- LIFL
Applications with IndoorOSM data
Cross platform 3D indoor map
This prototype is a derivate from OSMBuildings. Running example can be found here: http://osmbuildings.org/indoor/
Technically int renders on 2D canvas. That way it is very portable to many web platforms. The example uses a floor plan form Europa-Center, Berlin. The plan has been transcribed to SVG and is then read as data source. Different sources and rendering details are possible.
Cooperation on this project is very appreciated. Get in touch.
2D Indoor Map with Routing
A first draft version of an IndoorOSM map application has been developed and is available here: http://indoorosm.uni-hd.de/ - broken now
The application visualizes the interior structure of a building for each building-level. It shows a birds perspective of one level and a level-switcher allows the selection of different levels. Also, Indoor Routing capabilities are integrated in the client, so it is possible to compute routes through the building (also for rooms on different levels). When computing a route, a user can decide between two different modes: on the one hand, the complete route is displayed (which provides a brief overview but looks a bit strange for mutli-storey routes). Otherwise, the user can request partial routes for each individual floor, so while switching the floors, the different route parts are visualized. Also a blue dot indicates the start of the route, and a blue cross visualizes the target.
The application functions in different browsers as well as on the IPad and Blackberry devices (IPhone should also work). The application at the moment is of course an online application, however memory requirements are quite low, thus it should also be able to provide an standalone (offline) version (not yet tested).
3D Indoor Model with Routing
Based on the 2D version of IndoorOSM, there is a prototypical 3D application available. It is based on XML3D (i.e., a HTML5 extension for WebGL which is currently under development) and visualizes the rooms as 3D models. It functions in most of the latests browsers (except for Internet Explorer). In this version, on the right-hand side there is a level toggler which allows to hide or display different levels of the building. Furthermore 3D routing is implemented, thus routes inside the buildings are visualized as a 3D graph. The application is available on http://indoorosm.uni-hd.de/3d/
Indoor Evacuation Simulation
Based on IndoorOSM data it is possible to conduct multi-agent indoor evacuation simulations. As a simulation framework MATSim (http://www.matsim.org) is utilized. The required files (network, agents etc.) are automatically generated from OSM data which is mapped according to the IndoorOSM mapping proposal. The use case buildings consists of four floors with three bigger (lecture) rooms and several offices. The scenario assumes that the building is fully occupied, that is all lecture rooms and offices are occupied, which results in a total number of 313 agents. All agents are routed to one single building exit, thus the scenario describes a organized and structured evacuation. 100 simulation iterations have been conducted. The results are visualized in a small video on http://www.youtube.com/watch?v=7u9g022IrVY , whereby the iterations zero, 50 and 100 are visualized.
IndoorOSM on Android
Ishan Agrawal want's to develop a native app for Android devices with IndoorOSM. More Information on IndoorOSM on Android
Javascript application to browse buildings
You can use this application to see the inside of most mapped buildings. More details there : https://github.com/clement-lagrange/osmtools-indoor
