Go Map!!/Map Editor Interface
This page describes the map editor interface of the Go Map!! application and how OSM data works and is manipulated via Go Map!!.
Map Editor Interface
About Elements
OpenStreetMap uses the terms:
- A
 node is used to describe a simple point (typically: smaller objects e.g. a tree or small shops).
- A
 way is used to represent linear features. (e.g. highways, walls, fence)
- A
 relation is used to indicate that there is a relation between two elements.
- A multipolygon is a type of relation that is used to create “holes” in areas or to describe features that is separate from the entire area.
- A turn restriction is a type of relation that is used to indicate which roads you are allowed or prohibited to go to or if you are able to make u-turn.
Relations can be used for many things but Go Map!! mainly uses it for these two, so the guide will only focus on that.
In Go Map!! these elements are represented by:
- A node is displayed as an icon of what the node represents or a small square (☐).
- Ways are displayed as lines, polygons, or multi-polygons.

Create Notes and Elements
Note
To create a new note tap the "+" button. A ? will drop indicating the position of your soon to be note. Next you will need to tap on New Note.
Note: You must have “Notes and Fixmes” turned on.
Node
To create a new node or point of interest tap the "+" button. A ? will drop indicating the position of your soon to be node. To actually turn it into a node add tags. If no tags are added it will be automatically discarded.
Way
To create a way simply press the "+" button twice. On the first press a pin will drop which you can position as desired, then tap "+" again to add a second, connected node. Repeat to create additional nodes. If you accidentally just create one node you can simply tap on it again and press the "+" button.
Polylines/Area
To create a poly line/area simply hover your final node on top of the first node of your way and release. A circle of dots will indicate where your final node will be attached to. You can also attach the node to existing ways by hovering over them and releasing it.
Multipolygon Relations
To create a relation, first you must create (or already have) a closed way, then create (or already have) a second way that is either inside or outside of your first way. Lastly, select one of the two ways.
If you decide to select the way that is “outside”, select “More…” then select “Create Relation” lastly, hold press the way that is ”inside” and then select “inner” to give the way the “inner role”.
OR
If you decide to select the way that is “inside”, select “More…” then select “Create Relation” lastly, hold press the way that is “outside” and then select “outer” to give the way the “outer role”.
The blue outline on ways indicates that what you selected is a relation.
To add a way to an already existing relation simply tap on the relation, then hold press any way and give it either the “inner” or “outer” roles.
Creating multipolygon relations:
Restriction Relation
To create a turn restriction, first you must have at least 2 ways that are tagged as roads. Then, select the node where the roads intersect, then tap on “More…” then “Turn Restriction”.
You will be prompted with the turn restriction page. First, you should select the road that you are coming from (It will be highlighted in blue). All the other roads are roads that you can or cannot travel to. By selecting the middle button of each road, you will notice that they will change to the following:
- U-Turn
- This means that you are able to make a u-turn on the selected road (highlighted in blue).
- No U-Turn
- This means that you are not able to make a u-turn on the currently selected road.
- Go
- You can optionally go onto this road.
- Prohibited
- You are prohibited on going to this road.
- Mandatory
- You are mandated to go to this road.
Creating a turn restriction:
Creating Elements
Method 1 of creating elements:
Use one finger to move the map around and use the other finger to tap the “+” button.
Method 2 of creating elements:
Use one finger to hold the “+” button and use the other finger to tap on the map to add a node.
Add a node to a way
Simply tap on any place on the way, then press the "+" button. (Adding extra curvature on a road or for adding detail to a building.)
Additionally, whenever you hover a node in a way over an another way (doesn’t matter where) it will be attached to the way. (Connecting roads to other roads.)
Selecting/Moving Elements
Nodes
To select/move a node, tap on the node then drag the grey box to the location you want.
Ways
To select/move a way, tap on the line part to move the way in its entirety then hold press and drag the grey box to the location you want.
If you move a node in a way it will simply move the node, not the entire way.
Selecting a Specific Element
You can long press on an area to select a specific node, way, or relation; a list of nearby objects will pop up. Useful for adding nodes into existing ways (after selecting your desired object, hit “+”).
Undo, Redo
You can undo and redo many actions such as moving elements, tag changes, and creating relations by pressing [Undo, Redo].
Remember you cannot undo after submitting data.
Element Editing

(Tap on a button to navigate to it.)
 Tags
Tags
Tags are used to describe a feature on elements in the OpenStreetMap database. Example: Indicating that the node is a sushi shop or that the closed way is a building.
To select an existing object (either a node or a way) simply tap it. In order to select a building, you must select the wall rather than the center.
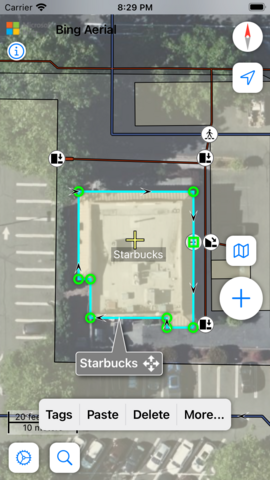
Selected objects are highlighted in green and will display the title in a grey box and the “Tags, Paste, Delete and More…” buttons. In this section were focused on Tags.
Common Tags
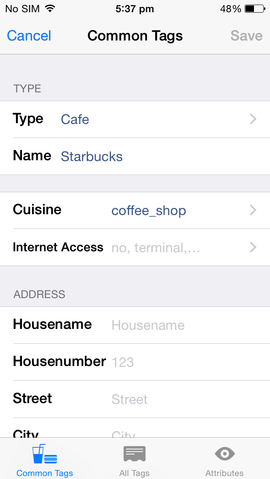
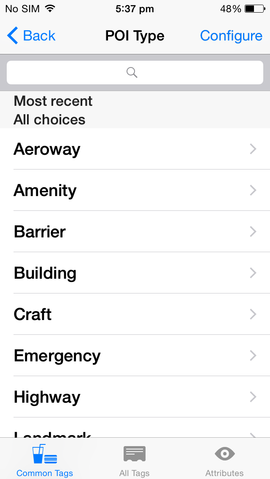
The tag editing screen presented has three tabs of views. The first view (Common Tags) presents fields for adding common POI types:
Custom Presets
Additionally, users can create custom presets by scrolling all the way to the bottom then tapping “Customize Presets”.
When tapping this button the “Custom Presets” page will appear. Here you can see you’re saved presets or you can create you’re own preset.
All Tags
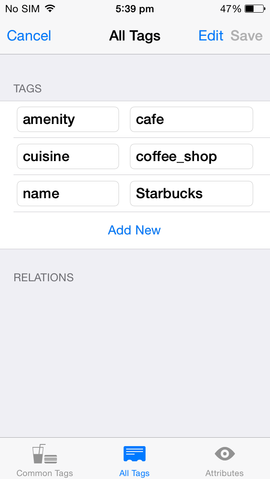
The second tab screen allows advanced users to add arbitrary tags and values:
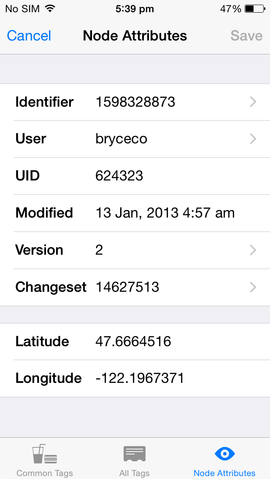
Attributes
The third tab screen shows metadata about the object: who created it and when, and additional low-level details. From this screen you can also drill down to information stored on the OSM server about the user, change set, object history, and object details:
- Identifier → Object page
- Used for identifying the element.
- User → User page
- Displays username who last modified the element.
- UID
- The numeric identifier of the user who last modified the object.
- Modified
- Last time the element has been modified.
- Version → Object history page
- The edit version of the element.
- Changeset → Changeset page
- The changeset number in which the object was created or updated.
——
- Lat/Lon → Copy/Paste into keyboard.
- The position of a node.
- Area
- Displays amount of area the element covers. (Closed ways/Areas only.)
——
- Elements in a way
- Displays the nodes that make up a way. (Open ways, closed ways, and areas only.)
Copy/Paste
The copy/paste function allows users to easily move tags around to other elements. Note: Copied items are saved in the system wide keyboard.
Copy
To copy simply press on “More” then press “Copy”.
Paste
To paste simply press on “Paste”
Next, there will be two options to choose: “Replace Tags” and “Merge Tags”
- Replace Tag(s)
- Will completely replace tags to the element you’re pasting on.
- Merging tag(s)
- Copied tags will be merged into the element you’re pasting on. (Table example below.)
| Copied Tags | Removed? | Element being pasted into | Result |
|---|---|---|---|
| addr:city=Toronto | addr:city=Gunna | ||
| addr:housenumber=123 | addr:housenumber=123 | ||
| addr:state=YU | addr:state=YU | ||
| addr:street=Never Road | addr:street=Never Road | ||
| air_conditioning=yes | air_conditioning=yes | ||
| amenity=cafe | amenity=cafe | amenity=cafe | |
| brand=starbucks | brand=Starbucks | ||
| brand:wikidata=Q37158 | brand:wikidata=Q37158 | ||
| cuisine=cofee_shop | cuisine=coffee_shop | ||
| drive_through=yes | drive_through=yes | ||
| name=Starbucks | Yes | name=Donkey Cafe | name=Starbucks |
| official_name=Starbucks Coffee | official_name=Starbucks Coffee | ||
| outdoor_seating=yes | outdoor_seating=yes | ||
| ref=1 | Yes | ref=4 | ref=1 |
Delete
Deletes nodes, nodes in ways, whole ways, and multi polygon relations. GoMap!! is unable to delete elements that have other types of relations due to no support for editing them. (A popup will appear to stop users from editing relations that is not a multi polygon.)
More…
This button allows you to do more things with elements and this things depends on the type of element you chose.
- Copy Tags
- Copies tag(s) in-app. See Copy/Paste
- Duplicate
- Duplicates elements and its tags.
- Disconnect
- Unattaches a node in a way that is connected to an another node in a way.
- Join
- Joins two separate ways into one whole way. (Only when they both have the same tags.)
- Reverse
- Reverses the direction a way is facing. (Indicated by the arrows on the way.)
- Rotate
- Rotates a node in a way and areas.
- A node in a way: The rotation is centered on the selected the node. (Selectef node won't rotate.)
- A area: The rotation is centered in the middle of the area. (Whole area rotates.)
- Rotates a node in a way and areas.
- Straighten
- Attempts to straighten ways by removing unneeded nodes in the way.
- Make rectangular
- Attempts to make an area square. (Attempts to make right angles.)
- Make circular
- Makes an area circular.
- Create Relation
- Creates a multipolygon type relation with the selected area. See Multipolgon Relations
- Turn restriction
- Creates a turn restriction relation at the beginning and end of a way. (See
| Copy Tags | |||||
|---|---|---|---|---|---|
| Duplicate | |||||
| Disconnect | |||||
| Join | |||||
| Split | |||||
| Reverse | |||||
| Straighten | |||||
| Rotate | |||||
| Make rectangular | |||||
| Make Circular | |||||
| Create Relation | |||||
| Turn Restriction |
