|

Knooppuntnet Planner is a planner application for node networks. It supports bicycle, walking, horse, in_line skating, canoe and motorboat networks.
This planner uses OpenStreetMap to let you create your own routes along recreational node networks. It includes node networks for cycling, walking, horse riding, boating, canoeing, and inline skating. It covers node networks in Belgium, The Netherlands, Germany, France and Austria. As node networks expand, modes of transport and geographic coverage will grow accordingly.
Knooppuntnet planner is an end user application of OpenStreetMap data. Anyone can make contributions to OpenStreetMap. That’s why it is the most detailed map on the planet. If you want to learn more about this project, please use the links in the Credits and Useful Links sections.
Get Started
The Knooppuntnet Planner is reached from the Knooppuntnet home page by clicking or tapping the map icon

Select the icon for the Planner type you want, to open the planner map:


- cycling
- walking
- horse
- motorboat
- canoe
- inline skating
The planner map for the chosen type is displayed. This might be a good moment to create a bookmark or add this page to your favorites!
The map shows the nodes and node routes of the chosen network type. You can always switch to a different type from the map display.
What do you see?

Top bar above the map
- In the middle, buttons useful when editing routes, and the Output button for result output.
- The buttons are only active when they can be used
- On the right hand side, icons to switch between map/planner types.
- The bar has a different colour for each transport type, e.g. light green for the bicycle node planner.
- Note that changing the planner type will preserve the results so far, and you can continue each route type when you return there.
- Note that if you leave the site (open a different site, close the tab, hit F5 or close the browser), results are lost.
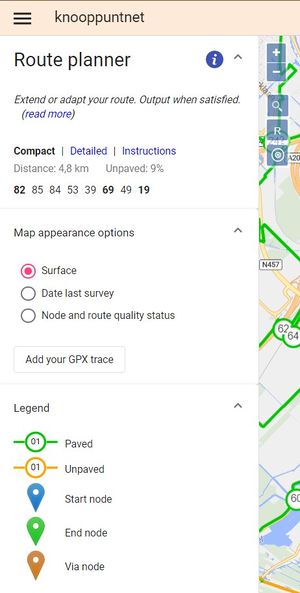 Knooppuntnet Planner Sidebar Information bar on the left
From top to bottom:
- The sidebar can be hidden/unhidden using the three line icon.
- At which stage your planned route is, and what to do next.
- The result display options: Compact, Detail, Instructions. Compact is the default.
- The result display. Compact is just the chain of node numbers; Detail gives node numbers and distance between nodes; Instructions gives the nodes and full navigation instructions.
- Map appearance options (collapsable): These are network display options: Surface, Last survey date, Quality. Surface is the default. It shows paved sections in green, unpaved sections in orange. See Advanced options for the other two options.
- Button to load a gpx trace. The display of the trace can be toggled from the layers menu
- Legend (collapsable): Explains line, node and pin colours according to the Map option above.
Map area
- Upper left you see the zoom buttons (+ and -), search button (the looking glass), the Centre Route button (R) and zoom to current location button (the target).
- Upper right you see the full screen toggle and the Layers button for optional display layers.
- Lower left is a scale (distance) indicator
- Lower right is the copyright attribution statement.
 Knooppuntnet Planner Map Layers
Map
- The map is the OpenStreetMap (OSM) with the chosen node network type on top.
- The node networks are as currently available in OSM. The networks are still being built and then added as they appear on the streets. The cycling networks in The Netherlands and Belgium-Flanders are complete.
- If the numbers are not shown, zoom in for more detail.
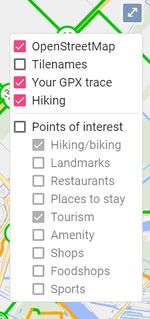
Optional display layers:
With the Layers button in the upper left corner of the map you can toggle the display of basic layers and POI's (Points Of Interest)
- OpenStreetMap layer is the base map layer
- Tile names layer is an advanced option, not useful for planning routes
- <Network type> layer, e.g. "Inline Skates", is the network layer for the active planner type.
- Your GPX trace layer toggles the display of your gpx-trace if you have one loaded.
- Points Of Interest layer can be toggled on or off. When on, you can toggle categories of POI's as you wish.
You can toggle map layers at any time. It will not affect your route, but it might affect your plan!
Plan your route
The basic routine is easy.
- Find your target area to start
- Put start node
- Put end node
- Edit route
- Export route
Find target area
Pan: Click or tap and hold/slide to drag the map around. Make sure to do this on a clear section of the map without nodes or route lines.
Zoom: Mouse wheel up/down, use two-finger motions pinch/spread, or use the + and - icons on the map.
Move here: Click or tap the Target icon to move and zoom to the current location. The first time you do this the browser will ask your permission to use the location.
Search: Use the Looking glass icon to start a search by name.
Route display: Click or tap the R icon to zoom and pan to display the entire route
You can use these actions at any time when creating or editing your route. They will not affect your route, but your route may disappear from view until you hit the R icon.
Start node

Click or tap the node you want to start your trip with. The blue start pin appears.
Click or tap and hold to slide the pin to another node if you want. You can also use Undo (on the top bar) to undo the last step or Restart to start again.
End node

Click or tap the node you want to end your trip (or the the first part of it) with. The green end pin appears, and the shortest node route between the start and end pins is displayed. On the sidebar, the list of nodes along your route is displayed with the total distance and the percentage unpaved.
Click or tap and hold to slide the pin to another node if you want. The route display will adapt. You can also use Undo (on the top bar) to undo the last step or Restart to start again.
If you are happy with the result, you can skip the next step and proceed to Export Route.
Edit route
Edit your route as described below. The route display, the node list, the total distance and percentage unpaved will adapt after every action.
If you are happy with the route as shown on the screen, you can move on to "Export route".
Export your route

Click Export to get the output menu. It provides options for
- ready-to-print pdf-output in Compact, Node strip and Navigation instructions layout
- download your route as a gpx-file
- copy a link to the route to the clipboard. The link will open the application with your route in it
- a QR code containing the link to your route. Scan the QR code to open your route in the browser of a mobile device
Advanced options
The planner offers a number of advanced options. These are designed to help OSM mappers maintain the OSM representation of the node networks. They tie the Knooppuntnet Planner to the Knooppuntnet Analysis application, and can actually redirect you to it.
Feel free to explore! The Advanced options are just listed here; if you want to know more, please check the Knooppuntnet Analysis manual.
Advanced Options
| Type
|
Action
|
Result
|
Comment
|
| Sidebar-Network display
|
Toggle Most recent Survey date
|
Colours show period unsurveyed
|
Survey systems are not yet in place
|
| Sidebar-Network display
|
Toggle Node and Route Quality
|
Green: OK; Red: Problems detected.
|
Red is not routable. Use Ctrl-Click on the element to explore
|
| Map: POI Detail pop-up
|
Click the Osm link below
|
Osm shows the POI on OpenStreetMap in a new browser tab..
|
OSM mappers can proceed to edit the object.
|
| Map: POI Detail pop-up
|
Click the Edit link below
|
If the JOSM-editor is active with Remote Control on, the object is loaded into JOSM
|
OSM mappers can proceed to edit the object.
|
| Map: Nodes
|
Ctrl-Click on the node
|
Details pop-up is displayed.
|
The link below opens the node in Knooppuntnet Analysis
|
| Map: Network sections
|
Ctrl-Click on the network section
|
Details pop-up is displayed.
|
The link below opens the route in Knooppuntnet Analysis
|
| Map: Nodes & Sections Detail panel
|
Click a node, network or route link
|
The network or route is displayed in Knooppuntnet Analysis
|
From Knooppuntnet Analysis, Osm node network integrity can be checked and maintained in full detail.
|
|


