OSM CSV Appender
| OSM CSV Appender | ||||||||||||||||||||||||||||||||||||||||||||||||||||||||||||||||||||||||||||||||||||||||||||||
|---|---|---|---|---|---|---|---|---|---|---|---|---|---|---|---|---|---|---|---|---|---|---|---|---|---|---|---|---|---|---|---|---|---|---|---|---|---|---|---|---|---|---|---|---|---|---|---|---|---|---|---|---|---|---|---|---|---|---|---|---|---|---|---|---|---|---|---|---|---|---|---|---|---|---|---|---|---|---|---|---|---|---|---|---|---|---|---|---|---|---|---|---|---|---|
| Author: | User santamariense | |||||||||||||||||||||||||||||||||||||||||||||||||||||||||||||||||||||||||||||||||||||||||||||
| License: | GNU GPL | |||||||||||||||||||||||||||||||||||||||||||||||||||||||||||||||||||||||||||||||||||||||||||||
| Platform: | Linux | |||||||||||||||||||||||||||||||||||||||||||||||||||||||||||||||||||||||||||||||||||||||||||||
| Version: | 1.0 (2019-07-01) | |||||||||||||||||||||||||||||||||||||||||||||||||||||||||||||||||||||||||||||||||||||||||||||
| Languages: | English and Portuguese
| |||||||||||||||||||||||||||||||||||||||||||||||||||||||||||||||||||||||||||||||||||||||||||||
| Website: | https://github.com/santamariense/osmcsvappender | |||||||||||||||||||||||||||||||||||||||||||||||||||||||||||||||||||||||||||||||||||||||||||||
| Programming language: | Python | |||||||||||||||||||||||||||||||||||||||||||||||||||||||||||||||||||||||||||||||||||||||||||||
|
Join CSV data into OSM file | ||||||||||||||||||||||||||||||||||||||||||||||||||||||||||||||||||||||||||||||||||||||||||||||
| ||||||||||||||||||||||||||||||||||||||||||||||||||||||||||||||||||||||||||||||||||||||||||||||
OSM CSV Appender is a tool used to join CSV table of data to objects on OSM by a common tag or object id. It is available for now only to Linux operating system. The code is available on GitHub.
System requirements
What you need to run OSM CSV Appender:
- Linux operating system
- Python 2.7
- Python modules to import: sys, os, ast, unicode_literals, PyQt5, datetime, xml.dom.minidom, copyfile
Download
This is available for downloading on:
No installation is needed. Just download and run it. More details ahead.
How to use
OSM CSV Appender is supposed to work with JOSM and another programs to handle data from CSV files as LibreOffice Calc and Qgis.
Preparing files
- OSM File
There is limitation about the size of OSM File, for this reason it is important to download as exclusive as possible only what you need. Use overpass to filter data to be downloaded. Consider to download relations without their member to get a light *.osm file. The limitation occurs because the file is stored into RAM memory.
- CSV File
You can select the fields to be imported using the application, but it is quite better if you already delete fields that you will not use on appending process. You must keep the column with the field that will be used to join CSV data to OSM file as well as the fields you want to import to OSM file. Make sure all fields to be imported already have OSM tags formats. If you want to join the files by OSM object geometry id, osmfullid is a reserved key to be used as field name in CSV file. Examples of valid osmfullid are n8564534, w3267065211, r11154545...
Using the application
It is possible to run the application exclusively on the terminal linux, or graphic interface if you prefer.
To run the application, use the terminal/bash:
python osmcsvappender.pyc
OSM CSV Appender runs on python 2.7 version, once you have more than one version installed, maybe you should use:
python2.7 osmcsvappender.pyc
If you want to run in one-line-command directly on terminal use:
python osmcsvappender.pyc --cmdln (variables)
Example of a simple case with solution using --cmdln command:
- To update the population and source:population tags of all places nodes, joining CSV to OSM by a fictional id tag called QSYU:NKMHGID (which has osm geometry identifier like n1234567)... Solution:
python osmcsvappender.pyc --cmdln "/home/myfolder/places.osm" "/home/myfolder/poptable.csv" "/home/myfolder/" ";" "none" "[['place','*']]" "['node']" "['population','source:population']" "QSYU:NKMHGID" "True"
Or, if you prefer, it is also possible to run with an interface on terminal using --tint:
python osmcsvappender.pyc --tint
Do you need some help?
python osmcsvappender.pyc --help
The current version can be get by
python osmcsvappender.pyc --version
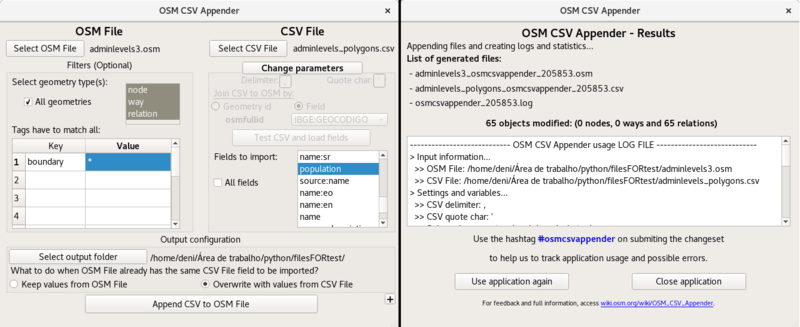
Detailed step-to-step use of the graphical interface

- Select OSM file
- Optionally you can filter the objects that will be able to get appended data to them
- You can choose geometries types
- And their tags as well
- Select CSV file
- Delimiter and quote char will automatically detect their values. You can change them if they are wrong.
- Join CSV to OSM by - you have to select one.
- Now, Test CSV and load files. If something has gone wrong with your CSV file, you will get notified.
- Fields to import - Select all one you need
- Output configuration
- Select the folder where generated files will be saved.
- Select "overwrite" or "keep values" depending on what result you want to get
- Press the "Append" button to append the selected CSV fields to the selected OSM geometries and tags.
- This can take a while. Just wait. If your system has no enough memory for your OSM file, the appending will die.
- If all will have gone well, you will hit the result page. It contains the generated file, and the log file as well.
Assessing results
To get a full assessment, analyze the generated CSV files. Verify how many times a field was imported to OSM objects. Have the control of the situation. Verify also if the number of modified objects was exactly what OSM CSV Appender has counted - for that, open the OSM file with a text editor and find for the word modify.
Back to JOSM it is time to assess the appending results. Open the OSM file and verify what is really modified. Feedback possible errors on github.
Grab some objects as sample that is supposed to be modified and verify if you got the results you wanted.
At submitting changeset box, you can see all objects that will be changed on osm.org.
You can use the "find option" on JOSM to help you about the assessing. For example, if what you wanted was to modify only amenity=university and something more was modified, consider to run OSM CSV Appender again with more specific options. In this example, you could search by modified -amenity=university.
Submitting the changeset
Use the hashtag #osmcsvappender on submitting the changeset to help us to track application usage and possible errors.
If you get some errors, feedback us on github.
Issues
There is limitation about the OSM file size. A different method of appending will be used in further version as a way to get around this situation.
