Proposal:Placement
| Placement of the OSM-way | |
|---|---|
| Proposal status: | Draft (under way) |
| Proposed by: | imagic |
| Tagging: | placement=*
|
| Applies to: | |
| Definition: | The key placement can be used to specify the placement of the OSM-way relative to the road it represents. |
| Statistics: |
|
| Draft started: | 2012-12-14 |
The key placement=* can be used to specify the placement of the OSM-way relative to the road it represents.
Overview
As this proposal contains a lot of examples for mappers as well as consumers at the first glimpse it might look more complicated than it is . This section presents a short overview of the most important points.
- What is this proposal about?
- This proposal suggests one additional key placement together with a few values.
- What should this key be used for?
- Whenever the OSM-way is not drawn in the middle of a road the key placement can be used to specify this.
- Why do we need this?
- Any consumer which wants to render/display the road at a very high zoom level (e.g. a navigational device) needs to known about the position of the OSM-way relative to the road it represents. If the consumers assumes that the OSM-way is in the middle of the road when in fact it is not the display would be incorrect.
- Why not simply draw the OSM-way always in the middle of the road?
- Because it is not possible in every situation, especially if roads join/fork or the number of lanes changes. Imagine two roads which join: how would you draw the OSM-way around the point where the roads join?
Note: Especially as a lot of different mapping styles exist the placement of the OSM-way is not defined. This proposal does not en- or discourage any mapping style it just presents a possibility to add the information about the placement of the OSM-way. All examples presented use some mapping style - other variants are possible.
As a picture is worth a thousand words here is a screenshot of JOSM with activated Lane and Road Attributes style:

placement=transition is mapped at a near-90° angle. Such extreme angles should be avoided. Further down in this proposal you can find better mapping examples. (This text was not in the original proposal but added later.)Rationale
Currently data consumers - mostly renderers (see note below) - assume that the OSM-way of a road is in the middle of that road. This often is not true when a road forks or another road joins and therefore the lane count changes. The key placement=* can be put on that part of a OSM-way that is not in the middle of the road. Together with information about the width of the road and if we assume that consumers know how the lanes of the given OSM-way are connected to the lanes of the adjacent OSM-ways (see note below) they now have enough information to determine the outline of the road and the position/course of the lanes and can present a realistic representation of the road to the user.
In the following examples we will assume that the consumer has some information about the width of the road, maybe guessed on the information from lanes=*, or directly from width=*, or by explicitly mapping it with area:highway=*. The exact method of determining the width is irrelevant for the proposed tagging.
Legend:
- Green line/dots: the OSM way(s) and its nodes.
- Grey area: the assumed area of the road. The proposal is about the correct shape of this.
- Red arrows: the outline of the road is assumed by the renderer to be half of the (determined) road width away from the middle, as given by the OSM-way.
- Orange separation: where the OSM way is split.
- Red dots: known to be precise points of the outline of the road.
- Red line: connection between the precise outline points.
- Blue arrows: known/assumed lane connectivity
Note on renderers: When speaking of renderers keep in mind that each navigational device is also a renderer, and - especially if a lane assist is provided - one with very high zoom levels, i.e. the geometry of the road is very visible and therefore important.
Note on lane connectivity: This proposal does not present any way to provide information about lane connectivity. It is assumed that this problem is solved somehow. In many situations tagging with turn:lanes=* is sufficient to get (at least) a good estimate of lane connectivity.
Current status: lane count decreases
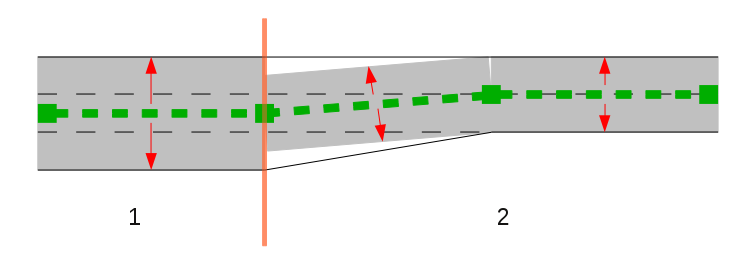
In section 1 the OSM-way is tagged with lanes=3 and in section 2 with lanes=2 (the first part of section 2 could also have lanes=3 with placement=transition and width:lanes:end=||0). The consumer determines the width of the road based on the key lanes=*, and places the outline of the road exactly half of this width away from the middle which is (by mistake assumed to be) given by the OSM-way.
Current status: motorway exit
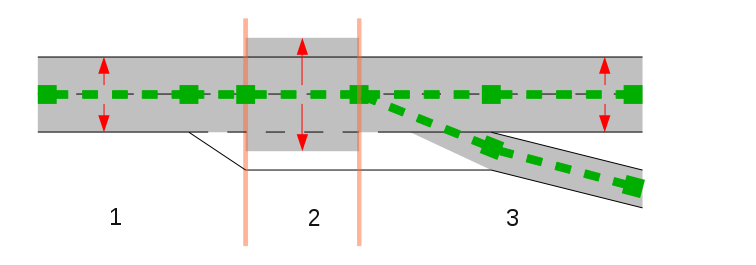
This example shows how sometimes motorway exits are mapped. Section 1 is tagged with lanes=2, section 2 with lanes=3, the upper way in section 3 again with lanes=2 and the way beneath with lanes=1. The consumer assumes that the OSM way is in the middle of the road - which it isn't - and accordingly estimates a wrong outline.
Tagging
The following values are possible for the key placement=*.
| Value | Description | Example |
|---|---|---|
| transition | The OSM-way is does not run parallel to all lanes in the middle of the whole road. This value should be avoided whenever possible and is usually only necessary if the road forks or joins with another one. | placement=transition
|
| middle_of:<number of lane> | The OSM-way runs parallel to the lanes of the road and is drawn in the middle of lane number <number of lane>. See below for an explanation of lane numbering. | placement=middle_of:1
|
| right_of:<number of lane> | The OSM-way runs parallel to the lanes of the road and is drawn at the right side of lane number <number of lane>. See below for an explanation of lane numbering. | placement=right_of:1
|
| left_of:<number of lane> | The OSM-way runs parallel to the lanes of the road and is drawn at the left side of lane number <number of lane>. See below for an explanation of lane numbering. | placement=left_of:2
|
To determine the <number of lane> the road is viewed in the direction of the OSM-way and the lanes are numbered from left to right with the leftmost lane equal to lane number 1. For road with two driving directions always use the suffix :forward respective :backward, view the road in that direction and also only consider the lanes of that direction.
Sometimes the placement of an OSM-way changes gradually from the start to its end. Instead of the value transition, one can use the suffixes :start and :end to provide information about the placement at the start resp. end of the OSM.way. This is usually not necessary if such information can be retrieved from the previous resp. following OSM way.
Exemplary tags: one-way road
We assume that the OSM-way runs from left to right. We also assume that cars are driving on the right side of the road.
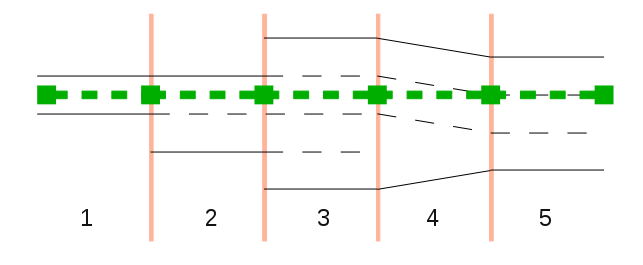 |
Exemplary tags: two-way road
We assume that the OSM-way runs from left to right. We also assume that cars are driving on the right side of the road.
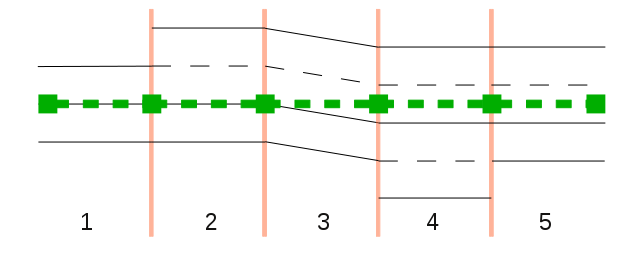
|
Examples
Examples for mappers
TODO: Examples based on aerial images. Maybe just one situation and different mapping styles, to prevent that some people think that this proposal suggest any specific mapping style.
Motorway exit
|
A: No placement tag necessary. |
 |
This example shows a common motorway exit. The part of the main motorway where the number of lanes increases from 3 to 4 (part B in the image) is tagged with placement=transition because the OSM-way is not drawn parallel to the road. In some cases this part is rather short and therefore it might not always be necessary to map this.
The OSM-way in part E describes the beginning of the slip road. As it is not drawn in the middle of the road (and in fact it can not) it is also tagged with placement=transition.
The part of the motorway where the deceleration lane is present is tagged with placement=middle_of:2 because the OSM-way is drawn in the middle of the second lane.
If one tries to draw the OSM-way as often as possible in the middle of the road it will result in the following:
|
A: No placement tag necessary. |
 |
Now the part of the motorway where the deceleration lane is present doesn't need any placement tagging but one additional transition way is necessary (part D). For consumers supporting the placement key this will lead to identical results as the previous example, but for consumers which do not support the placement key it will lead to poorer results.
Note: In the above example it would be sufficient to use placement=transition in part B and D, because a data consumer is able to determine the correct values at start and end on its own.
Examples for data consumers
In the following examples we show how a consumer can estimate the outline of a road correctly. Although we concentrate on how to determine the outline of a road the same procedures are valid to determine the course of the lanes.
Simple transition from three to two lanes
|
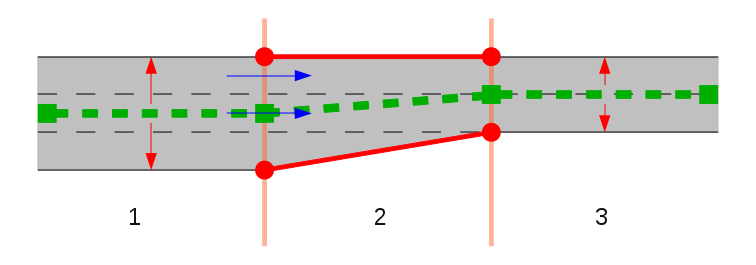 |
In section 1 the OSM way is tagged with lanes=3 and in section 2 and 3 with lanes=2 or lanes=3 if width:lanes:end=||0. Additionally the way in section 2 is tagged with placement=transition.
In section 1 and 3 the consumer places the outline of the road exactly half of the roads width away from the middle which is given by the OSM-way. The tag placement=transition tells the consumer that this approach is not possible in section 2. To determine the outline in section 2 the consumer does the following:
- Determine the edges of the outline of section 1 and 3 (depicted as red dots in the image)
- As there are no additional nodes in section 2 besides the ending nodes (as in the example) simply connect the red dots to obtain the outline. Note: If one assumes that the lane count is increased/decreased exactly as specified in the article of the key
lanes=*and the the connecting node of the OSM-ways where the lane count changes is always in the middle of the road as well as the second node of OSM-way where the lane count has changed, it would be possible to guess the outline correct. But as soon as there are additional nodes in between this approach would fail.
Transition within a curve with additional nodes on the transition way
|
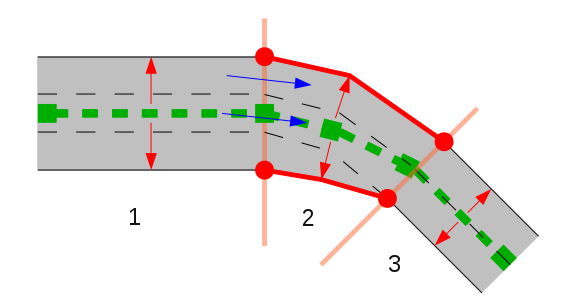 |
In this more complex example section 2 contains additional nodes.
TODO
Motorway exit
The following two examples show two possible variants of a motorway exit - others are possible. The placement of the nodes nor the ways is not part of this proposal. Just use the right placement value for your tagging style.
|
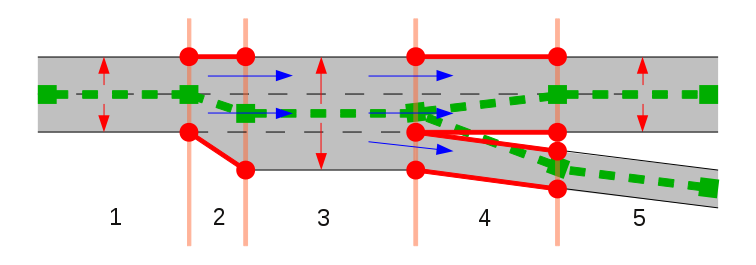 |
Again a motorway exit as in the example in the section Rationale, but the OSM-way is drawn in the middle of the road whenever possible, and where it was not possible (as in section 2 and 4) the tag placement=transition is added. The consumer is now able to reproduce the outline of the road correctly, but the OSM-way looks somehow unnatural.
|
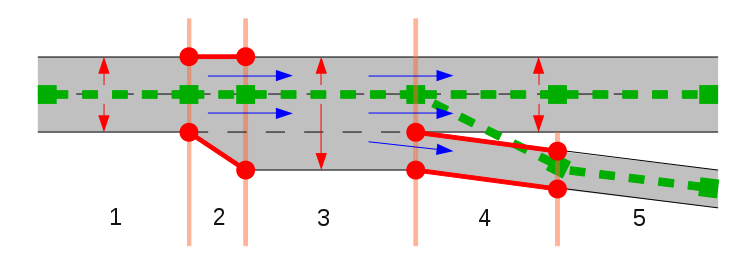 |
Drawing the OSM-way of the motorway in a straight line might be more intuitive to the mapper. This is also possible as can be seen in the example above: the OSM-way of the motorway is now drawn in the middle of the main lanes and in section 3 the OSM-way is tagged with placement=right_of:1 to indicate to the consumer that the OSM-way is at the right end of lane 1. In section 2 the OSM-way has to be tagged with placement=transition if the beginning of the exit lane is important for the consumer (in many situations this might be irrelevant). In section 4 only the exit lane has to be tagged with placement=transition. The OSM-way of the motorway does not have to be split between section 4 and 5 and no special tagging has to be applied.
TODO: Example for a two-way road
...
TODO: Example that shows how to estimate the course of the lanes
TODO: Maybe the same example twice, once based on the lanes tag and alternatively using area:highway. Also one example with an incorrect placement=right_of:-tag.
Common questions
Oh no! Another reason to split a way!
The (most obvious) alternatives are to draw either a separate way on top of the already existing way with only placement=transition or to use a relation with the involved nodes or ways as members. The separate way would make editing more cumbersome and the relation is harder to create and maintain and more fragile.
No need for this - simply use area:highway!
Why not simply map the outline of the road with the proposed area:highway=*? It is true that explicit mapping would provide us with a very precise outline of the road. But not of the lanes, unless they are also mapped separately which is very unlikely to happen on a wider scale. Also neither the transition between different lane counts nor from an area where the roads are mapped without area:highway to another area where the roads are mapped with area:highway is defined. If used together with the key placement at least the first problem is solved and the consumer gets very detailed information of the outline of the road which it can use together with the information about lanes (including the key placement) to estimate the position of the lanes.
The approach using the key placement neatly fits into current tagging practice and also provides additional, needed information if the outline of the road is mapped with area:highway.
Editor support
JOSM
The style Lane and Road Attributes visualizes, amongst others, a variety of lane-dependent tags directly while editing, and also detects some common tagging mistakes like e.g. inconsistent number of lane-dependent values. The image below shows a road tagged with the keys turn:lanes=*, width:lanes=* and placement=*.

Current usage
Related keys
lanes=*to specify the number of laneswidth=*to explicitly specify the width of a part of a roadarea:highway=*to explicitly specify the outline of a roadturn=*to specify the indicated turning lanes
See also
Comments
Please use the Discussion page for this.