Rendering OSM data with OSM2World and Blender
(Redirected from 3D animation)
This page is about generating animations of small city models, using just OSM data. Here we are leaving the GIS world and enter the 3D modelling arena to get something really cool out of geodata :)
Preparations
- Enrich desired area with 3D tagging and micromapping in general
- Download OSM2World (SVN recommend!) and practise using small OSM areas. Therefore, loading small parts (less than a district recommend) using JOSM and reopen the .OSM file with O2W
- Install Blender3D and learn basic editing
- Install kdenlive and try to open some tutorials
Export
- Use JOSM editor to download a certain area.
- Store this dump as .OSM file
- Open it with OSM2World again and wait for processing finished
- Check if your area looks as desired and if it will fit.
- Export to multi .OBJ file
Post Editing
- Fire up Blender3D, clean the scene and import the .OBJ files step by step.
- Add 3 sun light sources that have each different angles. One as main source and the rest to soften shadows (so less intensity)
- Add a new camera and make it pointing to somewhere
- Render and check from various perspectives, if the geometries are still looking ok.
- Some areas might overlay with some ways and cause clipping artifacts. Thus you might push the ways a bit up (z-axis) to solve the problems
Animation
- Make a plan, what you want to show your audience. Which places/objects, in which order and how long the clip should take
- Create a path for your camera and follow this tutorial
Rendering
- Do some simple renderings (low resolution, no raytracing, no AA) for finetuning the animation
- Do the final rendering. You might create single frames as images, or some MP4 stuff
Post processing
- Start kdenlive and add the blender animation
- Create title clips, that contain the photos of the desired areas
- Add all components from the media gallery and arrange them on the timeline channels. Switch the compositing to "composite" for the title clips and add fading effects to each start and end.
- Add music, e.g. from Jamendo
- Do final Render
Case study Rostock
For Geoforum MV 2013 we micromapped a suburb of Rostock and created an 3D print from an certain area (university campus within the Südstadt district). Thus we used the processes, described above.
-
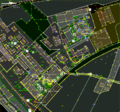 JOSM raw data

See full animation
See also
- Geoforum MV 2013
- Party render
- http://www.youtube.com/watch?v=9J5Q1RUGZCU - another Videotutorial on that topic
- Manhattan 3D city rendering] using Blender, too