Austin, TX/Buildings Import/Software Setup
This is a guide that walks you through all the free software you need to install to prep for importing data into OSM.
Video Overview
![]() The NYC buildings folks made nice video demonstrations and their process is very similar to ours. These will be good supplementary reference materials.
The NYC buildings folks made nice video demonstrations and their process is very similar to ours. These will be good supplementary reference materials.
Throughout this guide, links to the corresponding videos will be given in these boxes (or by clicking the red play button). The whole series of short videos is available from this youtube playlist.
1) Create Special OSM Import Username
![]() You can watch/listen to a demo of this step from the NYC buildings folks: click here for youtube video.
You can watch/listen to a demo of this step from the NYC buildings folks: click here for youtube video.
Your account: <username>_atxbuildings
According to OSM's Import guidelines, bulk data imports like this should be done from special usernames. This is important so that the OSM community can easily identify what data is coming from imports and what is created by normal users.
- Go to the sign up page: https://www.openstreetmap.org/user/new
- Please create a new username for the data import, not your normal account. We're using the format <username>_atxbuildings where username is your normal OSM username.
- The password does not need to be super secure. You probably should not use one that you also use for important things.
- A confirmation email will be sent, and you'll need to click on the link it sends to confirm the new account.
(If you don't have a normal OSM username, that's fine, but go ahead and create a user that ends in <username>_atxbuildings for the building import)
Note: if you already have an OSM account registered with one email address, it will not allow you to register a second account on the same email address. If you have another email account, you could use that. Or, many email services (including gmail) allow you to append any text to your username after a plus sign (+) and it will still go to your account. For example, you could use myname+osm@gmail.com for a second account.
Also, please add your username to the participants list Austin,_TX/Buildings_Import so we can keep track of accounts used for the import (and also so we can thank you!)
2) Install JOSM
- Go to the JOSM website at http://josm.openstreetmap.de/
- Windows users: you will want the Windows installer (look for the first of three grey boxes)
- Mac users: you will want the Mac OS package (link is found right below the windows installer)
- Linux users: download josm-testing.jar and run from the terminal with:
java -Xmx1024m -jar josm-testing.jar - You may be able to install the josm package from the Debian or Ubuntu package manager, but it will likely be an out of date version. JOSM maintains an up-to-date repository though, see notes on the download page.
Java dependency
Java runtime version 7 is required to run JOSM. If you are able to run JOSM after downloading, then you're fine and can ignore this section. If not, see notes below.
Mac OS shipped with Java 6 through version 10.6 (Snow Leopard). That will not work for JOSM unfortunately. You will need to download Java 7 manually.
Java 7 requires an Intel-based Mac running Mac OS X version 10.7.3 or above. See Oracle's Mac java installation instructions.
If you're really stuck on Java 6 (for example, if you have an older Mac), you can run an older version of josm. See details on the System Requirements page.
3) Add import username credentials to JOSM

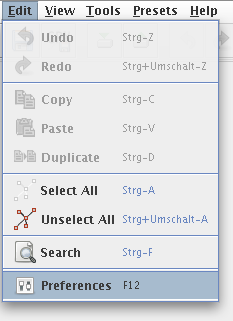
- Edit -> Preferences
- click the globe for connection settings:

- choose the Use OAuth radio button at the top of the dialog
- click the New Access Token button
- Add the OSM username/password you just created and click Accept Access Token
- Click OK at the bottom of the preferences window.

4) Set up JOSM remote control

![]() You can watch/listen to a demo of this step from the NYC buildings folks: click here for youtube video.
You can watch/listen to a demo of this step from the NYC buildings folks: click here for youtube video.
(Note on the video: the utils2 plugin isn't strictly needed for us, but the conflation plugin is so be sure to install that. The notes plugin may also be useful.)
- From the top menubar choose Edit -> Preferences
- click remote control icon on left which looks like this:

- check Enable remote control
- check Download objects to a new layer
- click OK
Now JOSM is set up properly (when you click on links in the task manager, the data will automatically open in JOSM). You will need to restart JOSM for this to take effect.
5) Start Importing!
Head back to our Contributor Guide to get started on your own or at one of our volunteer events. Grab a task just to see how it will work