Howto render Garmin contour layers with no artefacts
Background
Step 1: Srtm2Osm: Getting the data into OSM format
The first step is to generate contour lines using Srtm2Osm, which writes contours as OSM ways into an OSM file. The tool supports only rectangular areas, so any other shape requires cutting (and this is where most artefacts turn up).
For more details, see Srtm2Osm.
Note: Srtm2Osm uses Shuttle Radar Topography Mission's data, which contains quite a lot of voids (usally steep slopes). Jonathan de Ferranti of viewfinderpanoramas.org has corrected a lot of them - copy his tiles to /srtm/SrtmCache beforehand, so Srtm2Osm will not download the faulty ones.
As a result you'll get an (usally huge) OSM file containing only ways, some of them very, very long (they're the critical ones). If the desired area is too large to be handled by Srtm2Osm in one run, you can render several tiles (they need a bit of overlap, 0.04° seem to work well). Later on, mkgmap can be used to patch them together again.
Step 2: SRTM2OSMsegmenter: Splitting the long ways
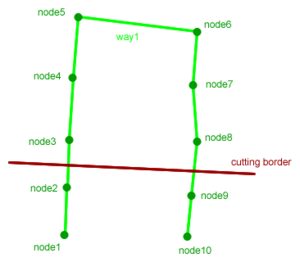
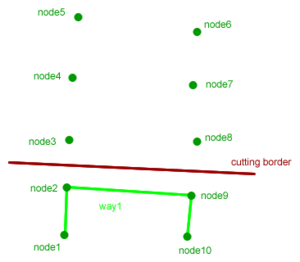
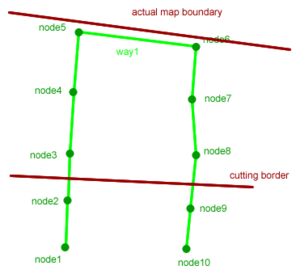
Without SRTM2OSMsegmenter the long ways of Srtm2Osm's output leave only 2 not satisfying options to cut the data into a shape:
- long ways will be cut at the border: produces loads of artefacts along the border, the shape stays intact
- long ways will be left in completely: no artefacts, but the shape will have to be extended to accomodate the ways (which in large input files may be a couple of 100 km)
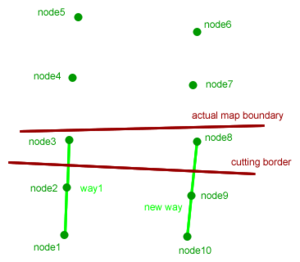
SRTM2OSMsegmenter will solve that by splitting long ways into consecutive shorter ones. There's a lot of limitations to that tool (make sure to read and understand them), but it works well for pure Srtm2Osm generated contour data. 250 nodes seems to be a good value for the length of the new ways - it will move the map boundaries by some 5-7km at most.
For usage details, see SRTM2OSMsegmenter.
Step 3: osmconvert: Cutting the shape
Osmconvert will cut the the data to a custom shape. Make sure to use the --complete-ways option. Because of SRTM2OSMsegmenter, all ways are short now, so the shape will not have to be extended more than a couple of km to acommodate them.
Note: files larger than 2 GB will have to be cut under Linux until zlib for Windows can handle large files.
Download and Usage in Details see Osmconvert.
Osmosis may be used for cutting as well, but the completeWays options seems not to work for a lot of people.
Step 4: mkgmap splitter: Splitting the data
The splitter will split the data into smaller tiles that can be handled by Garmin devices. Use the --mixed option to split contour data. If step 1 produced several tiles, the splitter has to make several runs - use the --mapid option to get consecutive file names from all the runs and use a text editor to combine the template.args files. Doing that you can run all tiles together through mkgmap in the next step and compile them into one map.
Download and Usage in Details see www.mkgmap.org.
Step 5: mkgmap: Rendering the data
Straightforward now: use the tiles and the combined template.args to render the mapset.
Download and Usage in Details see Mkgmap.
Step 6: Polishing up
There may be a handful of artefacts left in the result. You can delete them manually:
- open and edit the .img files in MapEdit++
- save to Polish format
- recompile with mkgmap (which will accept Polish format as input)
If you have any questions or problems, don't hesitate to contact me.


