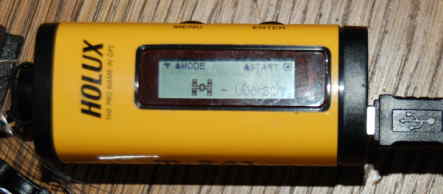
JA:Holux M-241

概要
M-241をOpenStreetMapで使うために最初に行う事は、少なくともファームウェアをバージョン1.11にすることです。さらなる詳細は以下のファームウェアセクションで説明しています。
ユニットは、ログ採取を自動的に開始するか、スタートボタンを押して開始するかのどちらも選べます。ログ採取が始まると、画面の左端に、走っている人のアイコンが表示されます。
ログ採取中に、ウェイポイントを収集するには、緯度経度を表示する画面を出しておく必要があります。Enterボタンを押すと、ウェイポイントを採取し、左端の下部に、小さなフラグアイコンを1秒表示します。
M-241は、2000mAhの単三バッテリー1個で12時間GPSデータを取得できます。USBミニポートで接続した場合、バッテリなしで利用できます。レビューによると、USBミニポートには充電機能はありません。
M-241の使用
ほとんどのシステムの場合
BT747はLinux、Windows、Mac、携帯電話(J2ME)などに対応しています。たとえば、*DOP,SAT情報,ミリ秒Windowsの拡張データを採取するためにM-241を設定することが出来ます。
Linuxの場合
もしも、カーネルを独自にコンパイルしている場合、設定時にCONFIG_USB_SERIAL_CP2101=mを設定してください。
Holux M-241からトラックデータをダウンロードするためのGPSBabelのBashスクリプトは以下の通りです: Gerkin
gpsd
M-241でbluetoothを使ってはいけません。USBケーブルを使う事で数W節約でき、単三電池の寿命を延ばし、ラップトップからの電力を使うことで、さらに持久力をのばせます。
stty 38400 < /dev/ttyUSB0
gpsd -N -D 2 /dev/ttyUSB0
gpsbabel
gpsbabelでトラックデータをダウンロードするためには、CVSからのgpsbabelを使い、以下のように行います。
gpsbabel -t -w -i m241 -f /dev/ttyUSB0 -o gpx -F `date +'%F-%H:%M'`.gpx
- (このモデルはrouteをサポートしないので、"-r" スイッチは外しました --gerkin Oct 2009)
結果のファイルはウェイポイントを含んでいません('Enterボタン'を押した時の位置)。これらを得るためには、http://www.enricozini.org/2008/tips/holux-m241-waypoints/にあるスクリプトを使います。
これについての使い方は、[1]にあります。そこで提供されるgpsbabelコマンドラインはもう正しくないことに注意してください。
下記のコマンドはHoluxトラックログをダウンロードします(が、たとえば/dev/ttyUSB0のように、正しいポートを指定する必要があります):
gpsbabel -t -i m241 -f /dev/ttyUSB0 -o gpx -F `date +'%F-%H:%M'`.gpx
mtkbabel
トラックログとウェイポイントをダウンロードするには、少なくともバージョン0.7の mtkbabelを使います:
mtkbabel -s 38400 -f `date +'%F-%H%M%S'` -t -w
-tはトラックログのダウンロードに使い、-wはウェイポイントに使います。MtkbabelはXXXが-fで指定された、XX.bin XXX_trk.gpx XXX_wpt.gpx というファイルを作成します。
USBを使う時には-s 38400を指定しなければなりません。bluetoothでは、既定値(115000)で動きます。
ソースコードを編集することで、カスタムコマンドを簡単に送信することが出来るようになります(hackingを参照)。いくつかのさらなる設定では、コマンドラインスイッチで行う事が出来ます。--helpを参照してください。
ある人は"Mtkbabelの方がよく動く。デバイス上でスイッチを押したすべての時点からのトラックを作成するので、ウェイポイントを得られる(gpsbabelでは得られませんでした)。"
Windowsの場合
ドイツ語の手順は http://www.die-ritters.de/blog/holux-m-241-und-bt-747.sturkopf にあります。
このデバイスに接続する2つの方法(USBとBluetooth)があります。おのおのは、若干異なる設定を要求します。片方だけ設定すれば十分なので、両方を設定する必要はありません。しかし、USBのほうが、記録されたデータポイントをダウンロードする時間が短くてすみます。さらに、複数のBluetoothスタックがあるので、特定のソフトウェア/ハードウェアの組み合わせに対して設定を調整する必要があるかもしれません。
WindowsでBluetoothを使う
最初に、Holux M241が持っているbluetoothを有効にします。これは以下で確認出来ます:
- 'Setting'が表示されるまで、Menu (Mode)ボタンを押し、次にEnterを押します。
- 'Bluetooth'が表示されるまで、8回Menuを押し、次にEnterを押します。
- もしも'On'であればすでに有効です。
- もしも'Off'ならば、Menu (Sel)を押して、次にEnter(OK)を押してbluetoothを有効にします。
ラップトップマシンでBluetoothデバイスを検索させます。以下の手順は、ThinkPad X300でBroadcomm bluetoothスタックを使った時の例です。ご使用のbluetoothアプリケーションはこれと若干違っているかもしれません。
- マイコンピュータを選び、'マイBluetooth'を選択します。
- 'Bluetooth'メニューから'Bluetoothデバイスの追加'を選択します。
- ドロップダウン上で'すべてのデバイスの表示'がなされ、Holuxデバイスが一覧表示されるようにします。
- それを選択し組み合わせのためにパスコード'0000'を入力します。
- 'SPP Slave'の脇にあるチェックボックスをチェックし、'設定'をクリックします。
- 好みの名前を付け、そこに表示されているCOMポートを記録しておいてください。
これで接続できるようになります。将来接続する時には、bluetoothトレイアイコンを右クリックし、クイック接続->Bluetoothシリアルポート->Holux_M-241と選択します。
Bluetooth越しのデータポイントの転送はUSBを使った場合よりも若干遅いことを心に留めておいてください。また、デバイスのバッテリが放電しきっていた場合、Bluetooth接続を行う場合にもUSBを使って電源を供給することができます。
WindowsでUSBを使う
- USB->シリアルチップセットのドライバ(Silicon Labs CP210x)をダウンロードします。
https://www.silabs.com/products/mcu/Pages/USBtoUARTBridgeVCPDrivers.aspx - 探すものは'VCP Driver Kit' (CP210x_VCP_Win2K_XP_S2K3.zip)です。
https://www.silabs.com/Support%20Documents/Software/CP210x_VCP_Win2K_XP_S2K3.zip
- CP210x_VCP_Win2K_XP_S2K3.exeを実行し、ドライバをインストールします(既定値ではC:\siLabs\MCU\)。
- C:\Program Files\Silabs\MCU\CP210x\ にドライバがインストールされます。
- MiniUSBケーブルでHoluxを接続します。
- デバイスマネージャを開き、'(COMとLPT)ポート'配下で、'Silicon Labs CP210x USB to UART Bridge (COMx)'を探し、COMポート番号を記憶します。
Windows配下で BT747 ソフトウェアを使う
- java.sun.comからのSun JREをインストールします。
- http://www.bt747.org/webinstall から'Install Desktop version'を選択してBT747アプリケーションをダウンロードします。
- settings menu->Download Protocolに行き、'iBlue / QStarz / Holux / Konet'が選択されるようにします。
- ウィンドウの下の方で、使用しているCOMポートを選択します(たとえば COM6など)。そして、スピードを38400に設定します。
- 下の方の左端(let hand corner)のconnectをクリックします。
- 'Log Operations'タブ(最初のタブ)に移動します。
- 'Raw Log File'で、生データを出力したいファイルを指定します(たとえば 'C:\gpsdata\mylog.nmea)。
- Download をクリックします。
MacOS X (Bluetooth)を使う
MacでHolux M-241を使うのはとても簡単です。System Preferences中のBluetooth設定を使い、"Any Device"をインストールします。Use Passcode: 0000か組み合わせ設定をなしか、PPSlaveにします。Macは、Bluetoothが有効の時に常時有効な/dev/tty.HOLUX_M-241-SPPSlave-1か、USBによって電源が入った時にInstructions with Screenshotsというデバイスを作成します。gpsbabelのβバージョンをダウンロードし、以下のようにタイプします:
gpsbabel -t -i m241 -f /dev/tty.HOLUX_M-241-SPPSlave-1 -o gpx -F dump.gpx
MacOS X (USB)を使う
USBでM-241を使うために、デバイスで使うUSBチップセットのドライバをインストールする必要があります。これはチップセットの製造元のWebサイトでドライバを入手することが出来ます。現在 https://www.silabs.com/products/mcu/Pages/USBtoUARTBridgeVCPDrivers.aspxです。
つぎに、読み取り可能なフォルダ/var/lockががあることを確認し、[2]によってすべてのものを書き込み可能にします:
sudo mkdir /var/lock
sudo chmod 777 /var/lock
これには管理者パスワードが必要です。
BT747を入手し、どこかにコピーします。通常は/Applications/gpsです。Mac OS Xの起動スクリプトのどれかをクリックします。もしもシェルとしてbashが動いていないのであれば、スクリプトを修正する必要があります。スクリプトの最初の行が以下のようになっていますのでそこを修正します:
#!/bin/bash
USBケーブルを繋ぎ、BT747を起動し、38400ボーで /dev/cu.SLAB_USBtoUARTに接続します。
ファームウェアの問題
2008/2009年における最新のファームウェアはバージョン1.11, 1.12, 1.13です。バージョンは"Setting"ページで確認出来ます。
ファームウェアアップデートは製造元の[3]にあります。
すべてのリリースで、デバイスはNMEAインタフェースで送られる場合のみ一時的に5Hz(200ms)に設定され、このレートでは記録されません。
1.11
Firmware 1.11 allows you to set the unit to log one point per second, and it allows to start logging without waiting to have a fix (logging will start as soon as a fix is acquired).
With this firmware, specific parameters for logging that are set by third-party software such as BT747, are being kept during power-on/off cycles and battery changing.
Such parameters include Speed, DOP (Dilution of Precision) and Satellite information (numbers of satellites, Satellite IDs, position in the sky and signal/noise ratio).
Logging these parameters requires a significant share of the device's memory and reduces the capacity of points that can be logged.
Bluetooth cannot be switched off in this release.
1.12
This release still allows to set specific logging parameters while the device is switched on, they are reset to default once the device is powered on and/or the battery is changed.
In this release, Bluetooth can be switched on or off, so the device can save some energy when no Bluetooth is needed, or keep logging in environments where Bluetooth is not allowed such as in a plane.
1.13
This release still allows to set specific logging parameters while the device is switched on, they are reset to default once the device is powered on and/or the battery is changed.
Apparently new is the default logging of the speed, and the change of the internal binary logging format from 16 to 20 bytes per logpoint to allow 4 bytes for the speed.
Hacking the unit
It is easy to fiddle with mtkbabel source code to try and send your own commands to the unit. This ([4], [5], [6], [7]) is some documentation you can use. The links are taken from a post in the [http://www.gpspassion.com/forumsen/topic.asp?TOPIC_ID=85368 GPSPasSion forum].
For a source of ideas of what commands you can send, you can look into [http://bt747.wiki.sourceforge.net/ the source code of BT747]. For example, to set the M-241 to 2Hz fix, you can add this to mtkbabel:
packet_send('PMTK300,500,0,0,0.0,0.0');
$ret = packet_wait('PMTK001,300,3');
And if you want to set the MTK to an insane 5Hz fix rate, to take *really fine grained gpx traces* with your laptop, you can use this:
packet_send('PMTK300,200,0,0,0.0,0.0');
$ret = packet_wait('PMTK001,300,3');
Don't forget to set the serial speed to 38400 before talking with the unit:
stty 38400 < /dev/ttyUSB0
There are reports of people who managed to set the unit to log 5 points a second and lots of extra information, although 1 point per second is very good already and there should be no need for more. (FIXME: i can admit that its posible to get 5 points per second. But you get it as NMEA via Serial or Bluetooth, not logged into device memory. If you manually set the logging rate under 1s the device will raise it automatically until the next logging starts.)
Problems and Durability
The unit is very neatly packed. For a low user it can run over a year without any problems. For a regular OSM surveyor (one who uses almost everyday) here the some experiences:
- Frequently changing rechargeable battery for many months (8+) eventually makes the connector on the cap and the inside loose. This causes the device to get reset while running to begin with. At later stages (10+) it will loose the contact the contact and ask for repairs. A simple solder will do the job for another few months.
- The cap plastic is durable enough to last about 10 months. After a few falls of about a feet, the cap jaws will break and cause new problems.
- Its also an undocumented recharger. After your rechargeable battery (e.g. NiMH) is dead, connect to USB while the battery the dead battery still inside and slowly the rechargeable battery starts charging. I believe it was never meant to be this way but due to some circuits it has become one.
- Important: to open and fix or solder the unit, you need to remove the sticker with a satellite pic on it. Its the top side of the device. This is also where the strap is tied on. The sticker never looks obvious but its edges can be hunted from the sides.
(Since its hard to buy a new Holux M-241 in india, i have been patching it, soldering it a few times now. Its just about 1 year old now. Its very good and therefore the hard work.)
リンク
- GPS Reviews - OpenStreetMap GPS Reviews
- Specifications
- Reviews