JOSM/Plugins/Elevation
The JOSM plugin Elevation displays terrain elevation at the mouse location on the map and provides an optional elevation visualization layer to display contour lines, hillshade, lowest and highest points in the map view as well as an elevation raster.
In addition, it provides tools to set ele=* of selected nodes, set prominence=* of a natural=peak or natural=hill, determine the topographic isolation of a selected peak or the key col between two selected peaks.


The plugin is designed to use publicly available elevation data from NASA's Shuttle Radar Topography Mission (SRTM) or Sonny's LiDAR Digital Terrain Models of Europe. It can be configured to automatically download SRTM elevation data from NASA Earthdata as needed. For this, a free NASA Earthdata user account has to be registered.
Configuration
Persistent configuration
- From the JOSM menu bar, select
Edit -> Preferences. - In the opened preferences dialog, select the tab
Elevation Data. - Adapt the configuration to your needs.
- Click the
OKbutton at the bottom.

Configuration options
| Option | Default | Description |
|---|---|---|
| SRTM Type | SRTM1 | The type of SRTM data to use, either SRTM1 or SRTM3. |
| Elevation Value Interpolation | bilinear | The type of value interpolation from the SRTM elevation raster data, either bilinear interpolation or none. With bilinear, the elevation value at a map coordinate will be interpolated from the four closest elevation raster values. With none, the elevation value with the raster coordinate which is closest to the map coordinate will be picked.
|
| Max. Size of In-Memory Tile Cache | 128 | The maximum size (MiB) of the cache storing used SRTM tiles in RAM. By practical considerations, the cache size should be set such that at least four SRTM tiles can be stored in RAM. |
| Enable Elevation Visualization Layer | true | Enables a specialized map layer which can display elevation contour lines, hillshade, lowest and highest points in the map view as well as an elevation raster computed from SRTM data. |
| Layer Rendering Map Size Limit | 0.1 | Limit value of latitude or longitude (arc degrees) covered by the map view, where, if exceeded, elevation data caching as well as contour line and hillshade rendering will be temporarily switched off to avoid excessive CPU and memory usage. |
| Contour Line Isostep | 10 | Step between adjacent elevation contour lines (meters). |
| Contour Line Stroke Width | 1 | Width of the stroke used to draw elevation contour lines (px). |
| Contour Line Coloring Scheme | Constant color | Coloring scheme of elevation contour lines, either Constant color or False color. Constant color uses the defined color. False color uses rainbow colors to indicate the elevation of each contour line, from lowest to highest elevation in the map view.
|
| Contour Line Constant Color | #D2B473 | Color of elevation contour lines when Constant color coloring scheme is used.
|
| Hillshade Illumination Source Altitude | 45 | The angle of the hillshade illumination source above the horizon in the range from 0 (horizon) to 90° (overhead). |
| Hillshade Illumination Source Azimuth | 315 (NW) | Anglular direction of the hillshade illumination source (N: 0, E: 90°, S: 180°, W: 270°). |
| Enable Automatic Downloading of Elevation Data | false | If disabled, elevation in a map area can only be displayed if appropriate SRTM files have been manually downloaded prior to launching JOSM. |
| Use Password Authentication | false | Use Earthdata credentials for authorization of SRTM file downloads. |
| Use Authorization Bearer Token | true | Use an Earthdata authorization bearer token for authorization of SRTM file downloads. |
| Earthdata User Name | "" | Valid Earthdata user name required to authorize automatic downloads if password authentication is selected. |
| Earthdata Password | "" | Valid Earthdata password required to authorize automatic downloads if password authentication is selected. |
| Earthdata Authorization Bearer Token | "" | Valid Earthdata authorization bearer token required to authorize automatic downloads if this authentication option is selected. |
-
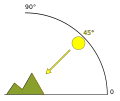 Hillshade illumination: Schematic of altitude
 -
 Hillshade illumination: Schematic of azimuth


Dynamic, non-persistent configuration
- In the JOSM layer manager at the top of the right-hand side pane, select the
Elevation Layer. - Right click on the layer manager entry of the
Elevation Layer. - From the displayed popup menu, select
Dynamic elevation layer adjustment. - In the displayed
Elevation Layer Adjustmentdialog, adapt the configuration options to your current needs. - Click the
Refreshbutton at the bottom of the dialog.
The changes will immediately take effect. However, the plugin preferences will not be changed.

Configuration options
| Option | Description |
|---|---|
| SRTM Type | The type of SRTM data to use, either SRTM1 or SRTM3. |
| Layer Rendering Map Size Limit | Limit value of latitude or longitude (arc degrees) covered by the map view, where, if exceeded, elevation data caching as well as contour line and hillshade rendering will be temporarily switched off to avoid excessive CPU and memory usage. |
| Contour Line Isostep | Step between adjacent elevation contour lines (meters). |
| Upper Cutoff Elevation | Greatest elevation value for which to draw contour lines (meters). For greater elevation values, no contour lines will be drawn. |
| Lower Cutoff Elevation | Smallest elevation value for which to draw contour lines (meters). For smaller elevation values, no contour lines will be drawn. |
| Contour Line Stroke Width | Width of the stroke used to draw elevation contour lines (px). |
| Contour Line Coloring Scheme | The coloring scheme to use for elevation contour lines, Constant color or False color. |
| Contour Line Constant Color | Color used for elevation contour lines with coloring scheme Constant color |
| Illumination Source Altitude | The angle of the hillshade illumination source above the horizon in the range from 0 (horizon) to 90° (overhead). |
| Illumination Source Azimuth | Anglular direction of the hillshade illumination source (N: 0, E: 90°, S: 180°, W: 270°). |
Note: You can set an isostep of 1 and an upper cutoff value that equals the lower cutoff value to draw contour lines for exactly one isovalue, i.e exactly one elevation value in meters.
Elevation visualization layer
Layer features
The Elevation plugin adds a specialized map layer which can display:
- Elevation contour lines
- Hillshade
- Lowest and highest points in the map view
- Elevation raster
In the layer manager, right click on the elevation visualization layer opens a context menu which allows enabling and disabling the options as desired.

The layer can be re-added via Imagery -> Add elevation layer.
Hint: Hillshade is an overlay using black color and alpha channel transparency. To be able to view the hillshade without displaying a map as background, set the background of the JOSM editor pane, which is black by default, to a bright color, e.g. white: Edit -> Preferences -> Colors -> Name: background.
-
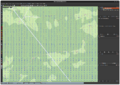
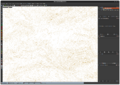 Elevation visualization: Contour lines on white background
 -
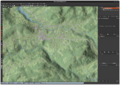
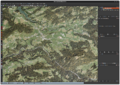 Elevation visualization: Contour lines on satellite imagery
 -
 Elevation visualization: Hillshade on white background
 -
 Elevation visualization: Hillshade on OSM standard map
 -
 Elevation visualization: Lowest and highest points of the elevation raster within the map view on satellite imagery
 -
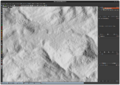
 Elevation visualization: Elevation raster


Info dialog
The elevation layer provides an info dialog with the following pieces of information
- Dimensions of the current SRTM tile grid, e.g.
4 x 4SRTM tiles - Elevation raster points of the current SRTM tile grid, i.e. the number of non-redundant elevation data points of the current grid's SRTM tiles, e.g.
7601 x 7601elevation data points - Current and maximum size of the SRTM tile cache
- Information on all SRTM tiles that are currently cached
- Tile identifier, e.g.
N45E009 - Tile type,
SRTM1orSRTM3 - Tile status, e.g.
valid,downloading,missing - Data size of the tile
- Source of the SRTM tile
- Tile identifier, e.g.
Elevation tools
The plugin provides the following elevation tools:
- Set Node Elevation: Set the
ele=*of one or more selected nodes based on the elevation value at the nodes' coordinates, which is obtained from the elevation raster data - Set Peak Prominence: Set
prominence=*of anatural=peakornatural=hillbased on itsele=*and that of anatural=saddleselected along with the peak or hill. - Topographic Isolation Finder: Determine the the topographic isolation of a selected peak and optionally add a new OSM data layer with the peak and its isolation reference points
- Key Col Finder: Determine the key col between two selected peaks and optionally add a new OSM data layer with the peaks and the
natural=saddle, which is the lowest col on the highest ridge path connecting the two peaks.
Set node elevation
To make the tool available, go to Edit -> Preferences -> Toolbar, select Set node elevation in the right-hand list of available objects and add it to the left-hand toolbar objects lists by clicking the Add all objects ... button in the middle. The tool will be enabled if at least one OSM data layer is open.
Set peak prominence
To make the tool available, go to Edit -> Preferences -> Toolbar, select Set peak prominence in the right-hand list of available objects and add it to the left-hand toolbar objects lists by clicking the Add all objects ... button in the middle. The tool will be enabled if at least one OSM data layer is open.
Topographic isolation finder

You can open the tool via JOSM's main menu if at least one OSM data layer is open: More tools -> Topographic Isolation Finder
Usage
- Select a node on the active OSM data layer, which is a
natural=peakornatural=hill, has anele=*and optionallyname=* - Click
Set selected peak - Optionally:
- Edit
Name(used for information only) andElevation: You may want to reduce it slightly if the closest higher peaks are only slightly higher, see hints. - Increase
Search distance: If the peak is not really isolated, the default is often sufficient. If no isolation reference points are found, you can repeat with a greater distance. - Edit the
Distance tolerance: If0, not more than a single isolation reference point will be found. It is recommended to set it to a value in the range of 50 to 100 m. Sometimes, there are potential isolation reference points in quite different directions. If so, you will notice and be able to decide, which point might actually be the closest slightly higher point. - Set the
Dead zone radius: Sometimes, the elevation provided by the elevation raster is slightly higher than the official elevation of the selected peak. If so, you would only find this super-close point. A value of 20 to 100 m is recommended.
- Edit
- Click
Determine topographic isolation - Result evaluation or iteration
- If at least one isolation reference point was found within the search distance, you will be allowed to click
Add to new data layer. This will add a new OSM data layer with a copy of the peak, the numbered isolation reference points (1= closest) and a rectangle indicating the search bounds. - If no isolation reference point was found within the search distance, increase it an re-run the search.
- If at least one isolation reference point was found within the search distance, you will be allowed to click
Hints
- The topographic isolation finder creates contour lines within the search bounds which are by 1 m higher than the peak elevation provided to the tool and determines the closest intersection point(s). If the closest higher peaks are only slightly higher then the peak of interest, it may happen that the raster elevation at the location of these peaks is lower (elevation raster data is averaged and therefore often does not represent the actual elevation of steep summits). Therefore do always have a look at the surrounding landscape and reduce the peak elevation provided to the tool to be by 1 m lower than the raster elevation of a potential nearest neighbor, which is officially higher then the selected peak.
- Sometimes, the raster elevation at or very close the the location of the selected peak is slightly higher than the official peak elevation. In such a case, set the dead zone radius to a value that will result in these points being excluded from consideration as closest points.
- Elevation raster data is not perfectly accurate and so are the contour lines created on its basis. The same is sometimes true for peak locations. Therefore, it is advisable to set a distance tolerance of 50 to 100 m. This will typically result in more than one isolation reference point being found, where the additional points are up to the tolerance further away from the selected peak. The additional points are often all around the very same spot. However, sometimes there are two or three spots with potentially closest points. In such a case, you will be able to evaluate the situation in more depth.
Key col finder

You can open the tool via JOSM's main menu if at least one OSM data layer is open: More tools -> Key Col Finder
Notes
- Do only draw conclusions from the results obtained with this tool for Wikipedia and alike, if you have fully understood the concepts of key col and line parent.
- Obtain some experience how this tool impacts your memory and CPU. Save/upload your OSM work prior to using the tool. If you run this tool with two peaks, which are further apart, e.g. Mont blanc
 Mont blanc and Elbrus Elbrus, you will experience high memory usage that may crash your JOSM with an out-of-memory exception.
 - By principle, this tool cannot consider the topography outside of the search bounds. If you select two peaks, which are e.g. separated by a river within the search bounds, the tool will also determine a 'key col'. It cannot determine that a 'ridge path connection' running over the river at the very edge of the search area is not a ridge path, because it does not look at anything beyond the search area. Therefore, you should always be critical about key col results.
- A determined 'key col' between two peaks is only then the actual key col of the lower peak if you selected the true line parent as the higher peak.
- Keep in mind that elevation raster data is sometimes inaccurate by a few meters. In rare cases, this can mean that you determine a 'key col', which is located on the highest running ridge path between the two peaks, but where another col on this ridge path is slightly lower and therefore is the actual key col.
Usage
- Select a node on the active OSM data layer, which should be a
natural=peakornatural=hilland should be located at an actual peak position - Click the
Set selected peakin section1a - Select another node on the active OSM data layer, which should be a
natural=peakornatural=hill, should be located at an actual peak position and which is presumably the line parent or at least higher terrain in the suspected direction of the line parent. - Click the
Set selected peakin section1b - Optionally increase the latitude and longitude values of
Search area expansion, if it looks like the highest running ridge path that connects the two peaks might run further outside a rectangular search area enclosing the two peaks. - Optionally select
4 neighborsforUnion-findto achieve slightly faster execution at potentially slightly reduced accuracy of the key col location. - Click
Determine key col - If a key col was found, you will be allowed to click
Add to new data layer. This will add a new OSM data layer with a copy of the two peaks, the key col and a rectangle indicating the search bounds.
Hints
- When used for peaks, which are further apart, switching to
SRTM3greatly reduces memory usage and increases speed of execution. But keep in mind that the data is less accurate thanSRTM1. - It is technically possible to interchange the order of the peaks, but this will result in a wrong note being added to the key col node.
- If uncertain about the actual line parent of a peak, test several candidates separately. The search where the highest col is determined might reveal the actual key col and line parent. However, keep the notes about 'over-watercourse ridge paths' in case of inadequate search areas in mind.
- In case that the terrain is not trivial or the peaks are further apart, use the tool in combination with false color contour lines and topographic isolation finder to obtain a better understanding of the topography.
SRTM elevation data
General
SRTM elevation data is subdivided into tiles, each covering 1° in longitude and 1° in latitude. The tiles are identified by the latitude and longitude of their south west (lower left) corner.
There are two relevant types of tiles: SRTM1 and SRTM3.
- SRTM1 tiles contain elevation data sampled at 1 arc-second and have an uncompressed size of about 25 MiB.
- SRTM3 tiles contain elevation data sampled at 3 arc-seconds and have an uncompressed size of about 3 MiB.
For more detailed information see NASA's SRTM user guide.
Downloading SRTM elevation data
NASA Earthdata
General
SRTM elevation data files provided by NASA Earthdata are compressed and have the extension .hgt.zip. NASA's data covers almost the complete Earth.
- SRTM1 files can be downloaded via NASA Shuttle Radar Topography Mission Global 1 arc second V003.
- SRTM3 files can be downloaded via NASA Shuttle Radar Topography Mission Global 3 arc second number V003.
Authorization of downloads
For downloading of files being authorized, NASA requires you to to register an Earthdata user account (free of charge) at Earthdata Login User Registration.
Manual download
Upon manual download of SRTM files, you will be prompted your Earthdata user name and password.
Manually downloaded SRTM files need to be placed in the subdirectory elevation/Earthdata/SRTM1 and elevation/Earthdata/SRTM3 of the JOSM cache directory. Under Linux, the JOSM cache directory should be located at $HOME/.cache/JOSM. It may be necessary to create both subdirectories.
Downloaded SRTM files may not be uncompressed or renamed. Otherwise they will not be recognized by the plugin.
Automatic download


To enable automatic download by the Elevation plugin, you can use your Earthdata credentials (user name and password). Alternatively you can use an Earthdata authorization bearer token.
In each case, this information needs to be entered in the Elevation plugin preferences.
If you decide for the authorization bearer token, do the following to generate a token:
- Log into your Earthdata user account.
- Click on the menu option
Generate Token. - Click on the button
GENERATE TOKEN.
As soon as the token was generated, click on SHOW TOKEN or the copy to clipboard option to copy the token. Copy the token into the appropriate text field of the Elevation plugin preferences and save it by clicking OK.
The token has an expiration date. Therefore, it will need to be recreated and reentered from time to time. A dialog will be shown if downloading of SRTM data fails due to an authorization error.
Note: It may be necessary to add LP DAAC Data Pool to the list of Approved Applications.
Remembering permanently missing SRTM tiles
Some SRTM tiles, which are located over sea (e.g. N43E014 over the Adriatic Sea) or in polar areas (e.g. > N59) are currently not provided by Earthdata at all. To avoid that an error message is displayed each time that the attempted automatic download of such an SRTM tile fails, the tile ID can be noted in the text file Permanently missing.txt in the respective download directory, e.g. elevation/Earthdata/SRTM1 in the the JOSM cache directory. IDs should be added line by line without any additional characters. Otherwise, they will not be parsed.
SRTM tile IDs can conveniently be added to the file via the option Remember tile as permanently missing of the download error dialog. If IDs are added manually, this should be done while JOSM is not running. Otherwise, added IDs might be overwritten in case that the option to add an ID via the error dialog is used afterwards. Also manually added IDs will only be recognized by the plugin after a fresh start of JOSM.

Sonny's LiDAR Digital Terrain Models of Europe
General
Sonny's LiDAR Digital Terrain Models of Europe provides elevation data, which is generally much more accurate than the data provided by NASA Earthdata. However, as the name says, the data only covers Europe. Therefore, Sonny's elevation data is preferred by the plugin over NASA's elevation data, if a matching file of the user-configured SRTM type SRTM1 or SRTM3 is available for the current map view.
SRTM1 compatible DTM1 files can be downloaded from https://drive.google.com/drive/folders/0BxphPoRgwhnoWkRoTFhMbTM3RDA?resourcekey=0-wRe5bWl96pwvQ9tAfI9cQg.
SRTM3 compatible DTM3 files can be downloaded from https://drive.google.com/drive/folders/0BxphPoRgwhnoekRQZUZJT2ZRX2M?resourcekey=0-j5_ZwbdfBp0KnGoFixPm9A.
Manual download
Sonny's elevation data files can only be downloaded manually. However, no user name and password are needed. With the files being stored on Google Drive, it is not possible to derive download URLs from the expected file names. The files can be downloaded individually. Alternatively, the option to download all files in the respective folder as one or more ZIP big archives can be used. This option takes some time to proceed, but is effectively likely faster than downloading the files individually.
Manually downloaded Earthdata SRTM files need to be placed in the subdirectories elevation/Sonny LiDAR/DTM1 and elevation/Sonny LiDAR/DTM3 of the JOSM cache directory. Under Linux, the JOSM cache directory should be located at $HOME/.cache/JOSM. It may be necessary to create the directories.
Source code
The source code can be obtained from JOSM Elevation Plugin on GitHub.