Mapillary/Data collection of 360 degree images with Mapillary
Data collection of 360 ° images

The capture of 360 ° images is done here with a GoPro Fusion type camera in 'multiple shots' mode.

The camera used here takes two photos for each shot: a front view and a rear view. These two photos are each stored on a different SD card in the camera and will need to be stitched together during the rendering operation to create the 360 ° view.
Preparing the Camera

The files of each photos taken are approximately 3 Mbps per half image and in .JPG format, for a resolution of approximately 3K pixels, and are therefore distributed over two SD Cards. A 360 ° view therefore occupies about 6MB in total. The SD1 card is located on the screen side of the GoPro Fusion and contains a folder named DCIM / xxxxBACK containing the photos taken from the opposite wide angle lens ('FUSION' logo side), while the SD2 card contains a folder named DCIM / xxxxFRNT containing the photos taken from the wide angle lens located on the side of the LCD screen of the camera. The SD cards used for the example have a capacity of 128GB (SN128DS v8) Before starting a series of capture sequences, it is advisable to perform formatting with the menu integrated in the camera. This function is accessible in the parameters menu at the bottom of the parameters list and allows you to format two SD cards simultaneously or only one of the two.
Start capturing images
The images are captured using the GoPro application installed on the smartphone.

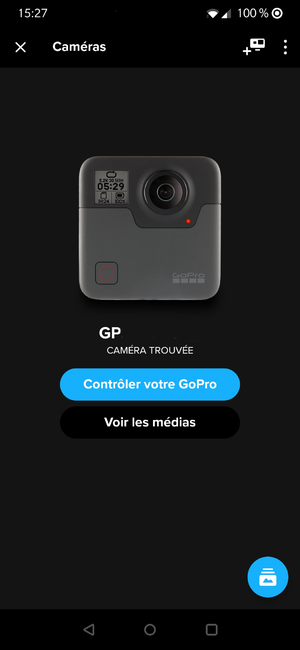
The application connects to the camera with WiFi and Bluetooth activated on the smartphone after performing the pairing procedure between the two elements. On the camera, the GPS icon (GPS status) must be dark (as in the picture). If the icon drawn on the LCD screen of the camera is clear, it means that the GPS has not been initialized correctly and it is therefore necessary to wait for the signals to be received from the satellites. The camera's LCD screen also indicates the remaining space for photos (number of photos that can be saved) and the battery capacity. The app displays the connection menu with the name of the recognized camera and a connection button named "Control your GoPro".
For use with Mapillary, the mode used is 'multiple shot', left button at the bottom of the GoPro application screen. The launch of the image capture or its stop is triggered by the central button located at the bottom of the smartphone screen. During capture, the number of images is incremented on the counter located at the top of the smartphone screen..
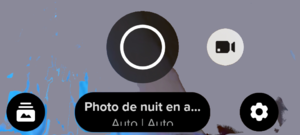
It is recommended to take several sequences of a few hundred photos by stopping the capture and then restarting it, rather than a single large sequence of several thousand photos. This method in several sequences facilitates the transfer and the possible corrections of images during the transfer on the Mapillary site.
The multi-shot mode settings to be made on the camera are as follows:
 P N AC (other choices not used: Accelere, vid acc)
 AUTO (other choices not used: 2,5,10,15,20,30)
 AUTO (other choices not used: 4s, 5s, 10s, 15s, 20s, 30s, 1m, 2m, 5m, 30m, 60m)
 PT No (other choice not used: yes)
 RAW N/A
Transferring captured images to a computer
The files of the images captured from the two SD cards (BACK and FRNT) must be copied into a single folder for the calculation of the rendering in 360 ° view otherwise the rendering calculation software will not be able to create the images.
Calculating the photo rendering on the computer
The 360 ° photo rendering uses a lot of resources on the computer which must therefore be powerful enough to perform this task as quickly as possible. The rendering software used is 'GoPro Fusion Studio'. We must first specify where the folder of unprocessed images is located when starting the software. Then you will have to make the desired settings for rendering and specify the output folder for rendering in the settings. Be careful to provide enough disk space. The output format of images should be set as follows:
Video Codec: JPEG
Resolution: 6K
D.Warp: Yes
Frame rate: 30
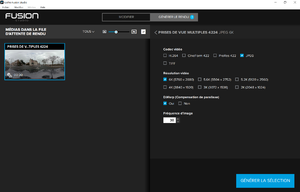
Each multiple shot sequences must be selected and configured individually in order to generate a rendering on each of them. The button 'generate the selection' allows to launch the calculation of the rendering for all the selected sequences. However, it is advisable to render one by one, or to separate the sequences in different folders before importing into Mapillary. After rendering with the settings described above, each 360 ° photo is approximately 10 to 15 MB in size. At the end of the rendering calculation, each photo assembled with a 360 ° view is named in this way 'PRISE_DE_VUE_MULTIPLES_3185_000000'. '3185' is the number of the sequence, and '000000' is a sequential number which increments over time for each rendered photo in the sequence. As said previously, it is recommended to group the photos of the same sequence in the same folder, this will facilitate the import of the photos into Mapillary in the next step.
Transfer photos to Mapillary
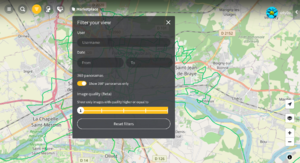
On the Mapillary site, photos are transferred via the 'Upload' menu accessible by the button in the upper left corner. You need to sign in first before you can transfer. This menu gives access to the dialog box titled 'Welcome to the Mapillary Uploader!' and its button 'Browse Files' which allows to select the files of a sequence of photos. The plot of this sequence will then be displayed on the map. If a photo should not be transferred for one reason or another (failed photo for example), it is advisable to remove it first. If it is a group of photos that should not be transferred in the middle of the sequence, then it is preferable to split the transfer and send the two sequences, the one that precedes the group of photos to delete and the one that follows it, and therefore make two separate transfers. It will be possible to reposition the photos on the map if their location seems incorrect to you before the final validation. This positioning error sometimes occurs in the event of poor GPS reception (example: passage through a tunnel) At the end of the transfer, the button named 'Exit Uploader' located at the top right allows you to return to the map. The display of photos on the web service is not immediate and also depends on the quantity transferred. There is the possibility of filtering the display of plots made with 360 ° cameras as well as the quality of the images with the 'Filter your view' menu of the Mapillary website.
See also
The GoPro Fusion app for Windows and Mac.
The GoPro Fusion User Manual. - PDF
How to update your GoPro Fusion.
GoPro Fusion Caméra firmware: firmware version:FS1.04.02.00.00