Files for work are big. To speed up things, increase memory given to JOSM. Check here for details, but it boils down to add parameters "-J-d64 -J-Xmx2048m"
Open .osm file in JOSM. WARNING - this can take some time and JOSM can feel slugish, but it gets better when you zoom in. You will get new layer.
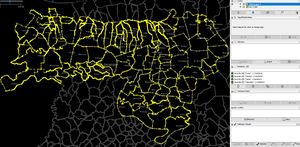
If you want to fix whole area (not just one settlement) - go to "File"->"Download data" (Ctr+Shift+Down) and go to tab "Download from Overpass API" and for query enter [1]. It doesn't matter what you select on map below. Click "Download as new layer". It is wise to turn off "Zoom to downloaded data", so zoom don't revert to whole country. After download, you should get new layer "Data Layer 1" and picture similar to this one (click for full size)
Now you are ready to rock
Work
You can choose what you want to fix, and you can check last report here. Please don't do national borders!
If you want to do only one settlement, download its relation with Ctrl+O (enter relation ID) and also download all data around borders
Select "Data layer 1" layer
Zoom to settlement you want. You can use Ctrl+F and enter name="Сврљиг".
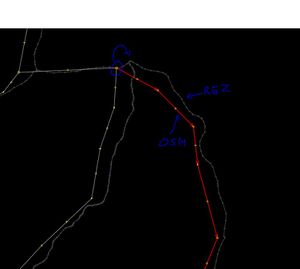
Find where roads are not matching, like on a picture . Don't fix too much at once, make every commit independent.
Copy cadastre way to OSM layer. You do this by first selecting "*.osm" layer. Then select one or more ways from cadastre. They should be cut at same places as OSM way (in the image, it is part circles with blue). Copy it (Ctrl+C). Switch to "Data layer 1" and paste it to same place . "Edit"->"Paste at source position" (Ctrl+Alt+V). Never do Ctrl+V.
Now select both old and new ways (holding Ctrl). With both ways selects, choose "More Tools" -> "Replace Geometry" (Ctrl+Shift+G)
There will be popup to solve conflicts. Simple chose "Keep" at bottom part and all boundaries should go green. For "ref:sr:maticni_broj" you should select "delete". It may happen sometimes (if you modify boundary of lower level, admin_level=7 or similar) that there is conflict in admin_level tag too. In that case, always choose lower number since .osm always have 9 (for example, if we had 7 and .osm is 9, keep 7). Click "Apply".
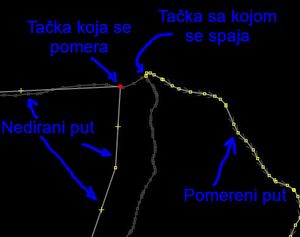
Now way is moved from old (OSM) location to new (cadastre) location and all nodes are modified/added to new locations. From 2 ways we have only 1. What is not fixed now are those end nodes circled with blue.They are now unglued from other OSM boundaries and we need to reconnect them. To do that, you should move existing OSM way (which is not touched earlier) by dragging it to new ways and holding Ctrl to glue it. If nodes are already close, select them holding left click and move them or press "m" (merge of nodes). If we look at previous example, we should do something like in picture: Whole point is to bring back connection. And since we move all locations to where cadastre boundaries are, we take new connection as proper one, and drag node of untouched ways to merged ways and connect them there.
We do same thing for other end point
When we zoom out and when we look at relations, there should be no gaps and everything should be connected. To make sure everything is connected, select way, and select relations on right side of JOSM and open them one by one with double click. Everyone should be have closed ways, as in picture :
Congratulation, you just merged your first boundary. Now do it hundreds of times:) With shortcuts and practise, this can be done using half of your brain:)
Good shortcuts worth knowing - "m" to connect selected nodes, "g" to unglue nodes
Commit
Choose what makes most sense for commit size. It can be 2-3 settlements at most, because after that point, number of modified nodes goes above 1000. Be sure to do "Validation" before commit to check for any non-closed realtions!
During "Upload data" command (Ctrl+Shift+Up), put "RGZ_Import" for changeset source.