User:Apapadop
|
Hi, my name is Alex - I live in NW London and am a very early newbie in this (since 2009, getting a bit better in 2012...)
I use Linux and Windows machines and have a sysadmin background - currently focusing in usability and security of information systems. Own a Garmin GPSmap 60CSx unit that I used for a 6-month motorcycle trip from here to India - worked like a charm and the OSM maps were fantastic. I got the opportunity to contribute a little bit by uploading tracks from remote parts of India, but the 10,000 track points limit is killing me - given I don't like carrying a laptop around.
I'm preparing for a bicycle trip around Chile and trying to learn enough to make my time there as useful to OSM as possible, so if you have any tips on that please let me know!
|
| This user hails from Greece |
| Apapadop uses a computer running Ubuntu. |
| Apapadop uses a Windows computer. |
Notes
waypoints = Points of Interest = POIs
trackpoints = tracks = recorded routes
My setup
Ubuntu Linux 10.10 on an IBM ThinkPad T43
Garmin GPSmap 60CSx with a USB connection
System modifications
I've edited /etc/udev/rules.d/51-garmin.rules to include:
#Added by Alex for Garmin USB support on 05 April 2011
SYSFS{idVendor}=="091e", SYSFS{idProduct}=="0003", MODE="666"
This allows my regular (non-root) user to extract data from the GPS device. Without this line, only root can use gpsbabel to get data from the GPS. Regular users need to prefix any commands mentioned below by "sudo" and then supply their password.
Connecting the GPS to your computer
On connecting the GPS to the computer (laptop) with the USB cable and turning on the GPS, dmesg displays this line:
usb 3-1: new full speed USB device using uhci_hcd and address 2
Nothing else.
Transferring waypoints from the GPS to the computer
As a regular non-root user:
gpsbabel -w -i garmin -f usb: -o gpx -F GPS_waypoints.gpx
This creates the GPX file GPS_waypoints.gpx that contains all recorded waypoints (POIs).
This is a typical content of the GPS_waypoints.gpx file: (in this example it contains only three waypoints)
<?xml version="1.0" encoding="UTF-8"?> <gpx version="1.0" creator="GPSBabel - http://www.gpsbabel.org" xmlns:xsi="http://www.w3.org/2001/XMLSchema-instance" xmlns="http://www.topografix.com/GPX/1/0" xsi:schemaLocation="http://www.topografix.com/GPX/1/0 http://www.topografix.com/GPX/1/0/gpx.xsd"> <bounds minlat="18.919172678" minlon="-94.799016668" maxlat="53.523365306" maxlon="121.640266674"/> <wpt lat="37.037650058" lon="27.430007709"> <ele>0.366211</ele> <name>002Pansion</name> <cmt>05-OCT-09 19:06:52</cmt> <desc>05-OCT-09 19:06:52</desc> <sym>Lodging</sym> </wpt> <wpt lat="31.457103146" lon="53.749110075"> <ele>1862.185303</ele> <name>006</name> <cmt>04-DEC-09 10:29:49</cmt> <desc>04-DEC-09 10:29:49</desc> <sym>Gas Station</sym> </wpt> <wpt lat="29.987958530" lon="52.875632364"> <ele>1636.277344</ele> <name>007</name> <cmt>06-DEC-09 8:53:57</cmt> <desc>06-DEC-09 8:53:57</desc> <sym>Pharmacy</sym> </wpt> </gpx>
Transferring recorded tracks from the GPS to the computer
As a regular non-root user:
gpsbabel -t -i garmin -f usb: -o gpx -F GPS_tracks.gpx
This creates the GPX file GPS_tracks.gpx that contains all tracks you have recorded with your GPS (like leaving breadcrumbs while you move).
This is a typical content of the GPS_tracks.gpx file: (example truncated for brevity)
<?xml version="1.0" encoding="UTF-8"?> <gpx version="1.0" creator="GPSBabel - http://www.gpsbabel.org" xmlns:xsi="http://www.w3.org/2001/XMLSchema-instance" xmlns="http://www.topografix.com/GPX/1/0" xsi:schemaLocation="http://www.topografix.com/GPX/1/0 http://www.topografix.com/GPX/1/0/gpx.xsd"> <bounds minlat="51.054692231" minlon="0.443685399" maxlat="51.086502559" maxlon="0.490423143"/> <trk> <name>03-JUL-11</name> <trkseg> <trkpt lat="51.073307181" lon="0.490377294"> <ele>121.263550</ele> </trkpt> <trkpt lat="51.073415224" lon="0.490423143"> <ele>126.550659</ele> </trkpt> <trkpt lat="51.073296620" lon="0.489498870"> <ele>123.186157</ele> </trkpt> <trkpt lat="51.073281532" lon="0.488788337"> <ele>121.744141</ele> </trkpt> <trkpt lat="51.073525194" lon="0.487795332"> <ele>117.898804</ele> </trkpt> ... <trkpt lat="51.078956835" lon="0.483917864"> <ele>69.352295</ele> </trkpt> <trkpt lat="51.078867316" lon="0.484153396"> <ele>69.832886</ele> </trkpt> <trkpt lat="51.078822054" lon="0.484116683"> <ele>70.313477</ele> </trkpt> </trkseg> </trk> </gpx>
It contains some headers and then just a list of all the different trackpoints recorded - each one between <trkpt> </trkpt> tags.
Editing the track/trace you uploaded to OpenStreeetMap.org
Once you have successfully uploaded a GPX trace to OSM via http://www.openstreetmap.org/trace/create and got the "[OpenStreetMap] GPX Import Success" email, you can click on the "edit" link from your trace's page (e.g. http://www.openstreetmap.org/edit?gpx=1078390 - but change the final number to the unique number of your uploaded trace) and then Potlatch 2 will start, showing you an editable version of the map, including aerial imagery, with your trace pre-loaded.
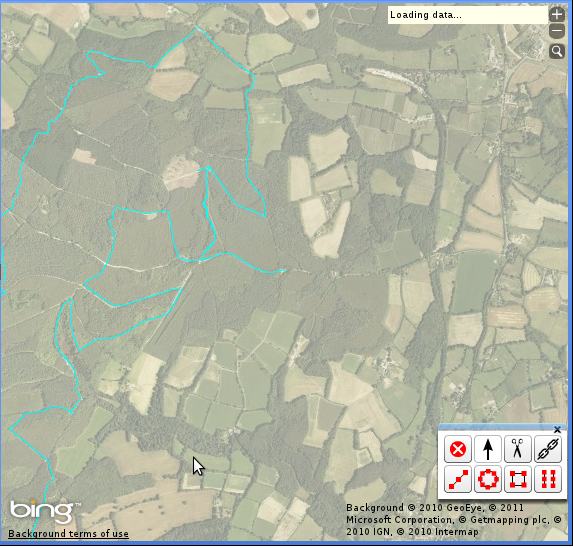
It is sometimes difficult to distinguish your trace from all the other OSM information already on the map. This is what the screen looks like for a second or two:
It is easy to see your trace (in light blue) on the aerial images.
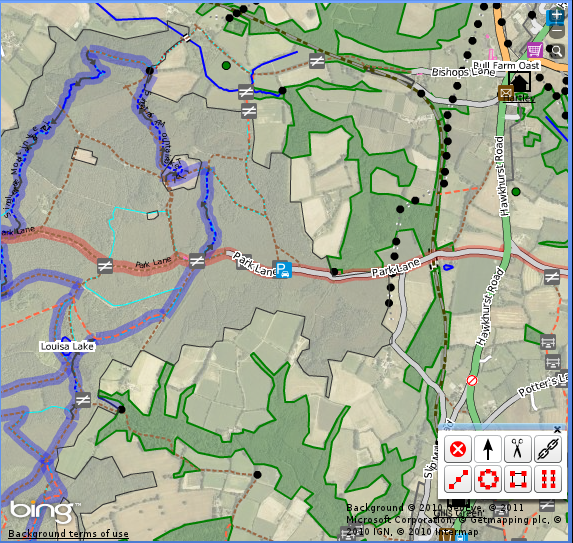
The problem is that then all the other map information is loaded:
This makes it harder to see your trace - which you can still barely distinguish with the same light-blue/cyan color.
Zooming in makes the trace easier to edit.
Transferring routes from the computer to the GPS
To send the route "home_to_work.gpx" to the GPS:
gpsbabel -r -i gpx -f home_to_work.gpx -o garmin -F usb:
Adding waypoints to OSM
Follow the instructions over at Upload_Waypoints for a quick'n'dirty method.
This method (using Potlatch for the final editing) has a number of limitations (labour intensive, not flexible enough, error prone etc), but it's simple. Plus, I haven't had the time/courage to figure out how JOSM works yet. Plus, I want to do all this while travelling so keeping the list of tools I need as slim as possible is a must. Potlatch will always be available on the OSM website, and will work from any Internet Cafe.
I want to add 50 new waypoints to OSM!
Great, me too! I went travelling for a few months and when I returned I had many Points of Interest that I wanted to add to the map, but didn't know how. I've found a (probably completely stupid) way of doing it:
- Save all the waypoints to a GPX file as described above.
- Now cut'n'paste waypoints to other, smaller files. My waypoints were of all sorts (restaurants, water sources, toilets, police checkpoints, camp sites, petrol stations, embassies etc) from Turkey, Iran, Pakistan and India. I found it easier to break up the large GPX file into smaller files
- Take one of the smaller files and following the instructions in the Upload Waypoints page, upload the GPX to OpenStreetMap.org.
- Activate the "show coordinates" option in Potlatch2
- Use your keyboard's arrow keys to navigate to the next waypoint and tag it appropriately.
- Save when you're done.
I have a GPX file with no timestamps
Yes, it is rejected by OSM.
There is a reasonable way around it. (but also see next section for an automatic workaround)
On Windows, you need to install Python
- Get the latest release from http://www.python.org/download/releases/
- As of May 2011 this is http://www.python.org/ftp/python/3.2/python-3.2.msi
- Install it on Windows
- Grab the script from https://bitbucket.org/lawgon/osmindia/src/tip/bogustimestamp.py
- Open a "Command Prompt", change directory to where you stored bogustimestamp.py and type bogustimestamp.py track.gpx track_timestamped.gpx (changing the names to reflect your filenames)
- Upload track_timestamped.gpx to OpenStreetMap - it should now be accepted.
On Linux, just do the last steps since python will probably already be installed:
- Grab the script from https://bitbucket.org/lawgon/osmindia/src/tip/bogustimestamp.py
- Open a terminal, change directory to where you stored bogustimestamp.py
- Make the script executable with chmod +x bogustimestamp.py
- Execute ./bogustimestamp.py track.gpx track_timestamped.gpx (changing the names to reflect your filenames)
- (if that doesn't work, try python bogustimestamp.py track.gpx track_timestamped.gpx)
- Upload track_timestamped.gpx to OpenStreetMap - it should now be accepted.
HOWTO create GPX files with timestamps
On my Garmin GPSmap 60CSx it seems that the default setup is to save GPX files to the internal memory (not the removable SD card), which is very limited, hence the device tries to save space by discarding the timestamps and each track log is restricted to 500 points.
But, if setup to save recorded tracks onto the SD card (also known as "Data card"), it appears that timestamps are preserved and track logs can be as long as 10.000 points.
These GPX files (that the unit directly saves on the data card - you have little control of what and how is saved or named) are accepted by Openstreetmap with no hiccups.
To setup my device to do this I had to go to the "Track Log" page and then:
- Setup -> Data Card Setup
- Tick "Log Track to Data Card"
Note: See http://www.gpspassion.com/forumsen/topic.asp?TOPIC_ID=90924 for an explanation of what the "Log Track to Data Card" option does.
HOWTO select entire track in Potlatch 2
Say you have just uploaded a GPX with a long track - hundreds of trackpoints. You obviously have better things to do than re-drawing this manually, so you just want to select the entire track and convert it to a way. To do this:
- On a Windows-based system you can ALT-click anywhere on the track.
- On a Linux-based system you can CTRL-SHFT-click anywhere on the track.
Voila, now all trackpoints have been selected.
What's a standard GPX file header?
If you have created a GPX file that contains only <wpt> stanzas like this:
<wpt lat="33.657864863" lon="73.054193454">
 <ele>506.256104</ele>
 <name>Concept Motors</name>
 <cmt>29-DEC-09 11:39:59</cmt>
 <desc>29-DEC-09 11:39:59</desc>
 <sym>Convenience Store</sym>
</wpt>
it can't be uploaded to OSM as is. You will need to add a header like this:
<?xml version="1.0" encoding="UTF-8"?> <gpx version="1.0" creator="GPSBabel - http://www.gpsbabel.org" xmlns:xsi="http://www.w3.org/2001/XMLSchema-instance" xmlns="http://www.topografix.com/GPX/1/0" xsi:schemaLocation="http://www.topografix.com/GPX/1/0 http://www.topografix.com/GPX/1/0/gpx.xsd"> <bounds minlat="18.919172678" minlon="-94.799016668" maxlat="53.523365306" maxlon="121.640266674"/> <trk> <trkseg> <trkpt lat="37.037650058" lon="27.430007709"> (<== UPDATE THIS TO MATCH THE COORDINATES OF YOUR FIRST WAYPOINT) </trkpt> </trkseg> </trk>
HOWTO merge (combine) ways in Potlatch 2
This is useful when you want to combine (connect) two segments of the same road, to form ONE road.
- Click to select the first way
- Hold down CTRL-SHFT and click on second way
- Click on the "Merge ways" button of the toolbar on the bottom right.
Note: This will not work (the button will be unavailable) if the two ways have overlapping points.
HOWTO resolve alignment conflicts between OSM ways and aerial imagery
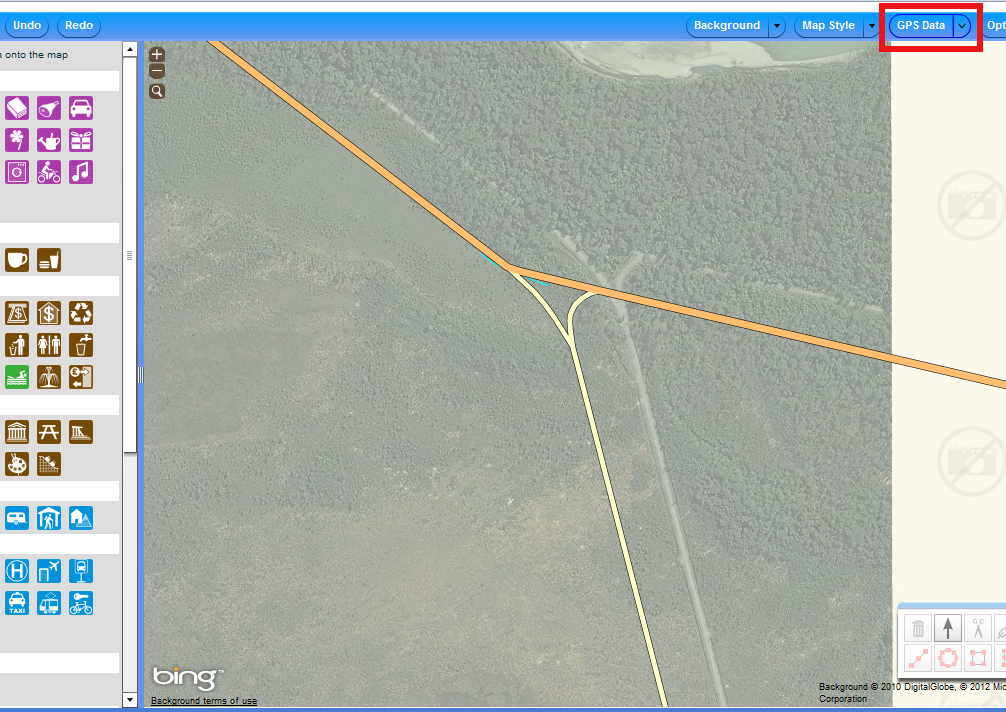
Assume you're editing with Potlatch 2 and you come to something like this:

The problem here is that aerial imagery is not aligned with the ways already mapped. So you need to decide which one is right here: The aerial image? Or the mapped ways?
Click on the indicated "GPS Data" button. This will bring up any GPS trace data existing for that area, as thin cyan (light blue) lines. You can barely see it in this example on the left side of the triangular road intersection. The important bit here is not perfect alignment - but this thin blue line indicates that someone moved through that space with a GPS, so the road is probably there.
Which means that in this example, the ways mapped in OSM are correct, and the aerial imagery background has to be adjusted before you do any further mapping. You can do this by holding down SPACE on your keyboard and dragging the aerial image with your mouse, until it aligns with the OSM ways.


