Proposal:CompoundFacility
| Compound Facility | |
|---|---|
| Proposal status: | Abandoned (inactive) |
| Proposed by: | Addict user |
| Tagging: | compound_facility=*
|
| Applies to: | |
| Definition: | Model of a compound facility for pedestrians |
| Statistics: |
|
| Draft started: | 2013.11.29 |
Page details
- The need for the current extension proposal emerged while we were working on a project, regarding Multimodal transportation.
A complex transportation system, where several modes of transportation is available, is called multimodal transportation system. In reality, these systems are not static, but constantly changing over time (for example: because of different density of traffic during the day). The number of passengers travelling, or utilizing such a system is in the scale of billions daily. This implies the importance of the current topic.
- Please visit our page, where you can get an even more detailed picture about the project and how it led to this proposal.
http://www.addict.hit.bme.hu/twiki/bin/view/Projects/MultiModalMobilityPublic/WebHome
Application
- An already working application of the proposal introduced below is available:
Rationale
Using current OSM data, routing information can be given to passengers about when and where they can change between transport modes, but there is no information about the details of a particular change: how they can pass between the stops of different public transport services indoor, or inside a complex facility like a station. To handle this problem, a new model is needed, which represents:
- important structure of indoor / underground facilities
- relevant data that routing applications can use
For this purpose, Compound Facility is modeled. The Compound Facility consists of one or more Levels which are connected to each other inside the facility. Pedestrians can access Compound Facility on foot through exit/entrance, or using other transport modes, like public transport vehicles, on Levels which contain BoardingArea. Besides modeling level parts for indoor infrastructure, relevant data for routing on level are described using ConvexAreaGroup, ConvexArea and RestrictedConvexArea.
Use cases
- Complex facilities' maps: outdoor / indoor / mixed
- Pedestrian routing data
- can be calculated from facility's layout (grid)
- different path for different user class/group can be explicitly defined
The Model /Tagging
Modeling compound facility (main relation)
- compound facility is mapped as an OSM relation
- members:
- its levels with role: level
- its entrances with role: facility_entrance
- if there are bus / subway stops within the facility, they are also members with role: stop
- key: name=*, name of compound facility. Example values: name="Keleti palyaudvar"
Example:
<relation>
    <member type='node' ref='-24778' role='facility_entrance' />
    <member type='node' ref='1645007153' role='facility_entrance' />
    <member type='node' ref='1645007146' role='facility_entrance' />
    <member type='node' ref='688953662' role='facility_entrance' />
    <member type='node' ref='1294188425' role='facility_entrance' />
    <member type='node' ref='-24782' role='facility_entrance' />
    <member type='node' ref='-24780' role='facility_entrance' />
    <member type='node' ref='1294188429' role='facility_entrance' />
    <member type='node' ref='688953661' role='facility_entrance' />
    <member type='node' ref='2242754262' role='stop' />
    <member type='node' ref='276547699' role='stop' />
    <member type='relation' ref='-25561' role='level' />
    <member type='relation' ref='-25565' role='level' />
    <tag k='facility' v='public' />
    <tag k='name' v='Corvin negyed' />
    <tag k='type' v='compound_facility' />
</relation>
Modeling levels
Level is spatial thing which extents in two dimensions support other objects and can be connected with other levels by level connectors. The zlevel indicates the vertical index of the level inside a facility (therefore must have integer value), compared to ground level, which is identified with zlevel=0.
- levels are mapped as OSM relations
- type = level
- area = yes
- The members of a level are OSM elements (node / way / relation) representing relevant indoor infrastructure parts:
- boundary, closed polygon, role: boundary
- level entrance, role: level_entrance
- entrance
- end of steps / elevator / escalator
- Point Of Interest (amenity point), role: levelpart
- moving_sidewalk: role: levelpart
- inside area (smaller area, room , shop ...) : role: levelpart
- boarding area, role: boarding_area
- Convex Area Group which indicates routing for a certain user group, role: convex_area_group.
| Key | Description | Example values |
|---|---|---|
| zlevel=* | level number of the level; 0 is always the ground-level | zlevel=0; zlevel=-1; zlevel=1 |
| name=* | the name of the corresponding level | name=ground_level |
| height=* | height of level in meter | height=4 |
| opening_hours | levels may have opening hours | http://wiki.openstreetmap.org/wiki/Key:opening_hours |
Example:
<relation>
    <member type='way' ref='-25472' role='boundary' />
    <member type='node' ref='-24826' role='level_entrance' />
    <member type='node' ref='-24784' role='level_entrance' />
    <member type='node' ref='-24788' role='level_entrance' />
    <member type='node' ref='-24800' role='level_entrance' />
    <member type='node' ref='-24810' role='level_entrance' />
    <member type='node' ref='-24812' role='level_entrance' />
    <member type='node' ref='-24770' role='level_entrance' />
    <member type='node' ref='-24772' role='level_entrance' />
    <member type='node' ref='-24776' role='level_part' />
    <member type='node' ref='-24774' role='level_part' />
    <member type='relation' ref='-25555' role='convex_area_group' />
    <tag k='name' v='Corvin negyed - aluljaro' />
    <tag k='tunnel' v='yes' />
    <tag k='type' v='level' />
    <tag k='zlevel' v='-1' />
</relation>
Modeling level infrastructure parts
- Infrastructure elements which are on a level, can be mapped as node, polyline, closed polygon, or relation
- Areas where foot movement is not allowed (e.g.: subway rail part, holes, etc.):
- These areas are mapped as OSM areas.
- key: levelpart=forbidden
- Access permission for pedestrians: foot=no .
- subway rail part:
- together with tag: railway=subway
- Holes:
- together with tag: barrier=railing
- Halls, areas where public access and pass is allowed:
- mapped as OSM area
- levelpart=hall
- ref=*: the ref of the area, for example value: ref=Keleti.
- type=*: type of the area, for example: type=waiting_hall.
- Room-like areas, where no other element is contained inside, and public access is denied: shop, operator room ...
- mapped as an OSM area or OSM node
- levelpart=room
- ref=*: the ref of the room, for example: ref=B111.
- shop: http://wiki.openstreetmap.org/wiki/Map_Features#Shop
- operator room:
- operator=*. Example value: operator=BKV
- Explicit stairs, ramps
- mapped as an OSM way:
- tagging: levelpart=footway
- moving sidewalk
- together with type=moving_sidewalk
- moving sidewalk
- construction parts: columns, pillars, etc.
- can be mapped as OSM area, OSM way or OSM node
- levelpart=construction
- type=*, for example: type=pillar, type=wall
- Area access points: these are not part of level, but part of area, hall, room, or wall
- mapped as an OSM node or OSM way
- type=door | turnstile
- door=manual | automatic
- other properties:
- height=*
- width=*
- step platform, escalator platform: the boundary of step/escalator on the actual level
- mapped as OSM area
- levelpart=step_platform
- no one can pass through this area
- the step/escalator end node must be on the boundary of this area
Modeling Boarding Point
- Places, where passengers can take on or take off public transportation vehicles, typically where the doors of the arriving public transport vehicle are placed.
- Boarding point is mapped as an OSM node.
- Tagging: public_transport=boarding_point
- Example:
  <node id='-1861' action='modify' visible='true' lat='47.485420241107924' lon='19.07066238647339'>
    <tag k='public_transport' v='boarding_point' />
  </node>
Modeling Boarding Area
Boarding areas are the areas inside stations or complex public transport facilities, where passengers can board/unboard public transportation vehicles. Boarding area may contain boarding points (see previous section), which mark the exact positions inside a boarding area, where the boarding takes place (where the doors of the stopping public transportation vehicle opens). Boarding area is the member of Level relation, and information about the public transport route is attached to the boarding area.
- mapped as an OSM relation
- type=boarding_area
- ref=*. Bus number or Metro number. Example value: ref=M3
- Refers to the OSM_ID of route which this station/stop belongs to
- if separate directions of route are available: route:id=*
- if only one route is available:
- the first one has route:id=*
- the other one has route:backward:id=*
- members:
- boarding point OSM node, role:boarding_point/(blank)
- Example:
  <relation>
    <member type='node' ref='-1715' role='' />
    <member type='node' ref='-1717' role='' />
    <member type='node' ref='-1861' role='' />
    <member type='node' ref='-1719' role='' />
    <member type='node' ref='-1721' role='' />
    <member type='node' ref='-1723' role='' />
    <member type='node' ref='-1725' role='' />
    <tag k='ref' v='M3' />
    <tag k='route:id' v='418604' />
    <tag k='type' v='boarding_area' />
  </relation>

  <relation>
    <member type='node' ref='-1729' role='' />
    <member type='node' ref='-1731' role='' />
    <member type='node' ref='-1859' role='' />
    <member type='node' ref='-1745' role='' />
    <member type='node' ref='-1743' role='' />
    <member type='node' ref='-1741' role='' />
    <member type='node' ref='-1727' role='' />
    <tag k='ref' v='M3' />
    <tag k='route:backward:id' v='418604' />
    <tag k='type' v='boarding_area' />
  </relation>
Modeling Reference Point
The purpose of reference points is to provide information for indoor navigation applications. The route of passengers travelling through an indoor area can be specified by a sequence of reference points. In our proposal, we introduce reference points, for make it possible to explicitly provide navigation information for indoor areas.
- Reference points are used together with convex areas (see later).
- Reference point either represent transport availability within a single convex area, or the connection between two adjacent convex areas.
Mapping:
- Reference point is modeled as an OSM node.
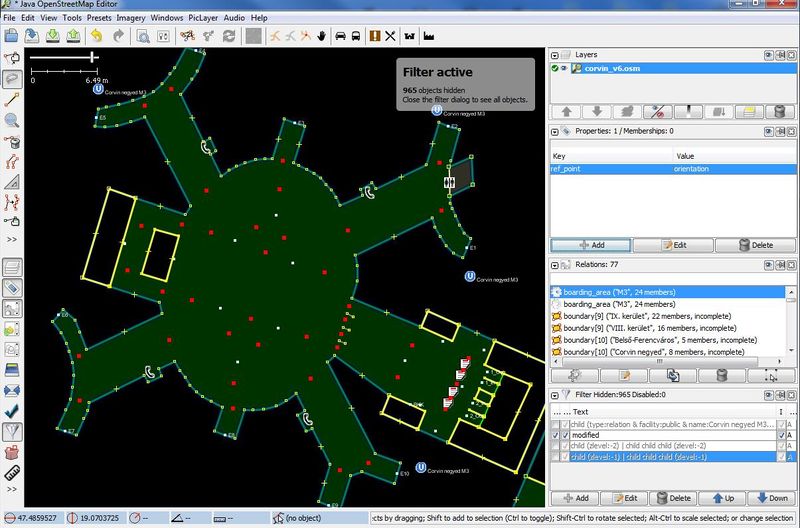
- ref_point=orientation
- Explicit reference is not required in LEVEL relation, only in Convex Area
Modeling Convex Area
Areas make it possible for passengers to walk on the surface without restrictions. Indoor navigation of passengers deals with the problem of finding the optimal route between two arbitrary points inside an area. If the modeler adds reference points to the area, the problem can be reduced to connect some of these reference points with straight lines, such that, the first and last points are the source and destination of the passenger. The problem: how can we connect reference points without the line intersecting any obstacle? The idea is to split the area to convex areas. Inside a convex area, any inner points can be connected with a straight line without intersecting the boundary of the convex area. Convex areas have to be specified to exclude obstacles of the original area. More details behind this concept can be read on this page
- Convex Area is mapped as an OSM relation.
- type=convex_area
- The members of a Convex Area are OSM nodes with individual role: ref_point (Reference Point) which may be
- Point of Interest
- entrance
- Orientation reference point
- end of explicitly mapped stair, ramp
- Example:
  <relation>
    <member type='node' ref='-24788' role='ref_point' />
    <member type='node' ref='-24800' role='ref_point' />
    <member type='node' ref='-24810' role='ref_point' />
    <member type='node' ref='-24812' role='ref_point' />
    <member type='node' ref='-24768' role='ref_point' />
    <member type='node' ref='-24826' role='ref_point' />
    <member type='node' ref='-24784' role='ref_point' />
    <tag k='type' v='convex_area' />
  </relation>
Modeling Restricted Convex Areas
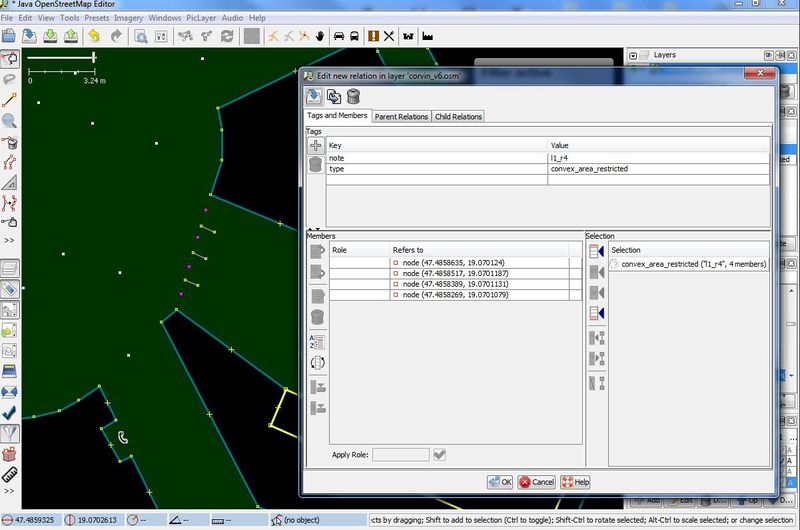
When describing a complex indoor area, with many obstacles, it may be more straightforward to forbid connections between groups of reference points contained by a convex area, instead of split the convex area to smaller ones. (For example, when a large area contains several columns in a row). The Restricted Convex Area is introduced for this purpose. For more information behind the concept, visit this page .
- If a Restricted Convex Area exists, it has to be referred in Convex Area Group.
- Similar to Convex Area, the Restricted Convex Area can be mapped as an OSM relation.
- type=convex_area_restricted
Convex Areas relation
- If there is an access restriction (no access from one convex area to another convex area) between adjacent Convex Area, it must be mapped as an OSM relation (e.g. one-way access restricted area: turnstile)
- type=restriction
- from= convex_area_identifier
- to=convex_area_identifier
- via=common_refPoint_identifier :optional
- restriction = no_entry
Convex Area grouping within level
Convex Area Group indicates the type of user group, for which it defines transport possibilities. This approach makes it easier for map drawers to model indoor areas to serve data for routing algorithms to compute routes for appropriate user groups. It collects ConvexArea, RestricedConvexArea and ConvexAreaAccessRelation.
- convex area group within an area is mapped as an OSM relation
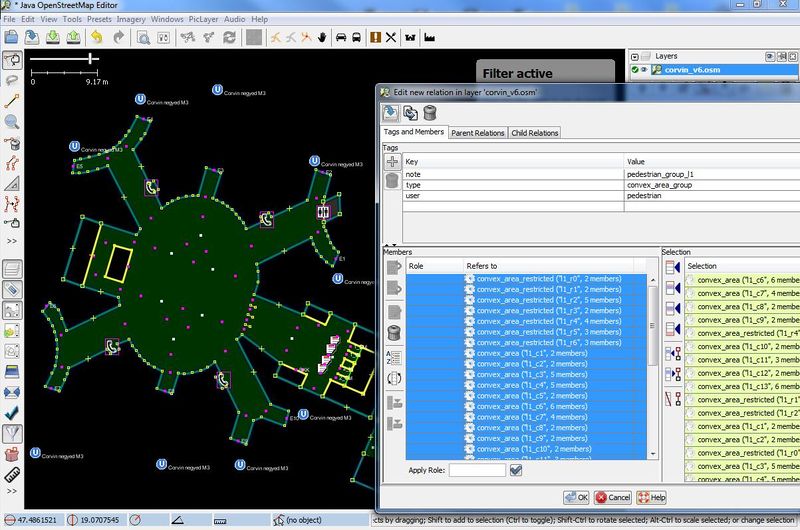
- type=convex_area_group
- user= pedestrian | wheelchair | blind | tourist
- Members:
- convex area representing relations with role:convex_area/(blank)
- restricted convex area with role: convex_area_restricted
- access restriction between convex areas with role: access_restriction
- Example:
 <relation>
 <member type='relation' ref='-25559' role='convex_area' />
 <member type='relation' ref='-25557' role='convex_area' />
 <tag k='type' v='convex_area_group' />
 <tag k='user' v='pedestrian' />
 </relation>
Modeling connections between different levels, between level and facility
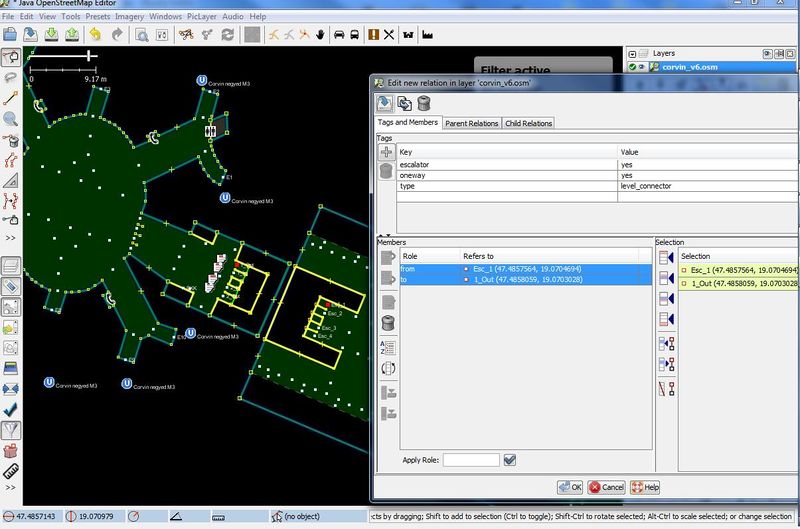
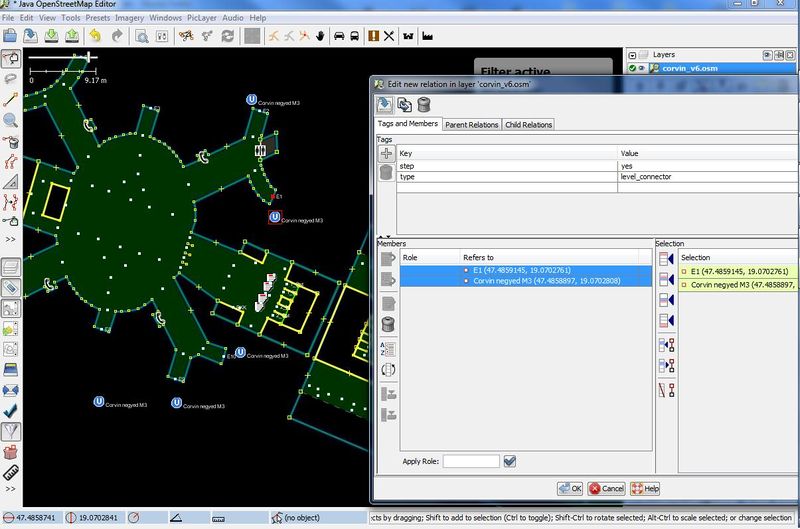
- Levels are connected by steps, elevators, escalators (vertical pass)
- The end points must be placed on different levels, with appropriate attribute : step_end=yes | elevator_end=yes | escalator_end=yes
- Elevators and Escalators have fix structure (ends, intermediate nodes ...), like steps, but they have direction which can be changed. Two alternatives to map elevator and escalator can be considered:
- just map their structure like steps, then their direction will be mapped separately
- map direction together with structure by using special tag
- For maintain purpose, the later alternative is better.
- they are mapped as OSM relations instead of OSM way. In this way, two overlapped end points on levels can be connected easily using OSM editor.
- type="level_connector"
- members are two level entrance nodes and intermediate nodes if any. In this case, member nodes must be ordered according to movement in order to define geometry way of this connector
- if it is one-way connector:
- tag oneway=yes must be used
- role of level entrance members indicates a from-to relation: role: from/to
- Can be used together with key:wheelchair
| Key | Description |
|---|---|
| step=yes | it is a step |
| elevator=yes | it is an elevator |
| escalator=yes | it is an escalator |
| oneway=yes | one direction only. Direction is specified by order of end points |
| length=* | length of step, escalator |
- Example:
  <relation>
    <member type='node' ref='-24770' role='from' />
    <member type='node' ref='-24860' role='to' />
    <tag k='escalator' v='yes' />
    <tag k='note' v='fk_lc1_2_02' />
    <tag k='oneway' v='yes' />
    <tag k='type' v='level_connector' />
  </relation>

  <relation>
    <member type='node' ref='-1781' role='' />
    <member type='node' ref='-1827' role='' />
    <tag k='note' v='fk_lc01_04' />
    <tag k='step' v='yes' />
    <tag k='type' v='level_connector' />
  </relation>
Mapping demonstration in JOSM
- JOSM is one of most used editor for editing OSM data (http://wiki.openstreetmap.org/wiki/Editing>). Wiki page: href="http://wiki.openstreetmap.org/wiki/JOSM
- Our example is Corvin-negyed(Budapest, Hungary)subway station with two floors underground. The first floor is a tunnel for pedestrians, while the subway station can be found on the second floor. The tunnel can be accessed from ground floor through 6 entrances, while the metro floor is connected with the first floor by four escalators. Since our goal is proposing solution to improve indoor transportation management, OSM elements will be demonstrated, which serves transportation for "pedestrian" user group. The following Points of Interest will be mapped:
- on the first floor:
- shops, telephones and public toilet
- ticket shop
- on the second floor:
- places marked for subway boarding
- information map
- download OSM data file of the area where the new compound facility will be modeled
- on the first floor:
- place the entrance nodes of the facility. Since OSM data of the area was downloaded, every new node will have real coordinates
- use the predefined railway=subway_entrance for these nodes.
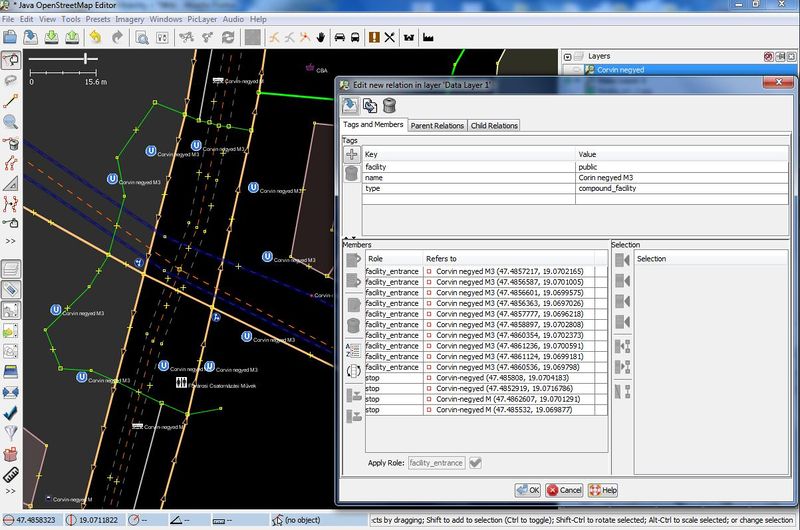
- select other relevant nodes which will be part of the compound_facility and create the relation
- facility=public
- name=Corvin negyed M3
- type=compound_facility
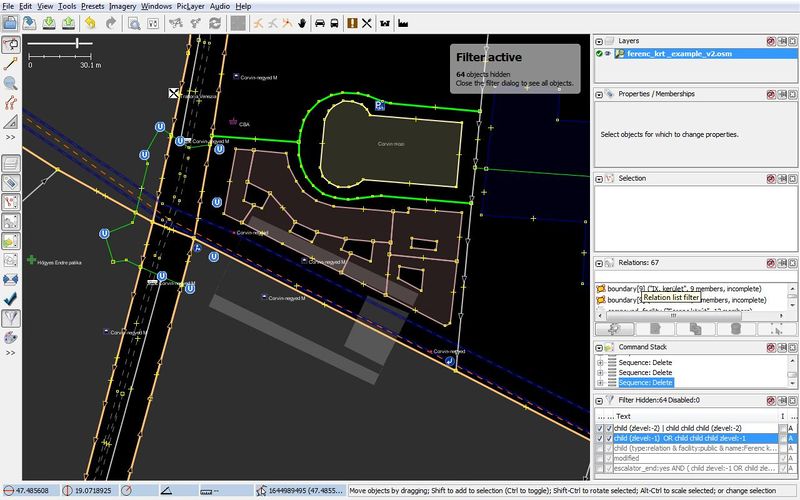
- for better visibility, create filter for facility, then disable this filter. Filter text: child (type:relation & facility:public & name:Corvin negyed M3)
Creating levels
Creating underpass level
PicLayer
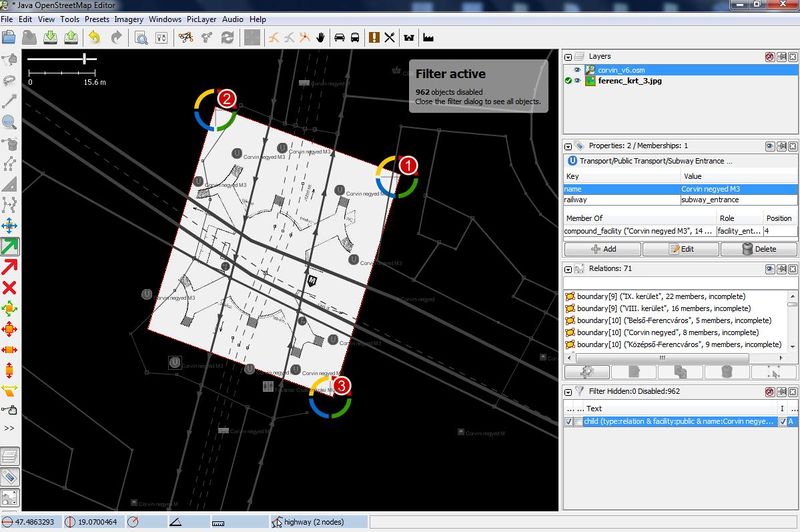
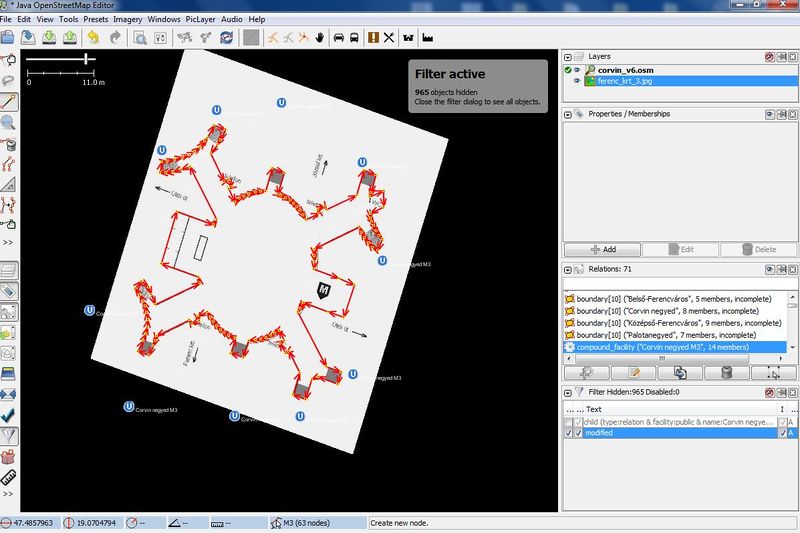
- If you have a blueprint, or something closely resembling to the area, you can use the PicLayer plugin of JOSM
- Insert the blueprint as a new layer: PicLayer -> New picture layer from file ...
- Activate picture layer
- After inserting, the picture should be placed and transformed according to reality, this way, the coordinates will be as accurate as possible.
- In order to transform image
- Select three check points using Green Arrow button (1,2,3 circle)
- Select Red Arrow, move to selected place (1,2,3 circle) to transform image.
- More about Picture Layer Plugin: http://wiki.openstreetmap.org/wiki/JOSM/Plugins/PicLayer
- With the help of PicLayer, the boundary of the floor can be created easily
Level relation
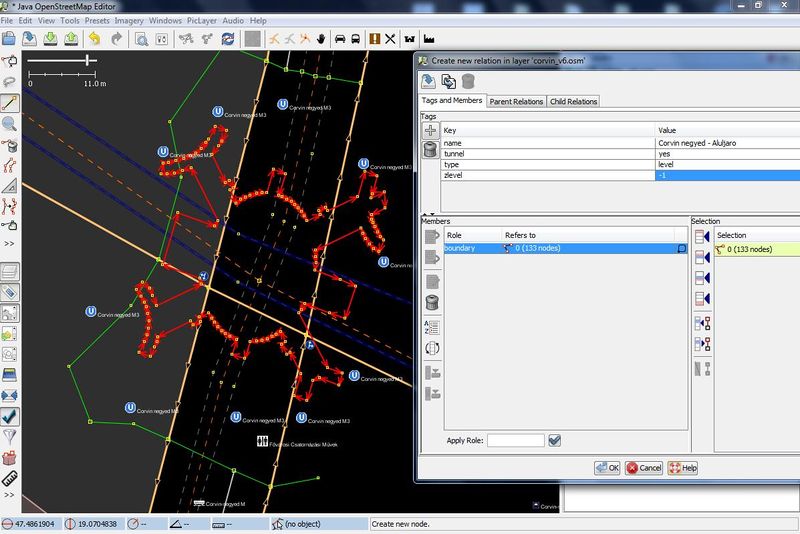
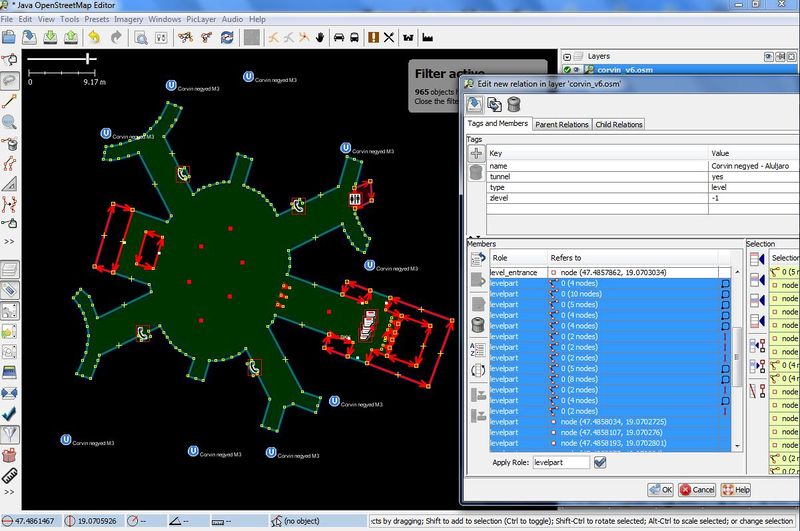
- Create level relation and add the new way with role:boundary
- type=level
- name=Corvin negyed - aluljaro
- tunnel=yes
- zlevel=-1
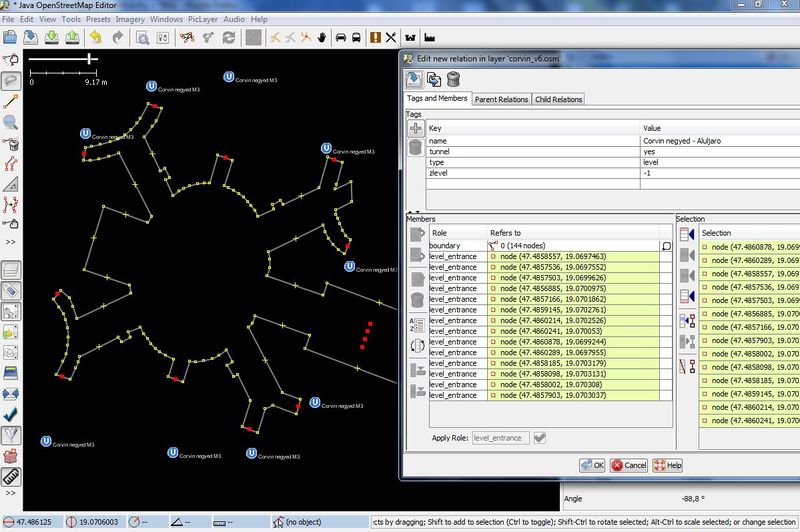
- Although, setting the boundaries is an important step, but in regards of public transportation, so called Points of Interest are more valuable (compound facility entrances, level entrances , stop positions ... ) specially because of their coordinates, since other structure can be geo-referenced by them.
- Setting properties of the tunnel level
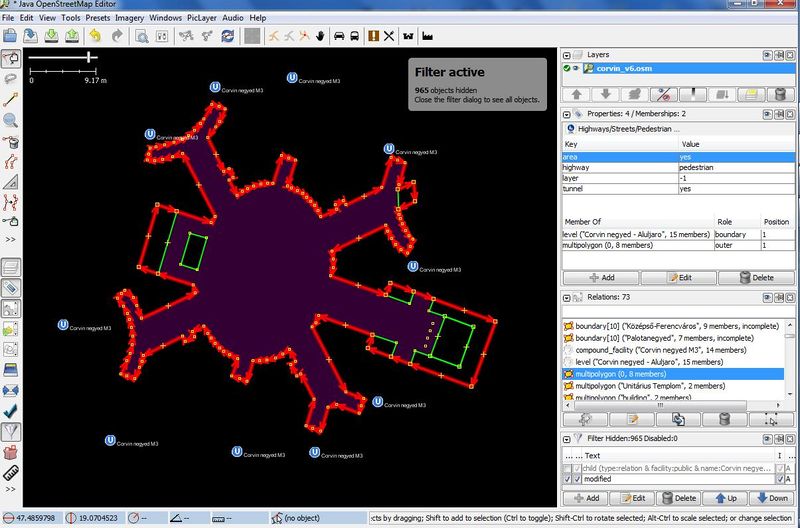
- Creating a multi polygon
- the boundary is already set, it will get the role:outer in multipolygon
- draw new areas with roles differing from the outer boundary, e.g.: shop, operator room, etc.
- Add keys and values to the specific areas:
- area=yes
- highway=pedestrian
- tunnel=yes
- layer=-1
- Creating a multi polygon
JOSM Filtering
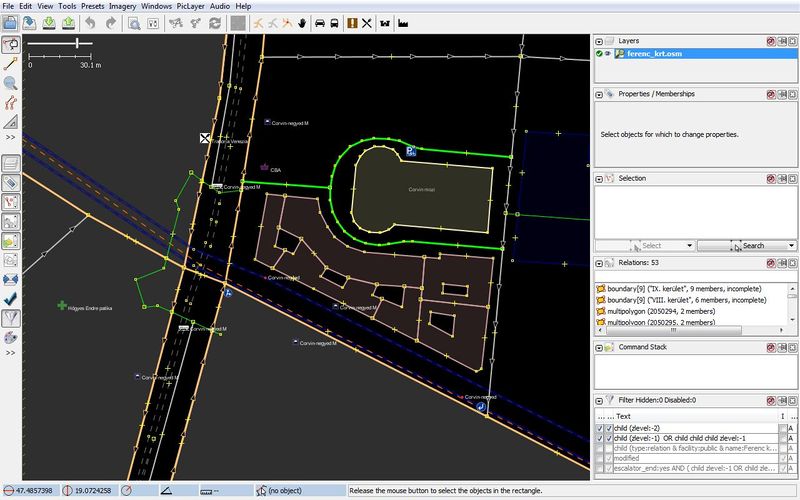
- Working with level -1. Filter text: "child (zlevel:-1) | child child child (zlevel:-1)"
- Working with level -2. Filter text: "child (zlevel:-2) | child child child (zlevel:-2)"
Mapping level entrances
- Level entrances are the nodes where floors can be accessed from other levels
Mapping levelparts
- levelparts are spatial features which have effect on transportation management or for specific user groups.
- In this example on floor (-1) , several objects are mapped as levelparts, like pillars, doors, toilet, shops and areas closed from the public, and ticket validation machines
Creating Metro level
Level relation
- creating the level itself is already explained in the previous section
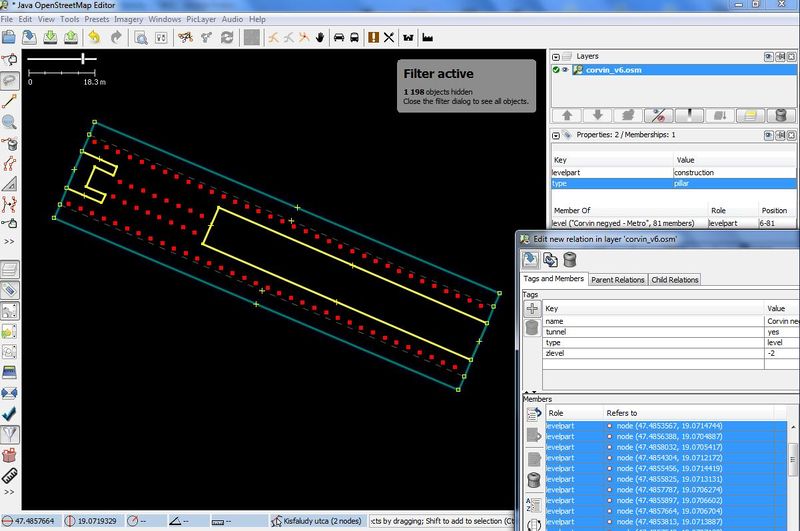
- difference: zlevel=-2
- The following level parts can be found on the subway floor (-2)
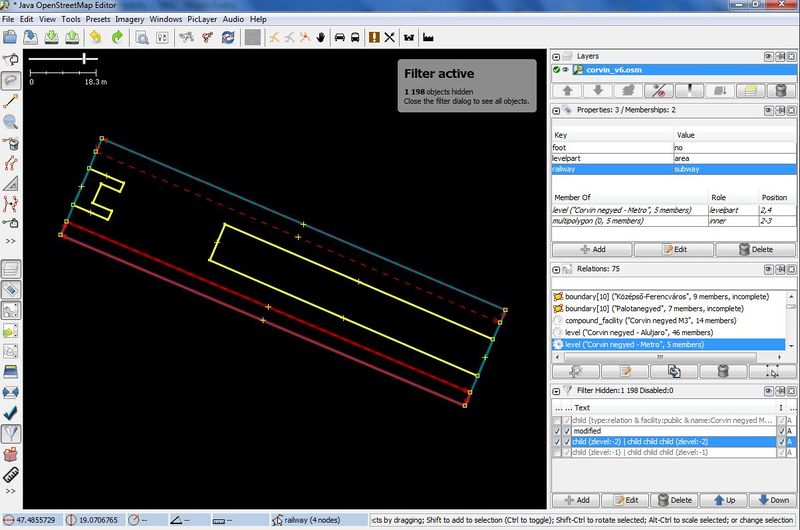
- two railway part
- an area which pedestrian cannot access, however, it contains the operator room
- boarding points
- multiple obstacles - columns
- information map
- multiple benches
- Railway
- foot=no
- levelpart=area
- railway=subway
Mapping obstacles
- Areas closed from public or acting as obstacles
- levelpart=area
- foot=no
- barrier=wall
- Construction
- levelpart=construction
- type=pillar
Mapping Boarding Area and Boarding Points
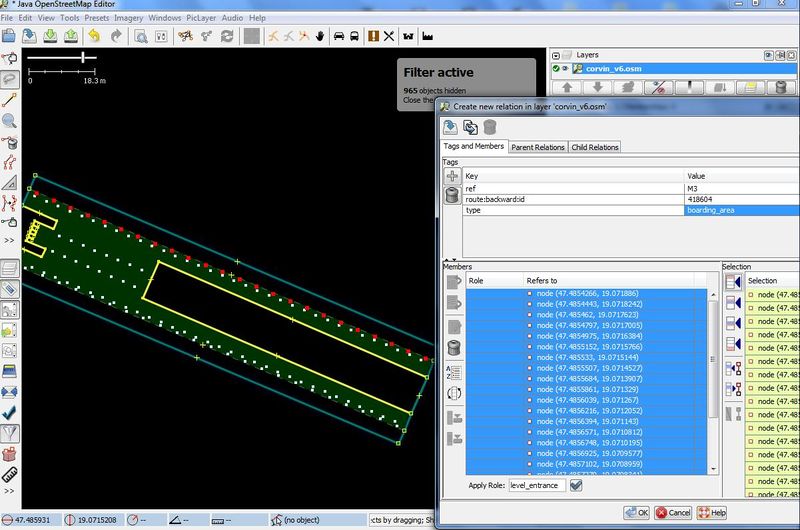
- According to the number of doors on the subway train, set up the boarding points: public_transport=boarding_point
- Collect these boarding points into a Boarding Area relation
- ref=M3 (How the metro line is referenced)
- route:id=418604 or route:backward:id=418604
- type=boarding_area
- Remember, that the route id can be different for different directions of the line
- When the boarding areas are created, add them to the level relation with role=boarding_area
Mapping convex areas
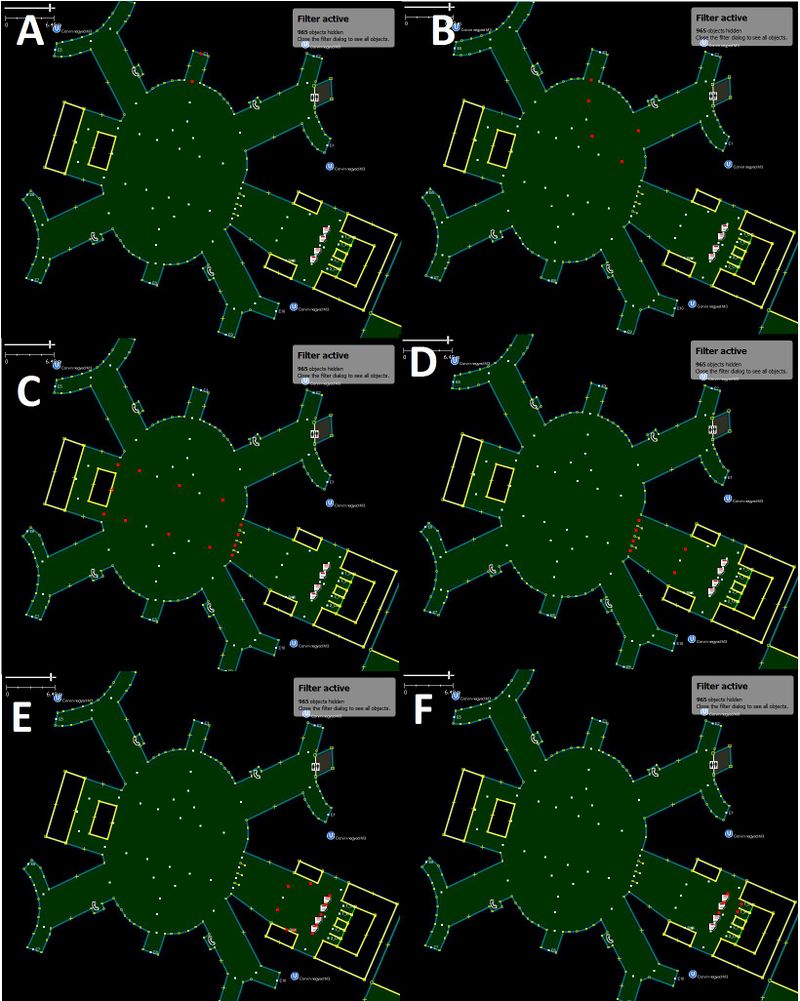
Let's start with a brief explanation: how can we access all the relevant points (entrances, information desk, escalator ends, etc.) from entrance E3? The first idea is we can connect E3 entrance with all other points directly using an OSM way. This solution is straightforward but we will have to do the same for all the other entrances as well. It increases the number of ways which must be stored and could result in a very bad rendering of the indoor map. Therefore we propose another solution for this problem: the use of Convex Areas. Within a convex area, every point can be accessed from all the others. According to the shape of the area and the numerous obstacles, many referce point and hence many different convex areas can be formed. It is hard to find the optimal solution. These points will be connected by "virtual edges" in routing applications and therefore, it will not affect the recent rendering tools, will only be used for routing. A possible layout of new reference points is below
While the following image shows a possible layout of a few convex areas
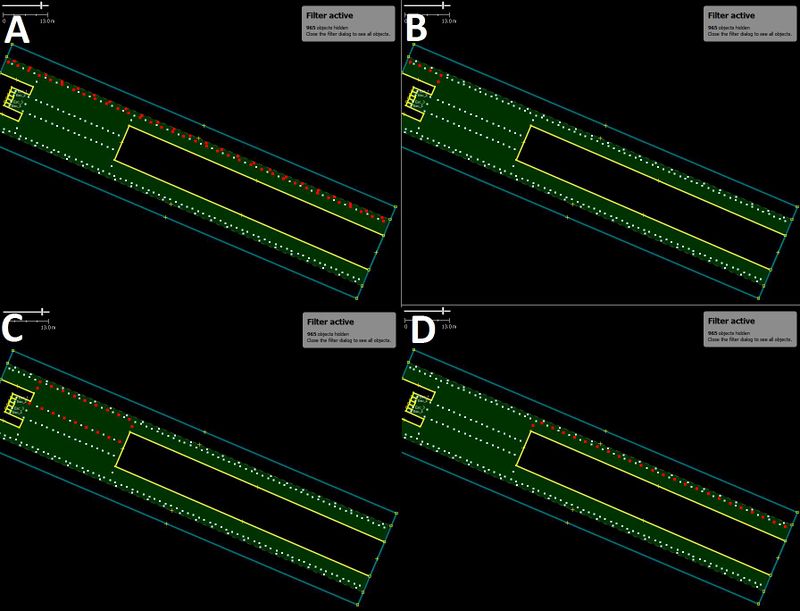
Metro level will need several reference points thanks to the many obstacles within the area
Mapping Restricted Convex Areas
In many cases, reference points are placed between obstacles like in our example. In this case, the basic principle of a convex area is not met, because the reference points cannot be attached by a straight line thanks to the obstacle between. Restricted convex areas are created for such cases, meaning that the members of a restricted convex area cannot be connected
Mapping convex area group
After convex areas were created, they should be grouped in order to indicate which user group they serve for. In this example, the user group is pedestrian and will be applied with tag: convex area group.
Adding convex area group to level
Levels may contain more than one convex area group since they might be accessible for different user groups (pedestrian | wheelchair | blind). All of them need to be added to the level relation so they can be accessed by other applications.
Mapping levels connections
The level connections (connection between floors at level entrances) can be mapped as OSM ways. However the problem is more difficult when we have to map connections by elevator, where the 2 level entrances are overlapped. Therefore we propose to do it by mapping them as OSM relations, with "type=level_connector".
In this example, floors are connected by stairs and escalators which operate in one direction only. Thus, this level connection relation must have key and value : oneway=yes and roles "to" and "from" to the connector's ends in order to indicate their direction.
Adding levels to compound_facility relation
facility should contain the level relations with role=level
Connection with outdoor features
- use level_connector relation to connect entrances with outdoor subway entrances
Compatibility with other editors
Other editors like ID and Merkaartor were tested and they were all capable of handling the new elements
Examples available
Several underground stations of Budapest, Hungary are already mapped using the tags in this proposal
- Határ-út
- Ecseri út
- Népliget
- Corvin-negyed
- Ferenciek tere
They are available at: http://www.addict.hit.bme.hu/twiki/bin/view/Projects/MultiModalMobilityPublic/WebSource
Other examples
Examples which could be mapped according to this model
- subway stations
- airports
Applications
- Pedestrian navigation on example OSM data
- multimodal transportation including pedestrian network
- http://www.addict.hit.bme.hu/twiki/bin/view/Projects/MultiModalMobilityPublic/WebHome
