Old maps and imagery are some of the best resources for figuring out what ground truth might have been in prior ages.
This page outlines fairly straightforward ways to use imagery and old maps for tracing into OpenHistoricalMap. This can involve any number of steps including finding, georectifying, verifying suitable licensing, and adding maps to your OHM editor of choice.
A selection of old maps, old map tiles, and imagery that may be suitable for use in OHM, as well as tools for georectification are listed on the OHM Resources page.
Find a map or old imagery you'd like to edit - literally, anywhere on the web! You can get some ideas for great maps here. You may also want to check out what's already available in your editor's list of imagery, as there are often historical layers already available, as this will allow you to jump to step #5.
Verify it has a suitable copyright for tracing - e.g., public domain, CC0, etc. - for tracing, or that the copyright holder has granted OHM users to trace the map. If a suitable copyright isn't available, consider asking the copyright holder to grant OHM contributors. If the imagery is pre-loaded into your editor, you can assume someone has already obtained appropriate permissions for that map.
Georectify the map - this means aligning the map so editors know where on earth the map represents.
Upload your tracing - it'll be a thing of beauty to behold!
Optional additional workflow
*Pick an old map with too much information for 1 person to trace*
*Recruit your friends to help* - you can ask in the OHM Forum or other online resources.
*Set up a project for team coordination on the OHM Tasking Manager*
Old Maps, Imagery, and Copyrights
Verifying the use rights associated with old maps can vary from very easy (an explicit statement on a webpage hosting the map or the map dataset) to the relatively straightforward (a 200-year old map is almost certainly in the public domain) to the somewhat inscrutable (a commercial map published 80 years ago in the United States by a provider who's still printing that map). There are also a variety of issues surrounding what "public domain" means. Luckily, with the raised awareness around copyright-related issues, more and more publishers and hosters are providing clearer and clearer statements about reuse permissions.
The Out-of-copyright maps OSM wiki page is extremely helpful and should be reviewed if you have any questions about the use of an old map for OHM. In addition, please feel free to contact the OHM community on Slack, Discord, or the Forum.
Finding and using pre-rectified maps
Built into iD & JOSM
Both iD and JOSM have pre-rectified old maps and imagery sources available, as shown in the images here.
Accessing iD's built-in imagery and maps for tracing.Accessing JOSM's built-in imagery and maps for tracing.
See if someone has already georectified the map. Great places for this include David Rumsey, OldMapsOnline,
If the map is already georectified, find the XYZ or WMTS address for the map. This is just a type of URL and not as mysterious as it might sound. See below for more details.
Reverse engineering Web-based slippy maps
Whenever you visit a slippy map on the web (one that you can slide around in the browser, zooming in and out of, etc.), but it doesn't have an obviously available XYZ, WMTS, WMS URL for loading into your editor, you can sometimes still figure out what URL to use for tracing the map in OHM. Key tools for this are your browser's "Inpsect Source" or "Developer Tools" features. If there's an online slippy map that you want to use, but you cannot figure out how to get it into your editor, please reach out to others in the OHM community.
Georectifying old maps
Identify the type of image the map is
The type of image you're looking at - e.g. file format, whether it's already on a server, etc. - may influence what georectification tool you use to work with that map.
Any old map image - e.g. a jpg or png file - Mapwarper.net, QGIS (but no hosting)
Georectify the map using the georeferencing tool of your choice
It's pretty much the same everywhere - aligning points on the map with corresponding points on a web-based representation of the earth. As per above, which tool you'll want to use is largely driven by the source of your imagery.
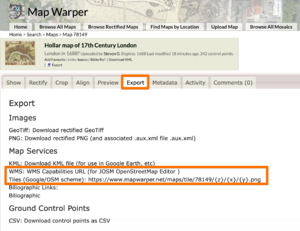
Finding the georectified map URL to put in your editor in Mapwarper's Export tab.Mapwarper.net - this is a great tool for georectifying maps you may have downloaded.
Wikimaps Warper for images hosted on Wikimedia Commons. The option to rectify maps in Wikimedia Commons appears automatically for images that use the Map template. Use the Trace tab to open iD with the georectified image preloaded as an overlay.
Allmaps.org - as discussed above, this is a tool used for georectifying high-resolution, highly-zoomable maps that use the IIIF format, which is common in libraries and museums. The Library of Congress, Leventhal Library, and many other libraries around the world have adopted IIIF as a standard for displaying high-definition imagery. Just look for the IIIF logo or "IIIF Manifest" URL on the web page for a library-hosted old map. Here's a short presentation on using Allmaps in OHM.
OldInsuranceMaps.net - this site is focused on hosting and georectifying Sanborn Fire Insurance maps in the United States. It also has a special button to automatically open the georectified map in OHM.
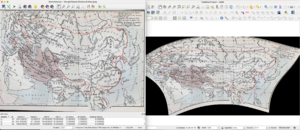
Georectifying in QGIS: a map of the of The Mongol Dominion from Shepherd's Historical Atlas.QGIS - this is a powerful open-source (and free!) GIS package, similar to the commercial ArcGIS from Esri. It has built-in georeferencing tools to use images you have downloaded. But, you may want to do your tracing in QGIS, save your tracing as a shapefile or GeoJSON using the appropriate CRS, and then import the shapefile to OHM using JOSM and the JOSM OpenLayers plugin.
Size of the map's area of focus matters
tl;dr: Large area maps are hard to georectify well.
The larger area a flat map covers, the harder it can be to accurately represent how that map aligns with the earth. This is why map projection can be so difficult. Suffice to say, it's easy to match up a very small stickie note on the surface of a reasonably-sized globe, but it can be very tricky to align a sheet of paper with an entire continent or to wrap a globe with flat paper. So, the smaller the area covered by the map, the easier it will be to accurately align that map for editing and matching other mappers' data.
Another issue for working with large area maps is that they've already been projected once to get onto a flat sheet of paper. Georectification requires that this map be reprojected to the Web Mercator projection used for many online mapping services, including OSM and OHM. Each projection - the original mapmaker's projection as well as the georectification projection - has inherent errors. Layering these two reprojection errors on top of an old map with inherent spatial inaccuracies can make working with old maps very tricky indeed.
Working with control points
Most major georectification tools work by having a user identify corresponding points on a source old map to be georectified and on a map with trusted accuracy. Often, his trusted map is from some provider of modern satellite imagery. These points are called ground control points or GCPs.
Two key questions related to GCPs: how many GCPs are enough and what's the best way to position GCPs? With both, there are some general good practices, but there's a bit of an art, as well as a science to georectification.
How many GCPs?: 3 is the minimum, but is probably not sufficient, and more is not always better. The last assertion may be confusing, but there is a weighting of the GCP positions and if many GCPs are placed in locations that reflect the source map's spatial inaccuracies, the rectification algorithms may warp the rest of the map in ways that are unhelpful.
How to place/position GCPs?: General principles: zoom in as much as possible on both the old map and the trusted reference; use points on both maps that have high likelihood of having *not* changed over time. For example, the center points of road intersections are likely to be relatively similar over time (unless lanes have widened, roads been straightened, etc.), but the corners of blocks may have moved. Key practices here: be suspicious; challenge your assumptions; be willing to delete or move GCPs if they produce bad results.
How to choose the right rectification method?: The rectification method can make a huge difference in the final result, though it is not always obvious how or when to adjust this. For example, in MapWarper the "auto" method can be overridden in "Advanced options" under "Rectify Method". If the rectification method has too much freedom, the rectified map can end up warped in areas between GCPs, whereas less freedom will keep the rectified map more rigid. Instead of using "auto", it is often better to try the least freedom method first (e.g. "1st order polynomial") and only moving to more complex methods if the simpler methods are failing.
Spatial accuracy of old maps
Old maps have many spatial inaccuracies. Sometimes, they are internally inaccurate. For example, an old map could be highly accurate along edges, or roads, but inaccurate once you move to the center of the map or away from the road. Or, it might be accurate for the relative position of major cities, but everything between those major cities might be off. And, it may not be consistently off throughout the map. Some parts might be too far north, while others are too far west.
In some cases, an old map might be valuable for georectification and tracing only in part of the map. Don't throw out a map just because the whole map is unable to be georectified. Also, a map may need to cropped into several parts and each part georectified separately.
Georectification URLs - XYZ, WMTS, TMS, etc.
After you have added enough control points (or, corrected the positioning of your control points) and you're satisfied with the quality of your georectification, you'll want to copy the georectification URL from the georectification tool and add it to your editor.
Many georectification tools (Mapwarper, Allmaps, etc.) provide an XYZ endpoint, but not all. XYZ endpoints generally follow this format: https://mappingtool.io/mapID/{z}/{x}/{y}.png. But... others follow formats like https://mappingtool.io/mapID/{z}/{x}/{-y}.png.
ArcESRI MapSever layers that are enabled for public access may look something like https://tiles.arcgis.com/tiles/[map code]/arcgis/rest/services/[layername]/MapServer/WMTS/tile/1.0.0/[layername]/default/[layerdetail]/{z}/{y}/{x}.
WMS URLs often point to detailed files (Mapwarper example) that editors can use to enable the display of the georectified map.
Loading the map in your favorite editor
Loading old maps and imagery in iD
If you used Wikimaps Warper to georectify the image, go to the Trace tab and click the link to open iD with the image preloaded as an overlay.
Otherwise, in the OHM iD Editor, open the layers panel in the right-nav, click "Custom" and paste in the URL from your georectification tool. You can use the same field on the "Custom Background Settings" window for all types of georectification URLs - XYZ, WMS, TMS, WMTS, etc. The rectified map should show up immediately after closing the custom settings window.
Steps for adding xyz tiles to the iD editor in OHM
Loading old maps and imagery in JOSM
In JOSM, you'll first need to create a custom imagery layer and then select that layer.
To create the layer, open the Imagery Preferences window, either through JOSM->Preferences->Imagery or Imagery->Imagery Preferences.
Adding a georectified map XYZ tile using JOSM's "Add Imagery Layer" dialog.
Then, based on the type of URL provided by your georectification tool, you'll need to click on the "+" button that corresponds to the type of URL you are using. For XYZ tiles, select the "+TMS" button and add the information highlighted in orange in the image to the right.
JOSM's Imagery Preferences window.
Unlike iD, you'll need to click the appropriate button for your URL type in order to add the imagery.
Also unlike iD, JOSM requires users to then select the just-created map layer from the Imagery drop-down. The benefit of this extra step is that mappers can add any number of custom layers to their editing session and switch rapidly between them.
Switching back and forth between a georectified old map and modern imagery is a great way to validate the accuracy of your georectification. While many features on the old maps no longer exist, it is highly likely that there is evidence of old features still showing on the earth. Examples include road centerlines, block corners, monuments, dry riverbeds, abandoned railroad tracks, etc.
When things are a little off
Sometimes you just won't be able to align your map perfectly to where it should be, based on modern imagery. This might be true, no matter how many control points you add to your georectification. In these cases, you may want to trace what's available directly from the map and then move all of those objects slightly to account for the georectification errors. You can see a depiction of this here.
When someone has already mapped something
Other times, your map will vary slightly from already-mapped information. In those cases, try to understand why the prior mapping is where it is and engage with the community before making edits. The prior-mapped objects may (should!) have `source` tags that may provide some other maps to compare to yours. You can also identify the author(s) of the prior mapping and reach out to them through OHM's messaging capabilities or by commenting on their prior changesets. It's important to seek the truth constructively.
Be careful with borders and coastlines
Both borders and coastlines have special properties and considerations when mapping. If you aren't experienced with either, it is best to get the assistance of others in the community to ensure these are being handled properly.
Be very careful and wary of maps on Wikimedia Commons
In general, there are an incredible volume of amazing maps to be found on Wikimedia Commons. Scans of original old maps generally have no issues.
SVG and other human-drawn maps, however, very frequently have issues related to misattributed copyrights and sporadic sourcing. For example, some SVG maps are directly sourced from copyright-protected maps from books or other publications, but are listed as some variation of CC BY-SA or CC0. In other cases, no source is listed, or a source is listed for which there is no connection to the map, or the source is just a pointer to a different Wikimedia SVG map of questionable provenance. Some examples are shown here.
When georectifying and tracing SVG or human-created JPEG or PNG maps from Wikimedia Commons (or anywhere else), please try to ensure that they were created from trustworthy sources with appropriate copyright and licensing permissions. Tracing the original source, where it is identifiable, may be a better way to obtain a quality trace for OHM.
In cases where a Wikimedia Commons SVG map is used for tracing, please be sure to add the appropriate license tag and add a source:2="name of primary source" tag if a primary source for the SVG is included.
Don't work too hard on figuring anything out
Whatever problem you're facing, the OSM community has probably already solved it. Drawing buildings, making lines parallel, tagging properly, etc. Nothing is too obscure, so just ask!
Properly tagging your old map traces for OHM
Tagging practices for OSM and OHM share many similarities, have significant differences, and are both topics worthy of many, many wikipages.
OHM tagging practices is a great place to start, but the following are the most important areas to remember, so they bear repeating here: