FR:Potlatch 2/Primer
Potlatch 2 est le logiciel d'édition OpenStreetMap qui est lancé lorsque vous cliquez sur l'onglet 'Modifier' de la page d'accueil d'OpenStreetMap.org. Il se lance directement dans votre navigateur internet et ne nécessite par conséquent aucune installation particulière (mais il faut que votre navigateur supporte les applications de type "Adobe Flash" ce qui peut nécessiter l'installation d'un module d'extension si ce n'est pas déjà le cas).
Avant de commencer à éditer, il est impératif de s'inscrire auparavant et donc d'avoir un compte utilisateur sur OpenStreetMap. Une fois inscrit, regardons ce que Potlatch 2 propose comme fonctions.
Vue
Arrière-plan
Changer l'arrière-plan
Cliquez sur le bouton "Arrière-plan" pour ajouter ou changer les images affichées en toile de fond sur la zone d'édition. Les sources "Bing aerial imagery" et "MapQuest Open Aerial" sont des images aériennes particulièrement utiles pour ajouter ou rectifier des données et sont légalement utilisables pour OSM (d'autres sources ne sont pas autorisées comme les images de Google Maps par exemple).
Attention toutefois à l'alignement des photos qui peuvent être en décallage de quelques mètres par rapport à la réalité (parfois beaucoup plus suivant les pays). Une touche permet de réaligner les images avec d'autres sources (GPS, cadastre, etc), voir plus bas.
Assombrir l'arrière-plan
Après avoir cliquer sur le bouton "Arrière-plan", vous pouvez cocher la case "assombrir" pour activer ou désactiver la fonction d'assombrissement de l'arrière-plan. Cela peut éventuellement vous permettre de mieux voir les données en avant-plan, tout dépend du travail que vous avez à effectuer.
Ré-aligner le calque de l'arrière-plan
Avec les images de l'arrière-plan, vous pourrez remarquer que parfois celles-ci ne sont pas correctement alignées avec les données d'OSM. Si c'est le cas, vous pouvez ré-aligner les images de l'arrière-plan en gardant presser le bouton "espace" du clavier puis en déplaçant l'imagerie vers sa bonne position avec la souris dans la zone d'édition.
Attention toutefois : il arrive que les images aériennes soient correctement positionnées mais que ce sont les données OSM qui soient elle-mêmes mal alignées. Il faut alors juger par soi-même quelle est la meilleure source (chercher à voir d'où proviennent les données OSM déjà présentes: GPS, cadastre ou approximations ou d'anciennes images aériennes; OSM a pu par le passé utiliser des images de précision inférieure provenant de Yahoo! ou SPOT Images). La date des contributions précédentes peut aussi être prises en compte (en général, les contributions anciennes sont aussi issues de sources de faible qualité de positionnement). Pour la France, les données cadastrales comme le bâti ne sont pas exempte d'erreurs d'alignement, en particulier dans les zones non-urbaines. Il faut aussi faire attention au fait que l'alignement des images aériennes peut varier en fonction des niveaux de zoom.
Style de carte
Pour pouvoir encore améliorer d'avantage l'aspect et la convivialité de Potlatch, vous pouvez changer le style de rendu de la carte. De la même façon que vous pouvez changer l'arrière-plan, certains styles de cartes sont mieux adaptés au type de travail que vous effectuez sur les données géographiques d'OpenStreetMap.
Données GPS
En cliquant sur le bouton "Données GPS" puis sur "GPS Informations", vous pouvez afficher toutes les traces GPS partagées par les autres contribteurs sur la zone d'édition actuelle et qui seront visibles sous forme d'un mince trait bleu. En choisissant l'option "Mes Pistes", vous afficherez uniquement vos traces GPS que vous aurez auparavant transférer au serveur OSM via la page "Envoyer la trace GPS". Pour supprimer l'affichage des traces GPS, il suffit de sélectionner l'option "Effacer" sur le bouton "Données GPS".
Editing Tools and Techniques
Before you begin editing, the first rule you need to know is the use of proprietary data. Data from copyrighted maps or any other proprietary data is strictly prohibited! Copying, tracing, or any act of reproduction of copyrighted work is not allowed! (Source: Copyright)
Please note: Linear features such as streets, footpaths, railways, and building outlines will hereby be referred to as ways.
Creating Features
Upon creating new features, be sure to tag them. See the Tagging Features section below for more information.
To create a point (or node), first make sure there are no features selected and just drag and drop the appropriate icon from the sidebar onto the map. Alternatively, you can double-click on the map to create a Point of Interest. Then refer back to the sidebar and select the appropriate tag in order to display the correct feature and icon.
To create a way, begin by clicking on the map at its start point, then click at each successive point. Double-click to finish the line or press ↵ Entrée.
To create a new way extending from an existing way, ⇧ Maj+click on one of the end points of the way. Then continue drawing as usual to create a new way with a new set of tags. If you were just looking to extend the existing way and keeping the same tags, see To extend a way below.
To create a polygon, begin by clicking on the map at its start point, then click at each successive point (similar to creating a linear way), and finish by clicking on the very first point to close the polygon. Hint: The cursor will change from the pen tool to a pen tool with a small black circle when hovering directly over the first point.
Basic Edits
To add a point to an existing way, select the way and ⇧ Maj+click at the desired location. Adding more points will help realign features and smooth curves.
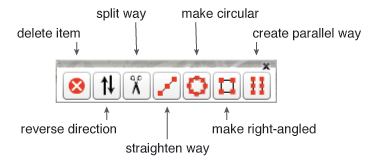
To delete a point, select the point and click the Delete Item button in the bottom right corner or press ⌦ Suppression (⌫ Retour Arrière) on your keyboard.
To delete a way, select the way and click the Delete Item button in the bottom right corner or press ⇧ Maj+⌦ Suppression (⌫ Retour Arrière) on your keyboard.
To move a point, click and drag the point.
To move a way, click and drag the entire feature (hint: grab a segment where you won't accidentally move a node).
To extend a way, click on one of the end points of the way. Then continue drawing as usual.
Advanced Edits
To make a junction between two ways, draw as usual until you need to make a junction. Then as you move your mouse over another way, the points will light up in blue. Click on one of the blue points or any other desired location on the way. Junctions must be made if the features are connected. For example, if two roads are connected, creating a junction will allow the two to share a common node and proper routing can take place.
To disconnect a junction, select the point on the way you wish to alter. Then press - on the keyboard to remove the point.
To reverse the direction of a way, click the Reverse Direction button in the bottom right corner. The direction of a way is only a concern for those features with a "oneway" tag - oneway streets, coastlines, islands, and so on.
- NEW: The direction of the selected way is indicated by the arrow on the Reverse Direction button!
To split a way, select the point at which you want to cut, and click the Scissor tool (or press X on your keyboard). Splitting ways are obviously helpful for disconnecting ways but the main purpose of splitting is often to tag the split features differently. For example, an overpass should be split and tagged separately as a bridge, and roads should be split at county borders and tagged as being in different counties.
To straighten a way, select the way and click the Straighten Way button in the bottom right corner. This will straighten the way by removing all points that are not junctions.
To make a way circular, select the way (must be a closed polygon) and click the Make Circular button in the bottom right corner.
To make a way right-angled, select the way (must be a closed polygon) and click the Make Right-Angled button in the bottom right corner.
To create a way running parallel, select the way and click the Create Parallel Way button in the bottom right corner or press P on your keyboard. This is especially useful where a divided highway exists and only a single way is shown.
Editing relations
To edit a relation in Potlatch 2:
- select a node or way which is a member of that relation
- select 'Advanced' on the left to see the relation list
- double-click the relation
Then, click 'Members' to see the members in order. You can change the order by dragging the list entries.
To add this relation to another, 'parent' relation, click 'Advanced' and then 'Add to'.
Tagging
Tagging is a major aspect of editing in OpenStreetMap. Fortunately, this process has been simplified over the years to reduce errors and unconventional tags from being used.
A great resource you should probably have bookmarked is Map_Features. It describes the differences between the various tags and what additional tags should probably be captured.
Tagging a Point via Drag/Drop
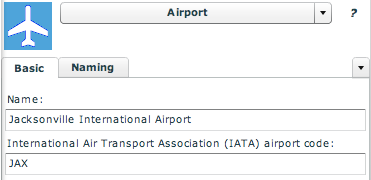
When creating a new point feature, dragging an icon from the sidebar to the map will automatically take care of some basic tagging. For example, when you drag an airport icon to the map, Potlatch has already tagged it as an airport.
Just as a side note, click the Advanced tab on the bottom. You will see the key=value pairs that make up the airport tag. aeroway=aerodrome is what's used to tag an airport in OpenStreetMap. It's not the most intuitive tag (at least in the United States), nor very memorable so we should feel quite fortunate that Potlatch has taken care of this for us. Now that you've seen how complex tags can get, click on the Simple tab to return to where you were.
With the feature still selected, refer to the sidebar again and begin typing in the airport's name in the Name field to add additional tags. Browse through all the fields and tabs, and fill out as much information as you can.
Once you're satisfied with the tags you have added, save, and move on to your next edit!
Tagging a Point via Double-Click
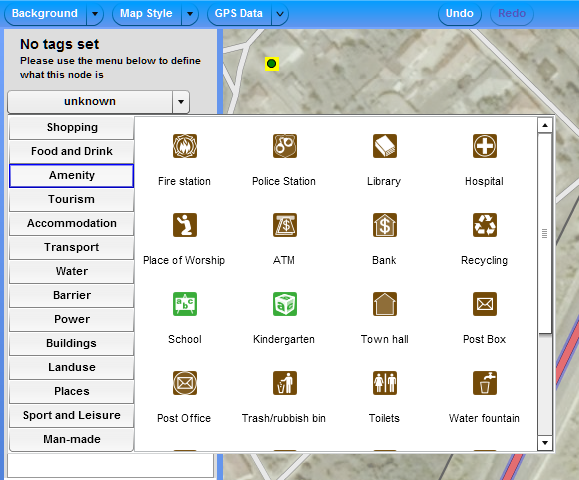
If you had already created a generic point by double-clicking on the map, you'll need to edit the tag manually or else no one will know what the point represents. Make sure this point feature is selected and choose the appropriate tag via the drop down menu in the sidebar currently labelled unknown.
Once you've chosen the correct POI type, browse through all the fields again and fill out as much information as you can.
Tagging a Way
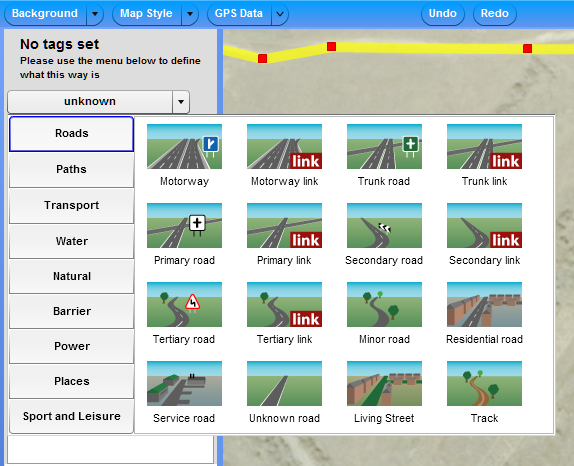
Unlike tagging a point, you can't drag and drop a primary road onto the map. You'll need to first draw the way and manually edit the tag later. Begin by drawing your new way and with the feature still selected, choose the appropriate tag via the drop down menu in the sidebar currently labelled unknown.
There are a number of similar options here regarding the road types, transportation, etc, so please don't forget to refer back to the Map Features documentation.
Once you've chosen the correct way type, browse through all the fields again and fill out as much information as you can.
Tagging multiple ways in one go
Often, multiple ways must be tagged identically. For example, a city street often consists of several ways, and while some tags will be different, many (such as highway=residential and name=Main Street) will be the same. To make this easier, you can select multiple ways in one go, using Ctrl+Click (Command-Click on a Mac). Then, the detail pane will allow you edit tags which will apply to all selected ways. Tags which have different existing values for different ways will be marked as '<different>'.
Importing (GPS, Shapefiles, etc.)
In the Background tab, click the Vector File button and choose between GPX, OSM or a Shapefile to assist you with your editing. Currently there is no way to import a local file (ex. a file from your own computer).
Undoing
Undo a Single Edit at a Time
If you make a mistake, you can always hit the Undo button or press Z on your keyboard.
Undo All Edits for the Feature
Pressing the Esc key will undo all your edits for the current feature.
Saving
Saving with a Comment
When all your edits are complete and look satisfactory, click the Save button and a small dialog box will prompt you to add comments on the edits you made. OpenStreetMap encourages users to leave a comment informing others of what changes were made and why.
Remember that any edits you save will not be immediately visible on OSM maps. This generally takes several hours so don't worry if you don't see your changes right away.
Note: If you want to close your changeset after saving, use the C shortcut.


