Pt:Key:bridge
 |
| Descrição |
|---|
| A ponte é uma construção artificial que se estende por uma estrada, ferroviária, fluvial ou outro recurso e carrega um rodoviário, ferroviário ou outro recurso. |
| Grupo: propriedades |
| Usado nos elementos |
| Valores documentados: 2 |
| Combinações úteis |
|
| Ver também |
| Situação: aprovado |
| Ferramentas |
|
A tradução desta página precisa ser revisada/revista. (desde julho de 2016) Se você entende inglês e gostaria de contribuir, por favor ajude a melhorá-la. |
| Please translate the table Template:Bridges and delete the old on |
A ponte é uma construção artificial que se estende por uma estrada, ferroviária, fluvial ou outro recurso e carrega um rodoviário, ferroviário ou outro recurso.
There is a single "bridge=<type>" tag:
bridge=yesbridge=aqueductbridge=viaductbridge=movable+bridge:movable=swingbridge=yes+bridge:structure=simple_suspension
que inclui várias estruturas semelhantes a pontes e pontes, como viadutos e aquedutos.
Em outras palavras, todas as estruturas de ponte são valores da tag de ponte. Isso é aceitável nos nós e nas formas, embora a maioria das instâncias seja de formas curtas.
No caso de um undercrossing / underpass você tem que decidir com base na construção, se você estiver sobre um túnel ou em uma ponte. As rampas de ambos os lados em um viaduto não fazem parte da ponte. Uma rampa pode ser marcada como aterro.
Como mapear

O caminho de uma rua ou de uma estrada de ferro deve ser dividido em três partes: o caminho antes da ponte, a ponte em si, o caminho depois da ponte. Muitas vezes, a ponte não se conectará diretamente a uma junção. Nesse caso, você deve adicionar um pedaço de estrada ligando os dois.
- Mark the beginning of the bridge (abutment) by a node.
In JOSM split the line bykey P, in Potlatch bykey x. - Mark also the end of the bridge by a node.
In JOSM split the line bykey P, in Potlatch bykey x. - Now select the way representing the bridge.
- Add the attribute
bridge=yes.
Example for a primary road:
highway=primary+bridge=yes+layer=1+name=usually the road over the bridge+ref=*
For the name of the bridge itself there are two proposals: bridge_name (en) and one using relations (en)
Other useful tags:
maxweight=*- max loadmaxspeed=*- speed limitmaxheight=*- use this on the road under the bridgeheight=*- height over groundlength=*- lengthmaxheight:marine=*- for sailing clearance under the bridge, use this ONLY if you are sure about it
Pontes Complexas

Para a descrição de pontes complexas, onde duas ou mais pontes se cruzam, usamos Key:layer:
highway=motorway- the ground level +layer=0highway=motorway- the first bridge from ground level +bridge=yes+layer=1highway=motorway- the upper bridge +bridge=yes+layer=2
There are five layer-degrees upwards (1 to 5), and five downwards (-1 to -5).
For ascending/descending chutes we dont use a layer.
When there are several bridges close together it is sometimes acceptable not to tag them as bridges, but to tag the single road below as going through a tunnel.
Combining with Key:layer
Tag layer=* is used to separate things that are physically on different levels. The tag bridge=* does not imply anything about layers, so if your bridge crosses any feature on layer=0 (the default if not present), you should consider adding a layer=1 (or higher).
Relation
A bridge can also be tagged as a relation. The proposal can be found under: Relations/Proposed/Bridges_and_Tunnels (en). This enables the grouping of several ways using the same bridge. The relation also enables tagging the number of the bridge (in germany bridges and tunnels have "Bauwerksnummern").
Renderização
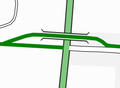
In Osmarender (en) (version 4) bridges are drawn with a black outline ending in angled little stubs. The road is drawn on top as usual depending on its type. OSM Carto (en) uses a black outline for bridges. JOSM (version 2561) defaults to usage of a blue-colored way segment. In the JOSM wireframe view, there is no distinction between bridge and non-bridge way segments.
-
 Osmarender (en) unclassified
 -
 Osmarender (en) cycleway (en)
 -

-
 JOSM wireframe


Veja também
- Key:name - Name of bridge or road through the bridge
- Key:layer - specify the layering of your ways in special cases.
- Approved features/bridge (en) - discussion and voting for extension of values
- Proposed_features/Bridge_Name (en) - proposal for the name of the bridge itself
- Relations/Proposed/Bridges_and_Tunnels (en) - group multiple bridge elements with a relation