Import Nigeria eHealth Borno Health Facilities Workflow
In this wiki we will:
- present the general import rules in OSM, then the data itself, the tool set to make the import, and the extra data that will be added as a useful complement.
- describe step-by-step a workflow to make the import, with screenshots and tips.
Quick Reference
In case you have read and understood this workflow, you can refresh all steps here.
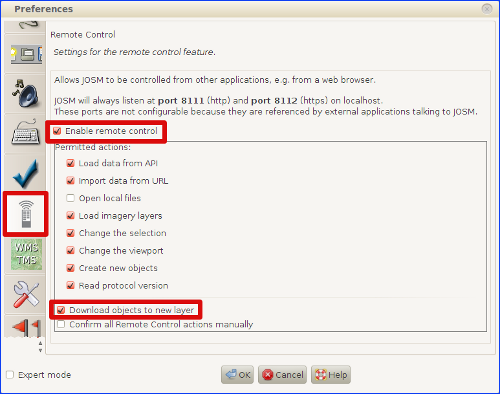
0. Check you have installed the Todo list and UtilsPlugin2 JOSM plugins, and that you have the remote control and the Download object to new layer enabled.
1. Load the data. Choose a task of the project and load the OSM data and the eHealth Africa health facilities into 2 different layers.
2. Add road access to all health facilities and contextual data (buildings). We will do this in the Data Layer 1. Remember to follow the Highway Tag Africa and the Nigeria roads tagging schema. Correct roads already in OSM when needed. Tag bridges and fords when river crossings, and never forget to add the surface=* tag to all roads. Add buildings when sure they are the ones from the facility.
3. Make sure you finished creating/modifying/deleting roads and other objects before proceeding to the next step, as you aren't allowed to add this kind of objects during the import steps
4. Upload these roads and contextual data to OSM, using your regular OSM account, with the following changeset tags:
- comment=eHealth Africa Borno Health Facilities import, #hotosm-project-946
- source=Bing or source=MapBox or source=Bing;MapBox, depending the imagery provider/s you've used.
5. Merge the layers. Merge the eHealth_Africa_Health_Facilities_BO.osm layer with the Data Layer 1 layer.
6. Add eHealth nodes to the Todo list. With the new filter, select all eHealth nodes and add them to the Todo list. Unselect all nodes, unselect the new filter and double-click on the first node of the Todo list. Zoom out a little to have a better view of the health facility surroundings.
7. Check the location of the node. If we spotted and are sure about the building(s) of the facility, move the node to the centre of it. Otherwise, don't move it. In case the position is suspicious, leave a fixme=Location approximate on the node tag on the node and report this with a remark in the TM task commment box.
8. Check the spelling of the node. Check both the name=* and the addr:full=* tags.
9. Two nodes near each other or at the same point. If at the same point, move one of them slightly to a nearby position. Otherwise, don't do anything. If something suspicious, leave a remark in the TM task comment box, for later review.
10. Mark the node in the Todo list. If there are more nodes still to check, go to step #7. Else, proceed to next step (#11).
11. Upload (import) the nodes to OSM, using your special OSM account, with the following changeset tags:
- comment=eHealth Africa Borno Health Facilities import, #hotosm-project-946
- created_by=JOSM/version
- source=ehealthafrica.org
- import=yes
- url=https://wiki.openstreetmap.org/wiki/Import_Nigeria_eHealth_Borno_Health_Facilities
12. Switch back to your regular OSM account now, to avoid using it for purposes other than importing
Presentation
Import rules in OSM
The data from eHealth Africa, considering its high accuracy, is to be imported into OSM and consequently, needs to follow the guidelines of any to-be-imported dataset.
The dataset has been analyzed, the attributes have been converted into tags, presented and validated to the imports mailing list.
Any import must be done through a specific OSM user account. So the advice is to create a new OSM user account (eg the usual name with _import at the end) from a secondary email address.
Only the eHealth Africa data will be uploaded using this account, so any other edit must be uploaded with the everyday OSM account. As the import is the opportunity to add objects around it, the proposed workflow will integrate this to make the whole job easy and efficient.
The eHealth Africa data for North Nigeria
These data has been originally made through field surveys conducted by tens of field collectors during the last 2 years within the 10 Northernmost states of Nigeria (Kebbi, Sokoto, Katsina, Zamfara, Kano, Kaduna, Bauchi, Jigawa, Yobe and Borno).
During the import we will put changeset tags that indicates the source. Nonetheless, it is useful to keep the source tag for each object as the changeset information is not forcefully got from any OSM extract tool and eHealth Africa could be disappointed not to be mentioned for this data + the metadata can disappear easily once the information is shared and shared, and the source can be a very useful information for people who will work with these data.
An import through the Tasking Manager
Rather than a single, blind import, it has been decided to import the data with a control check of each object. An specific HOT Tasking Manager project has been created for this purpose.
They all share the same grid and a specific feature: they propose to load in JOSM the extract of the data to be imported over the area of each task (square). Consequently, the normal OSM layer is loaded from the Tasking Manager + one layer containing only the eHealth Africa data for that task.
Other data to be added
Although not part of the import itself, we will use this import to trace the roads that access each of the health facilities, so we will improve the road coverage for Borno state in OSM. For the classification of the roads, it's very important that you read and understand very well the roads section in the Nigeria Wikiproject page, that is mainly based in the Highway Tag Africa wiki with some small adaptations to the Nigerian particularities. We can improve the existing roads accuracy and their tagging at the same time.
We will also add the health facilities buildings when possible.
Workflow
The workflow will show:
- first the common steps to start
- next, we will show some tips on how to add road access to all health facilities, with your regular OSM account
- last, we will show the final step about how to check and import the eHealth Africa health facilities, with your special OSM import account
Load the data
Open JOSM. Before you do anything, check that you have the remote control enabled and the Download object to new layer box selected in the JOSM preferences:
We also have to install the following JOSM plugins (if we don't have them yet in our JOSM): Todo list and UtilsPlugin2.
In case you needed to change any of these preferences, restart JOSM. Load Bing imagery and, if needed, MapBox imagery too.
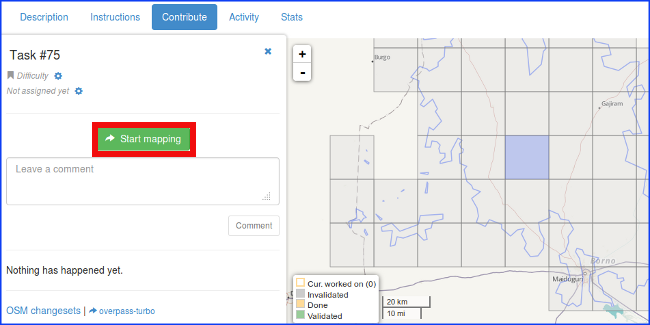
Go to the import TM project, choose a task, click on Start mapping...
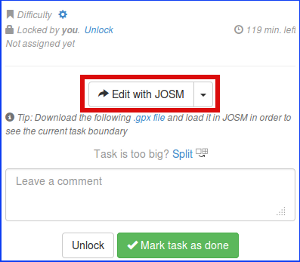
and then click on Edit with JOSM button...
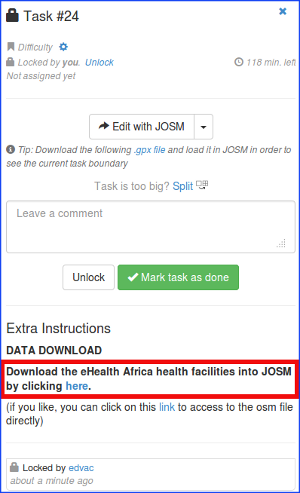
Once the OSM data is loaded, you need to load the eHealth Africa health facilities into a second layer. To do so, click on here in the sentence Download the eHealth Africa health facilities into JOSM by clicking here in the Extra instructions:
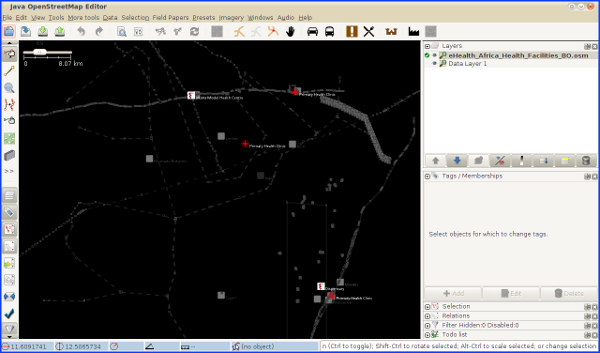
A new eHealth_Africa_Health_Facilities_BO.osm layer will be loaded in JOSM, containing the health facilities nodes to be imported for this task:
Preparing the import
The import will consist of 2 main steps:
1. Adding road access to all the health facilities and other contextual data, and uploading them with your regular OSM account.
2. Importing the eHealth Africa health facilities: Checking the correctness of the nodes (spelling, presence of duplicates, etc.), merging them with the OSM data (quite rarely we will find any other facility) and uploading them with your special OSM account.
Adding road access to all the health facilities and other contextual data
This is the step that is not actually part of the import. But adding a health facility to a map without mapping its accesses doesn't make much sense. We will also, when possible, add the buildings of the facility.
Roads
Before starting tracing roads, you have to:
a) Read and understand well the Highway Tag Africa wiki (if you haven't done it yet). All of it. Specially, pay attention about the restricted use of highway=track and highway=path. You will normally be tracing highway=unclassified and up.
b) Read and understand the (small) adaptation of the Highway Tag Africa wiki for the particularities of Nigeria. In general, you won't have almost any chance on tracing any new trunk nor primary roads, as they are mostly completed for Borno state (they are the A (trunk) and F (federal) roads). Most of roads will be either unclassified or tertiary roads. Most secondary roads will be eventually edited in another job out of the TM. As a rule of thumb, tertiary roads generally interconnect wards (municipalities), and unclassified roads are lesser roads that give access to villages and hamlets (normally with connecting purposes).
We will trace roads in the OSM data layer (Data Layer 1 if we have our JOSM localized in English), never in the eHealth_Africa_Health_Facilities_BO.osm layer!
If we find roads that have an incorrect geometry or wrong tags, we will also correct them.
Another particularity, specially for North Borno State, is that many roads are composed by several paths going in parallel. You can see this [example]. When this happens, we will just trace one way only: in some cases we can trace the most used of all tracks, and in other cases we will just map a way going through the middle of all tracks.
As usual, pay attention for river crossings, tagging bridges and fords accordingly. It the stream/river is not mapped yet, you can just map some meters up and downstream from the crossing.
And please, don't forget to add the surface=* to all roads!. The huge majority of all unclassified and tertiary roads in this area are not paved, so either surface=unpaved or surface=ground will be appropiate. Remember that unclassified/tertiary roads and up, are assumed to be paved by default.
Note that we have the majority of Borno State covered by Bing and/or MapBox imagery.
Other contextual data
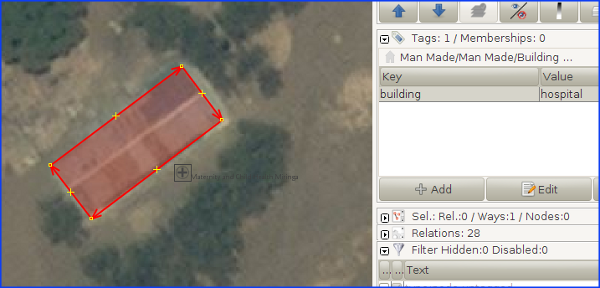
The location of the eHealth nodes is generally quite correct, but not perfect. If we see a building (group of buildings) that we reasonably think it is (they are) the health facility building(s), we will map this (these) building(s), tagging it (them) with building=hospital
Adding roads and contextual data will be, by far, the step that will take longer.
Remember that you aren't allowed to create/correct/delete or any other object in the next step of importing the eHealth Africa health facilities. So any road, building, etc that you want to add or touch, make sure you do it now before you proceed further!
Once we have finished tracing roads and adding other contextual data, we will upload the changes using our regular OSM account.
To do so, first make sure you have the Data Layer 1 active:
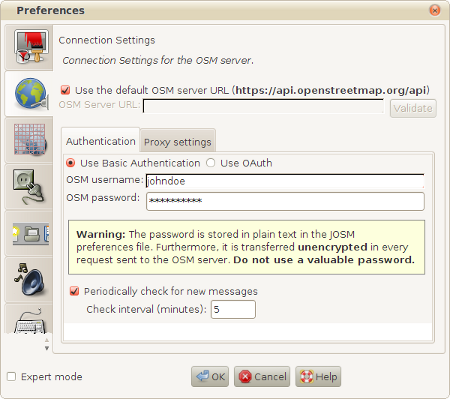
Next, check that you have your regular OSM account user in the preferences (F12):
Finally, you can click on upload. If you get some warnings/errors correct them, and then upload using the following changeset tags:
- comment=eHealth Africa Borno health facilities import, #hotosm-task-946
- source=Bing or source=MapBox or source=Bing;MapBox, depending the imagery provider/s you've used.
Importing the health facilities
WARNING!
This is the actual import step. So we won't touch (create/modify/delete...) any object except for the health facilities.
At the end of this section we explain what to do in case you commit that mistake.
Now it's time to work with the health facilities, to prepare them for importing.
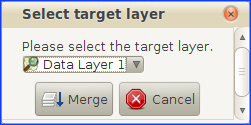
The first thing we will do is to merge the eHealth_Africa_Health_Facilities_BO.osm layer with the OSM data layer (Data Layer 1). Make the eHealth_Africa_Health_Facilities_BO.osm layer active, click on the merge button...
... and then choose the Data Layer 1 as target layer:
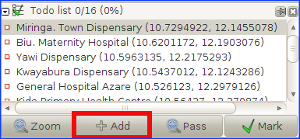
We will have often many health facilities for our task, so we will use the Todo List JOSM plugin to avoid leaving any unchecked health facility behind.
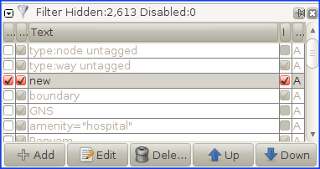
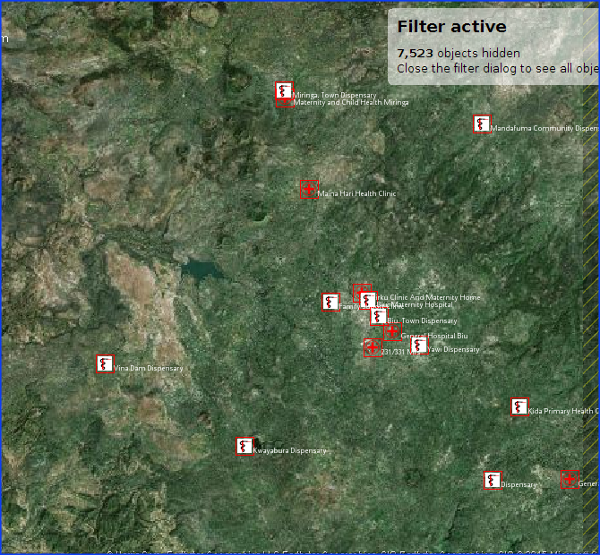
To add them to the Todo List, the best way is filtering the eHealth nodes out. We can do that using the filter new:
To add the nodes to the Todo List, first select all nodes...
... click on the Add button of the Todo List...
... click on any point of the editing area to unselect all those nodes and disable the new filter.
Double-clicking on the first node of the Todo list will automatically zoom in to that health facility node:
Zoom out a bit, so we can easily check about the presence of other health facilities around.
Now, we will follow these steps:
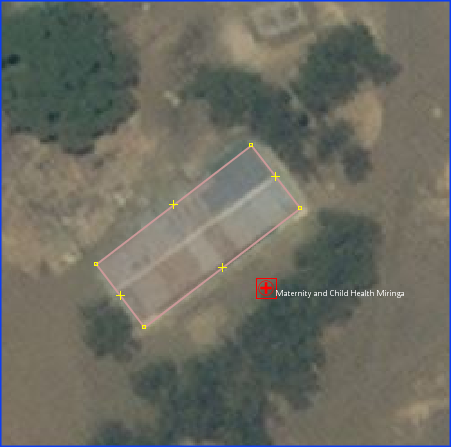
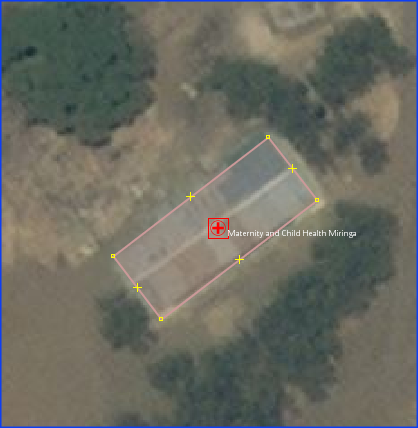
1. Check the location of the node. As we said before, the location of the eHealth nodes is generally quite correct, but not perfect. For the health facilities that we traced their building(s), we will move the node to the centre of the building (group of buildings):
Of course, if we couldn't spot the facility buildings, then we will leave the node where it is.
If we really think the position of the node is suspicious, we will leave it in that position, and add a fixme=Location approximate on the node, and report that with a remark in the task comments box. We will do the same when the imagery is cloudy and we can't double-check that the position is correct (also very uncommon).
2. Check the spelling. We will check if the name=* and addr:full=* of the health facility is spelled correctly and respect the cartographic writing conventions. And we will keep a space before and after a slash "/", and before the opening of parenthesis and after its closing.
In case of doubt, we won't make any change to the name and we will leave a remark on the comments box of the task when we mark it as done in the Tasking Manager.
3. How to handle two very close nodes. In quite rare cases we may find 2 nodes near to each other or at the same point (duplicated node). In case they are at exactly the same place, we will move one of them a bit. Then, we won't do anything to them and, in case they are suspicious, we will leave a remark in the task comments box for later revision.
4. Merging with OSM data. It's very rare that we find a health facility for this area already in OSM. In case we find one conflicting facility, we will merge both facilities into one, with the Replace Geometry tool of the UtilsPlugin2 JOSM plugin (shortcut Ctrl+Shift+G), keeping all info that we had for the former facility.
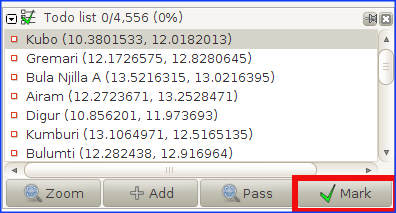
After these 4 steps, this node is ready for import, so you can go to the next settlement node by clicking on the Mark button of the Todo list:
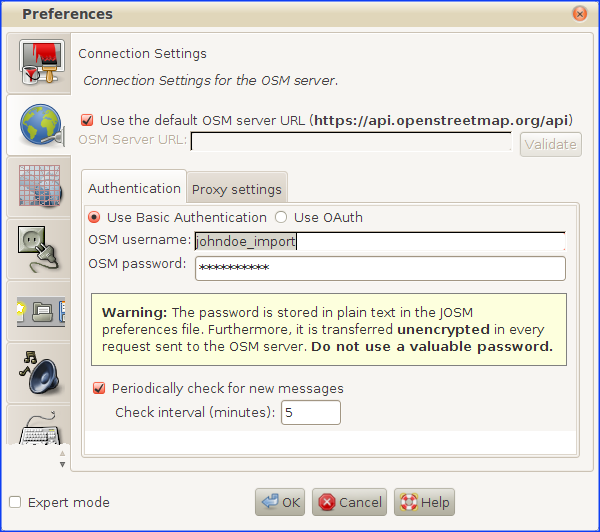
After finishing with all nodes, you are ready to import them to OSM. As we will import these nodes with the special OSM import account, we need to change the user in the preferences (F12):
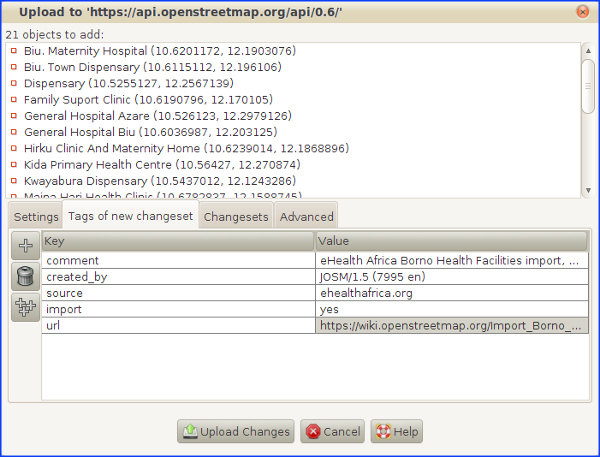
Finally, you can click on upload. If you get some warnings/errors correct them and then upload using the following changeset tags:
- comment=eHealth Africa Borno Health Facilities import, #hotosm-project-946
- created_by=JOSM/version
- source=ehealthafrica.org
- import=yes
- url=https://wiki.openstreetmap.org/wiki/Import_Nigeria_eHealth_Borno_Health_Facilities
WARNING!
If you see that in the list of objects to upload (see last screenshot) there is anything not related with health facilities, then that means that you have created/modified/deleted other objects. Sorry for that, but in this case the safest is to proceed the following way:
1. Delete the Data Layer 1
2. Go to the Tasking Manager and load again the OSM data and the eHealth Africa health facilities in two different layers as before.
3. Go directly to this section of Importing the eHealth Nodes and start again with the merging of both layers, checking of the health facilities, etc.
Good! Now go to the Tasking Manager, write any issues you might have encountered, and mark the task as done.
To avoid using the special OSM import account (example: johndoe_import) for other non-import changesets, go now to the JOSM Preferences (F12) and switch back to your regular OSM account (example: johndoe).
If you missed adding some roads or other objects, you can do it now, as you did in the Adding roads section, and using the same changesets tags at the end of that section.
If you are happy with what you did, you are now ready to start another task!
