JOSM/Plugins/indoorhelper
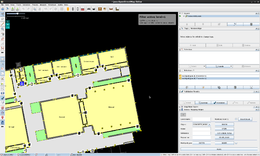
IndoorHelper is a JOSM plug-in to create, validate and view indoor maps correctly. It helps you to stay at one tagging scheme (Simple Indoor Tagging) and makes it easy to tag indoor objects quickly.
Quick animated how-to: Indoorhelper_how_to.gif
Summary
This plugin helps to map indoor objects using the Simple Indoor Tagging scheme.
Features
- tag object via button
- always stay at Simple Indoor Tagging schema
- create easy multipolygons
- indoor object validation
- provides a MapCSS
- import BIM data (beta state)
About OSM indoor data
The following topics might be useful in case one wants to working with OSM indoor data
- How to tag indoor objects: Simple Indoor Tagging
- Handle IFC/BIM data in OSM: indoorhelper#BIM
How to start - Guide to create indoor data
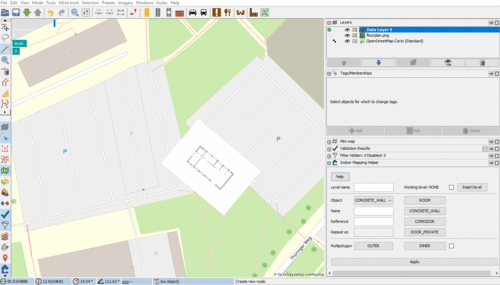
After the installation the plugin appears in the sidebar of JOSM. This plugin uses different JOSM functionality for example the AutoFilter.
Optional setup
Add indoor map (e.g. floorplans)
- use Piclayer plugin to fit indoor maps into existing OpenStreetMap data or GPS-tracks. Make sure the mapping is done on a layer other than where the image is shown (two layers are needed).
Add new level to layer
- draw the first object (of a new level) using the
Insert levelbutton. PressInsert level, insert level number, draw object and pressspacebar. Repeat for each new level.
Mapping
Mapping workflow:
- select the current working level using AutoFilter
- draw the object
- tag the object using
applybutton
The recommended order of editing is:
- rooms, corridors, stairways, elevators and individual areas
- POIs (door/entrance)
- walls and windows
Why using this order?
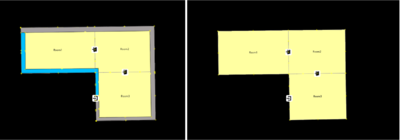
This order provides a "layer-mapped"-schema. Rooms, corridors, stairs or elevators are on the bottom. Walls and windows are above. Now, if walls and windows are filtered (not shown on layer), the basic objects (rooms etc.) fill the whole space.
Click to view a tutorial GIF showing how to map the basic objects or see Indoorhelper_how_to.gif
Mapping hints
Common mistakes
- door or entry nodes are not connected to a room, corridor or area. Always connect an opening node to a basic object.
- door or entry nodes are connected to a wall. Do not map a wall object where a door or entry node should be. Interrupt the wall for an opening node.
- freestanding walls are not part of a relation. Map freestanding walls as part of a multipolygon with
role=inner.
Tips
- if an object appears on multiple levels use
repeat_on=*-tag (description see below). So you only need to map the object once - stairways should be tagged with
incline=* - for more information about how to tag specific objects have a look at JOSM Presets
Plugin
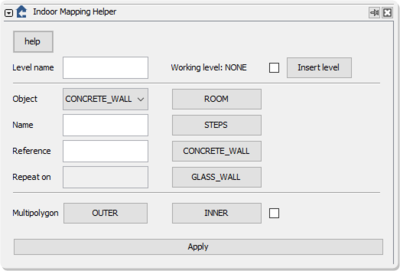
Level Bar
| Field/Button | Action | Description |
|---|---|---|
| Level name | Name the current level | Insert optional level name. Confirm with the apply button. The object will be tagged with level_name=*.
|
| Working level | A dynamic field showing the current working level | The field shows the current working level set by using the AutoFilter. This function is not working without the AutoFilter
|
| Checkbox | Activate/deactivate automatic level tagging | If active the current object will be tagged with level=*
|
| Insert level | Add a new level to layer | how to:
|
Tagging Bar
Panel provides tag presets via buttons
| Field/Dropdown | Description |
|---|---|
| Object | Available tags can be selested by using the dropdown menu. If no tagging is requested select NONE. A detailed tag map follows
|
| Name | Tags the object with a name tag (e.g. ROOM - classroom will be tagged with name=classroom)
|
| Reference | Tags the object with a reference tag (e.g. classroom - R025 will be tagged with ref=R025)
|
| Repeat_on | Set the levels on which the object appears (e.g. elevator - 3-4, means the elevator is starting at level 2 and is repeated until level 4. Also possible -3-6 or -3--1)
|
About repeat_on=*:
- tells if an object connects one or more level (e.g. stairways, elevators). See also Simple Indoor Tagging)
- to simplify mapping the plugin supports objects tagged with
repeat_on=*(e.g. stairways, elevators). If a level filter is active the object will be shown ifrepeat_on=*value includes active level
Tagging map:
| Plugin tag | Tag map | Usable with |
|---|---|---|
CONCRETE_WALL
|
indoor=wall, material=concrete
|
|
DOOR_PRIVATE
|
door=yes, access=private
|
|
DOOR_PUBLIC
|
door=yes, access=yes
|
|
ELEVATOR
|
highway=elevator
|
|
ENTRANCE
|
entrance=yes
|
|
ACCESS_PRIVATE
|
access=private
|
|
ACCESS_PUBLIC
|
access=yes
|
|
ENTRANCE_EXIT_ONLY
|
entrance=exit
|
|
TOILET_FEMALE
|
indoor=room, amenity=toilets, female=yes
|
|
TOILET_MALE
|
indoor=room, amenity=toilets, male=yes
|
|
GLASS_WALL
|
indoor=wall, material=glass
|
|
ROOM
|
indoor=room
|
|
STEPS
|
highway=steps
|
|
CORRIDOR
|
indoor=corridor
|
|
BENCH
|
amenity=bench
|
|
AREA
|
indoor=area
|
|
NONE
|
no tagging of indoor objects |
Preset Buttons
On the right side of the panel you can find the preset button section. These buttons are created depending on what objects you are using the most. To use these presets, just draw an object and click on the preset you would like to apply.
Multipolygon Bar
This tool is to add simple multipolygons only.
The recommended order of editing is:
How to:
- push
outerbutton to select drawing action - map the object, press
spacebarto add the outer object withrole=outer - push the
role=innerto select drawing action - map the object and press
spacebarto finish. After that select the "outer"-object you want to add the "inner"-object to. If selected pushenterto add the object withrole=inner
If you want to add more than one "inner"-object, skip step 1,2 and restart at step 3. To deactivate this tool use the checkbox next to it.
BIM
![]()
The plugin includes an import functionality for .ifc (BIM) files. To import a new .ifc add a new layer and use the BIM import button (File → Import BIM File). Please note that the import functionality is a beta version!
- For more information about how to translate BIM objects into OSM objects see Wiki Building Information Modeling.
- For detailed docs of BIMtoOSM parser check BIMtoOSM Docs
- Code hosted on Github BIMtoOSM Code
A GIF showing how to import BIM files:
Data Scheme
The data scheme which underlies the plug-in is based on the Simple Indoor Tagging approach but has some differences or improvements. It is completely based on tags and is therefore easy to understand.
To hold it simple the most important objects are directly tagged with indoor=*. To make sure the tagging is always on Simple Indoor Tagging standards specific objects will be automatically tagged with needed tag-combinations (example: TOILET_FEMALE : indoor=room, amenity=toilets, female=yes). For more information see Tagging Bar.
Data Validation
MapCSS Rendertheme
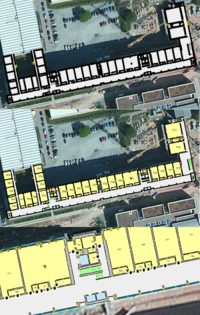
The first way of data validation is the MapCSS rendertheme which comes with the plug-in. It is installed during the first start. Thus the user does not have to care about it and has a instant graphical validation of the mapped data.
The rendertheme uses the zoomlevel filtering of MapCSS to show the data in different ways depending on the zoom level of JOSM. For example in a high zoom level every detail is shown and in a low zoom levels rooms and POIs are hidden.
JOSM Validator
The other method which can be used to validate the data is the JOSM validator file which is also installed with the plug-in.
The validator alarms the user if following mapping errors occur:
- way or node without the tag
level=* - properties which should be only assigned to ways are assigned to nodes
- properties which should be only assigned to nodes are assigned to ways
The validation check is done every time when the user clicks the "apply"-button or a preset button.
Limitations
- It's just a graphical representation
- therefore not suited for routing
- It is no usable standard (yet)
Development
Created by User:Erigrus
Maintainer: User:Rebsc
Source Code: ![]() JOSM/indoorhelper
JOSM/indoorhelper
Projects: ![]() JOSM/indoorhelper/projects
JOSM/indoorhelper/projects
BIMtoOSM Parser Code: ![]() rebeccasc/BIMtoOSM
rebeccasc/BIMtoOSM
