Vi:Mapping techniques
Mapping is done in two steps: First, you need to know where things are, mainly the streets and ways. Then you need to know what there is, namely the POIs, street names and types. You can do these one after another, or both at the same time, but you can hardly do the what before the where.
Getting the shape of streets
GPS tracklogs
- Bài chi tiết: Recording GPS tracks
The basic technique for mapping roads, footpaths, ferry crossings, ski routes, etc. is to just turn the GPS on and let it record tracklogs as you move. These --- provided they are in the WGS-84 datum, which is the default --- can be uploaded directly to OpenStreetmap and displayed on the editing map.
Set the GPS to record points as densely as possible. On the Garmin systems this is in the "Tracks", "Setup", "Resolution: Highest" menu.
JOSM itself can be used to record logs: the surveyor plugin (with the help from the livegps plugin) allows to add information to the current position.
Several applications let you record GPS tracks with your laptop, PDA or mobile phone, provided there is a GPS receiver connected.
Satellite/Aerial Imagery
Many cities have high resolution georectified aerial photos available for them which can be used to aid mapping. Due to licensing concerns of the derived data, only public domain or CC imagery should be used for this. It's also OK to use Yahoo!'s aerial imagery as available in the editing applet, and in fact this aids building the map later if you're using the online potlatch editor.
Before you go mapping, choose the area to map and find it on Yahoo! maps. Make sure you have the satellite tab selected so you're not using the copyrighted map data, and make a printout of the photo (Don't print out the street map!). When you go mapping you can take this with you with a pen (gel or ink works best, not ball-point pens unless you take a clipboard, nor pencil because it doesn't show up well) and annotate the photo with which bits are streets/paths, what the names are, and the locations of important places. You may also be able to use the photo to see if there's anything of interest you'd otherwise have missed like a hidden side street or courtyard.
When you get home, open up the editing applet and draw everything as you've noted down. Because you took the satellite photo into the field, you already know where everything is, and don't get confused about whether that green blob next to the black blob is a path or just a copper roof.
An alternate method is to use the GPSbabel application to convert your track log into a Google Earth format kmz file. This can then be loaded as a track into Google Earth and overlayed onto the satellite imagery. Each GPS fix is assigned a point with a time/date stamp, allowing easy cross reference with written notes. Any areas with GPS track issues are immediately apparent, as are missed routes / roads or errors in you notes.
To avoid copyright issues, only use Google Earth as a tool to spot problems in your data, or areas for further survey, not as a source of data such as road or place names.
Getting the details
A more theoretical approach to the recording of details is in the making at Geotagged meta data.
GPS Waypoints

- Bài chi tiết: Points of interest
GPS receivers make it very easy to mark waypoints. On the Geko for example, "Mark", "OK" will insert a numbered waypoint. In the example shown, the cartographer stopped in a pub car park, and marked a waypoint which was stored as number 206. Some GPS models allow you take an 'average' point. This will take multiple gps points and then average all the points, in theory creating a more accurate waypoint. Usually this is used when accuracy is higher priority with the data collection and time isn't as much as a factor but this can still be done quickly.
Use a notepad, or dictating-machine, to record what that waypoint corresponds to. Although it's usually possible to type this information into the GPS itself, it can be very fiddly.
Phương pháp dịch vị GPS
(Intermediate Level Technique)
When there is a structure or object that you want to gps but is inaccessible (like a cell tower surrounded by a large fence) then you can use the 'GPS Offset Method' to get its coordinates. To do this you will need your gps, compass, optionally a range finder and a way to record your data like a notebook or voice recorder. (Instead of using a range finder you can just estimate the distance but this will usually be less accurate.)
1) Start collecting gps points for your waypoint and give it some kind of recognizable ID like CT1 (Cell Tower 1). This is a good opportunity to use the average waypoint feature (that is included in a lot of gps units) since the next steps will take a minute or so to complete.
2) Use your compass to sight the structure and then record the bearing (azimuth) from your current location to the structure in your notebook.
3) If you have a range finder, shoot the structure and record the distance to it in your notebook. Estimate the distance if a range finder isn't available.
4) End gps data collection and save your waypoint.
An example format to record this information in your notebook:
CT1 = 90m @ 340° from WP1
CT2 = 60m @ 176° from WP2
etc.
5) When you get back to your computer you can download your waypoints and enter your offset notes into a spreadsheet. For less accurate coordinates of these structures, you can use the measure tool included in a lot of mapping programs to measure the distance and bearing. Then place the point referring to your notes about the waypoint offset information.
For highly accurate coordinates of the structure using this offset information, you can use commercial GIS programs like ESRI Arcmap + COGO Extension or Softree Roadeng(Survey).
(NOTE: Looking for a free alternative to accomplish this and will post here if I find one...)
Sử dụng ảnh số
- Bài chi tiết: Photo mapping
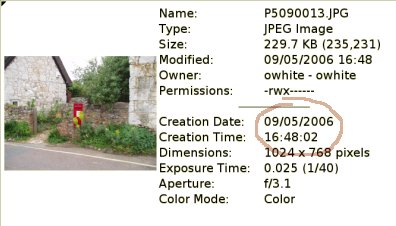
Digital cameras are useful for recording street names, village names, and other features. Because digital photographs are timestamped, we can find out where the photographer was at the time (using their GPS log), and mark that as the photograph location.
In the example here, we might put a postbox on the map, wherever the GPS was at 4:48 pm.
Alternatively, you can use specialized software that will correlate your GPS log to your photos. The GPS information will be added to the metainformation inside the images (most commonly, the EXIF metainfo inside JPGs). That way, you can programmatically have a list of places where you took a photo. OSM software such as JOSM includes support for these "geocoded photographs".
Some software, e.g. TrekBuddy allows one to associate a photograph with a waypoint. This is understood correctly by JOSM.
When geocoding photos, be sure that the camera is in sync with the GPS time (test it before trekking!); otherwise the correlation will be displaced.
- See also: Wikipedia article on geocoded photos
Hand-drawn maps of city streets
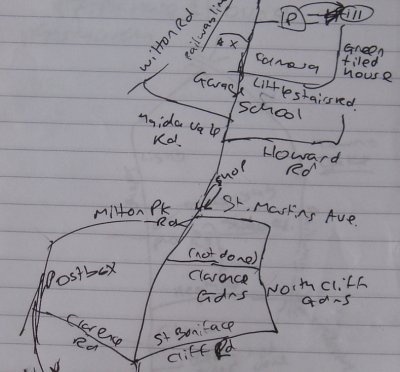
- Bài chi tiết: City mapping
In dense cities, one-way systems and grids of roads, it can be difficult to record the hundreds of street names encountered.
One method is to sketch how the streets intersect (not to scale), and correlate that later with the pattern of tracklogs generated.
Another technique is the two-pass approach, to record tracklogs, then go back with a printed map of street outlines from OSM and fill-in the road names by reading road signs.
A one-pass variant of the two-pass approach is to use aerial imagery (instead of track logs) to make the outline, then print out the untagged segments (i.e. a JOSM screenshot), then go write down road names.
If you don't have lots of space in your paper sheets, consider marking numbers in the print-out, then correlate those numbers to road names (or landmarks) in another sheet of paper.
Walking Papers Printed Map
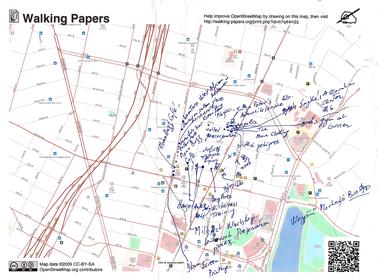
- Bài chi tiết: Walking Papers
This technique is similar to a hand-drawn map, but it gives you a head start with what we already know and you have the option of letting another volunteer edit the map from your notes.
Visit the web site walking-papers.org and choose the area where you will be going, print out the OpenStreetMap for that area, then take it with you and make notes on what needs to be changed.
After you are finished making notes for an area, you can choose what to do with them. You can just look at your notes while editing the map normally or you can scan in your notes. After scanning, you, or any other map editor, can edit the map while using your notes on the screen as a backdrop.
Voice recording / Audio mapping
- Bài chi tiết: Audio mapping

I have found voice recording to be the medium of choice mapping by bike. I started using paper as above, but found the continuous stopping and starting was time consuming and a killer on the knees.

There is a great number of different audio mapping styles, with different accuracy, level of detail, using different hardware and software. There are easy techniques for the beginner and difficult, but extremely powerful techniques for the advanced mapper. Check out the completely restructured main article.
Video
- Bài chi tiết: Video mapping
For those driving alone who can't stop to take notes: mount a video camera (or digital camera in "movie" mode) somewhere that it can see roadsigns, and leave it recording for the duration of your journey. You can combine this with audio mapping - speaking road names and information into the video camera's microphone, e.g. "turning left into Darwin Drive".
Afterwards, note the timestamp of anything interesting in the video (e.g. "Shops on the left between 1:32 and 1:37") and correlate that with the GPS tracklog. It's also easy to correlate features seen on the video with the tracklog ("I turned left here on the GPS track, but the road still continues ahead"; or "I turned left here onto a cobblestone road").
Trắc địa ảnh
- Bài chi tiết: Photogrammetry
Trắc địa ảnh là một kĩ thuật được dùng bởi nhiều công ty và tổ chức đo đạc bản đồ. Khi bạn có hai cặp ảnh cùng một khu vực từ các vị trí khác nhau thì có thể trích xuất hình học từ khu vực đó ra. Việc này có thể được làm bằng tay hoặc bằng phần mềm.
Colorizing the map
Once all the tracks have been added and updated, you are ready to begin colorizing the map. Some areas can be added from memory, but not all areas have clearly defined boundaries. It is important to make sure the streets (the GPS tracks and TIGER data) are properly updated first because often times they form boundaries for other areas.
You can use Yahoo images to fill in such things as parks, shopping centers, hospitals, golf courses, lakes and airports. Some things that aren't marked on the map include cemeteries, campsites, churches, schools, buildings and city zones. These areas can't be filled in with a GPS.
One way to start off is by referencing a directory for a certain category (i.e. churches, schools) with their addresses and then cross referencing them on a map. Once you know where they are, you can begin adding nodes and land use into OSM.
Most times cities and counties will have color-coded municipal zoning maps that can be used to fill in the land use for residential, agricultural, retail, commercial and industrial. These maps are often dividing into specific categories (ie light industrial, heavy industrial). The zoning maps can be loaded into an image editor such as Photoshop and then the zone colors can be combined. It doesn't matter what colors you pick just so you know what colors are what.
You can use a program like Map Rectifier to warp an image so it can be used in OSM. Once it has been warped, it can be loaded into JOSM in a WMS layer. From there, you can trace the zones and add the appropriate land use tag.
You may be able to find a GIS map from a city or county that has park info on it. You can view that shapefile data in a program like ArcGIS. Once the info is on the screen correctly, you can do a screen shot and then use that as your layer to warp in May Rectify. Shouldn't be a problem with copywrites but you'll want to check and make sure.
Adding buildings
Buildings can be added from Yahoo images by drawing a shape around the building and then tagging it building=*. Since each town and city could have thousands of buildings, you'll need to decide where you want to start. Maybe doing all the buildings for organizations such as churches, schools, community buildings. Maybe you start with the downtown or a major shopping center. If you want to tackle a whole town, try to focus on the larger buildings and work one a specific area at a time. Yahoo images are mostly from 2006 but in some areas even from 2001, so they may not be up to date. You may have to rely on your own notes or memory to image some of the newer buildings.
General issues
Transportation
Depending on the type of tracks which you intend to create, some transportation means are more suited than others. Obviously, for tracking rails and motorways, you have to use an allowed vehicle. Generally, a car is good to track all the length of a motorway, where little special features appear. A bike is good for medium distance tracks, where you might want to stop frequently to mark points of interests or intersections. For tracking residential areas with dense features, inline skates or a skateboard/longboard are the way to go.
Long Journeys
- Bài chi tiết: Long journeys
In some cases, you may be away from a computer for an extended period, and the number of trackpoints your GPS holds can become a severely limiting factor. You may need to increase the interval between trackpoints, consider using a different model of GPS, and plan ahead for extra battery capacity.
Privacy
In general you should keep your traveling to public rights of way, although there can be some exceptions (such as an access road into a camp site for example). Use your common sense, if a driveway is labelled 'No Trespassing' then respect the sign and do not enter.
When taking photographs which will later be made public, treat the property as you'd expect yours to be treated. Intrusive photographs are not needed in order to map the streets, you might question whether street number signs are 'fair game' - in rural areas these can be useful as they may be the only way to confirm the name of the public road leading to the property/address.
There's also a page for more detailed analysis of restrictions on photography and national differences.
Physically Securing Your Device
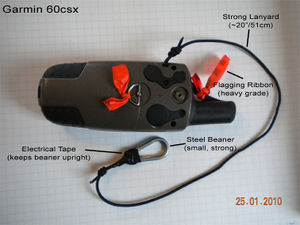
If traveling with a lot of gear and/or when there's a risk of dropping/loosing your gps unit, it's good to rig up your gps so it attaches to you. Here's an example photo. Just attach beaner to a secure d-ring or loop on your belt/vest/pack etc. Attaching bright color flagging ribbon is very helpful to find the device if you do drop it in a place where it blends into the terrain like in forested regions. (This setup also works great for other types of gear as well ie. field book, compass, range finder etc.)
See also
- Tricks and tips
- Recording GPS tracks
- Using GPS in vehicles
- Editing
- How others do mapping - cars with multiple cameras and a professional GPS, basically